My life has suddenly gotten busier than I expected. I’m having to juggle a new challenge over the next few weeks with existing commitments, appointments and life in general.
So, as it’s #throwbackthursday around the interwebs I thought I’d post the mandala I created last year for Remembrance Sunday.
A year ago, I was starting to get to grips with digital art. I can see how far I’ve come in developing my own digital art ‘voice’. This mandala, however, is still lovely.
I used Autodesk Sketchbook Pro along with a Microsoft Surface Pen and Microsoft Surface Studio.
This morning I awoke with a pounding headache, an introvert’s hangover from a therapy session and a busy meeting in the evening with lots of people and noise. A big mug of tea, a couple of Anadin Extra and the head has cleared somewhat, though I still feel quite fuzzy-headed and tired.
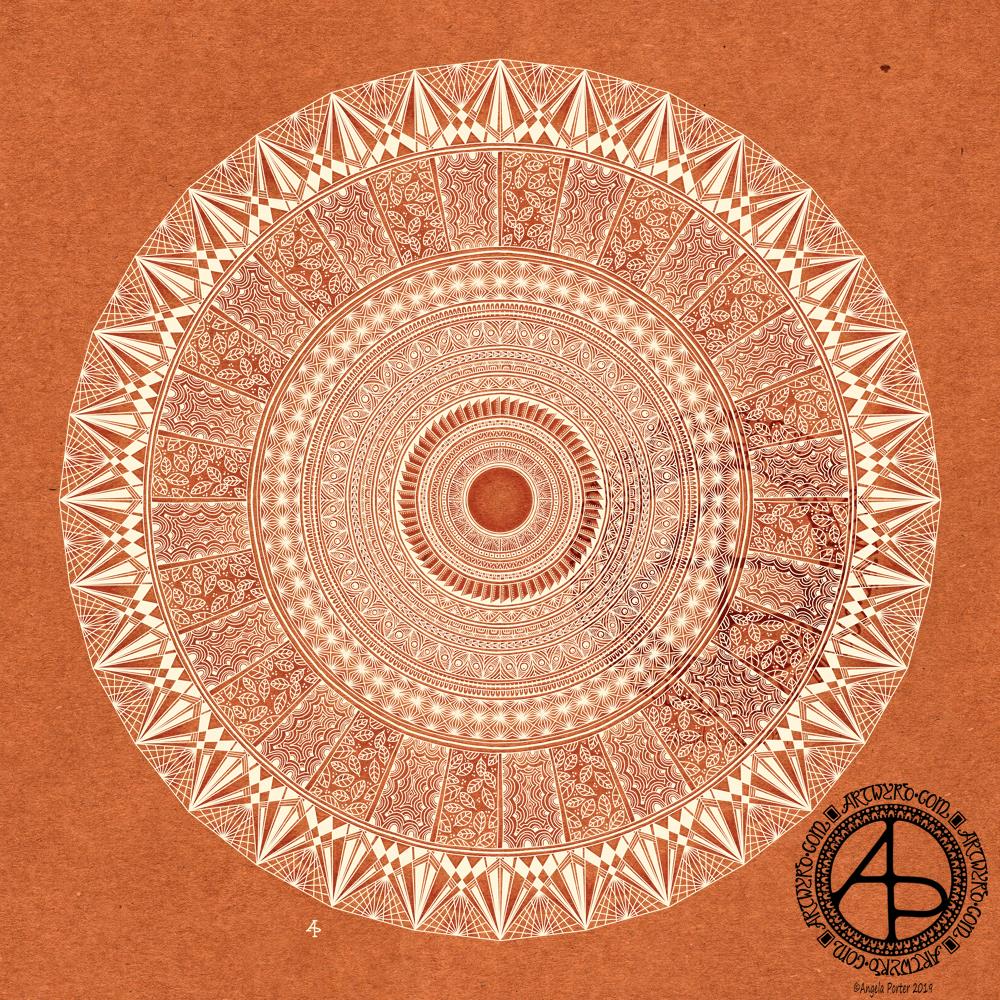
Despite the headache, or perhaps because of it, I slipped into mandala mode to start my day. I had wanted to include some wise words in it, but my mind just wasn’t functioning clearly enough.
Unusually for me, I chose a terracotta-coloured kraft paper background to draw with a creamy coloured ink. I added some shading behind the design in places, just to try to increase the depth and dimension. I’m not sure I’ve achieved it well this time, however. Once my head fully clears, I may do the shading afresh.
The resulting mandala is far more geometric and structured than is often the case with me, especially the outside ring. However, I’m quite pleased with it, especially given the state of my head!
I do like the warm, earthy tones of paper and ink in this design. The colours have been quite comforting and soothing to work with.
I drew this digitally, using my favourite combination of Autodesk Sketchbook Pro along with my Microsoft Surface Pen and Microsoft Surface Studio (which are the digital analogues of pen and paper).
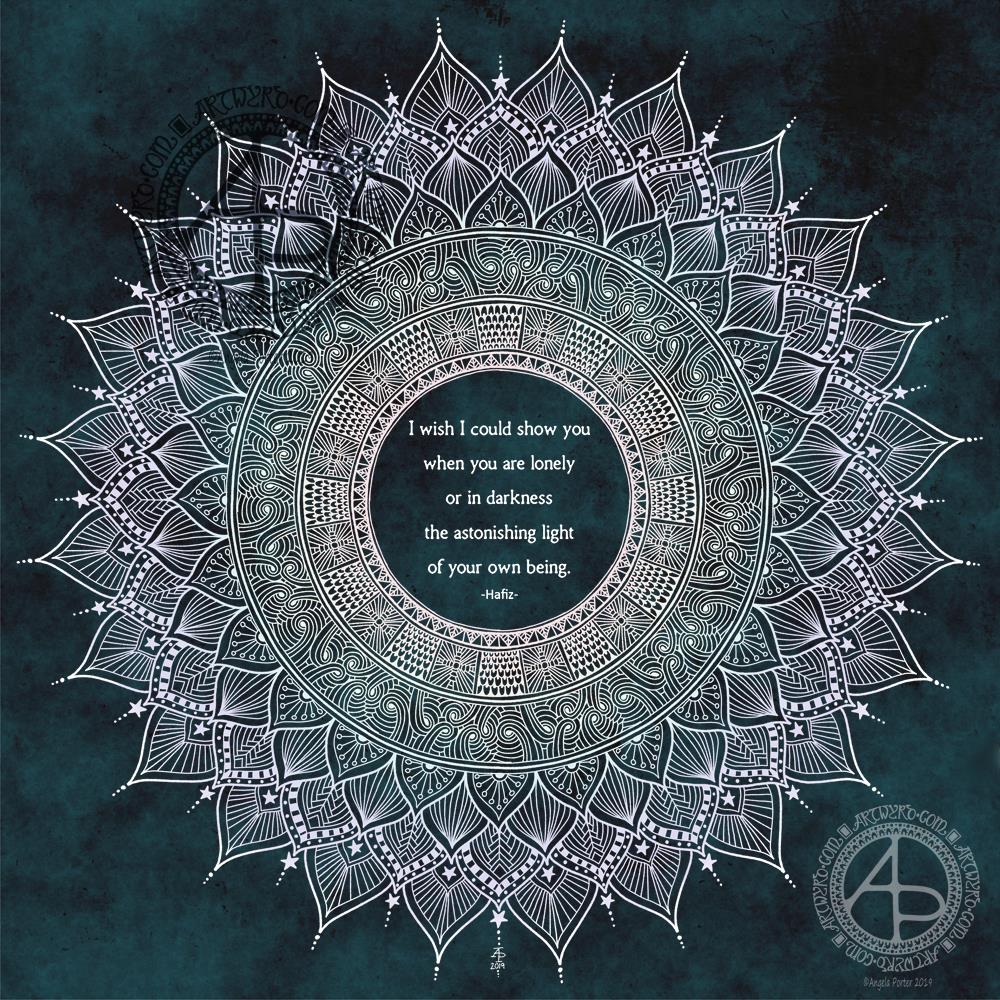
Another mandala today, this time with my favourite Hafiz quote in the centre.
I wanted a mandala that seemed to be almost glowing for this quote. Also, I added a very subtle rainbow colouring to it too. I’m quite happy with this mandala, though some darker shading behind some of the parts, along with some subtle highlights, would’ve helped with the dimensionality of the design.
I didn’t hand-letter the quote; instead I used a clear and simple pair of fonts. I do want to learn how to create circles of typography; I think the quotes would then be more sympathetic to the circular geometry of mandalas. I’ll need a bit of time to play around in Affinity Publisher and Affinity Designer to see if I can achieve this. Mind you, I do need to practice my hand lettering a lot more too.
All the same, I’m still happy with this design. The lettering will do – for now.
I always enjoy drawing mandalas, and it’s nice to revisit the line-art style of mandalas with lots of intricate patterns in them once again. They are so delicate, airy, lacy in feel compared to my more arty, abstract, coloured mandalas. They’re also a lot quicker to create!
It’s definitely a mandala morning here in the autumnal valleys of South Wales. The sun is managing to peek out through the pale grey clouds – the light is wintery wan.
I’m not sure if that description of the sky has influenced my colour choices for this mandala today or not; maybe on a subconscious level it has.
I’m really pleased with this particular drawing today. I like the pale, chalky colour on the darker background. I think I’ve got a nice balance betwixt densely patterned areas and more open designs. I also like the shading I’ve added to the background; it’s added a fair amount of depth and dimension to the design.
It has been a lovely way to spend an hour or so as I slowly come around this morning.
I was going to draw a flower or three to float above the mandala, similar to the skulls I drew through Inktober. However, I like the mandala just as it is, for now.
Digital Art created using Autodesk Sketchbook Pro along with a Microsoft Surface Pen and the digital paper that is the screen of my Microsoft Surface Studio.
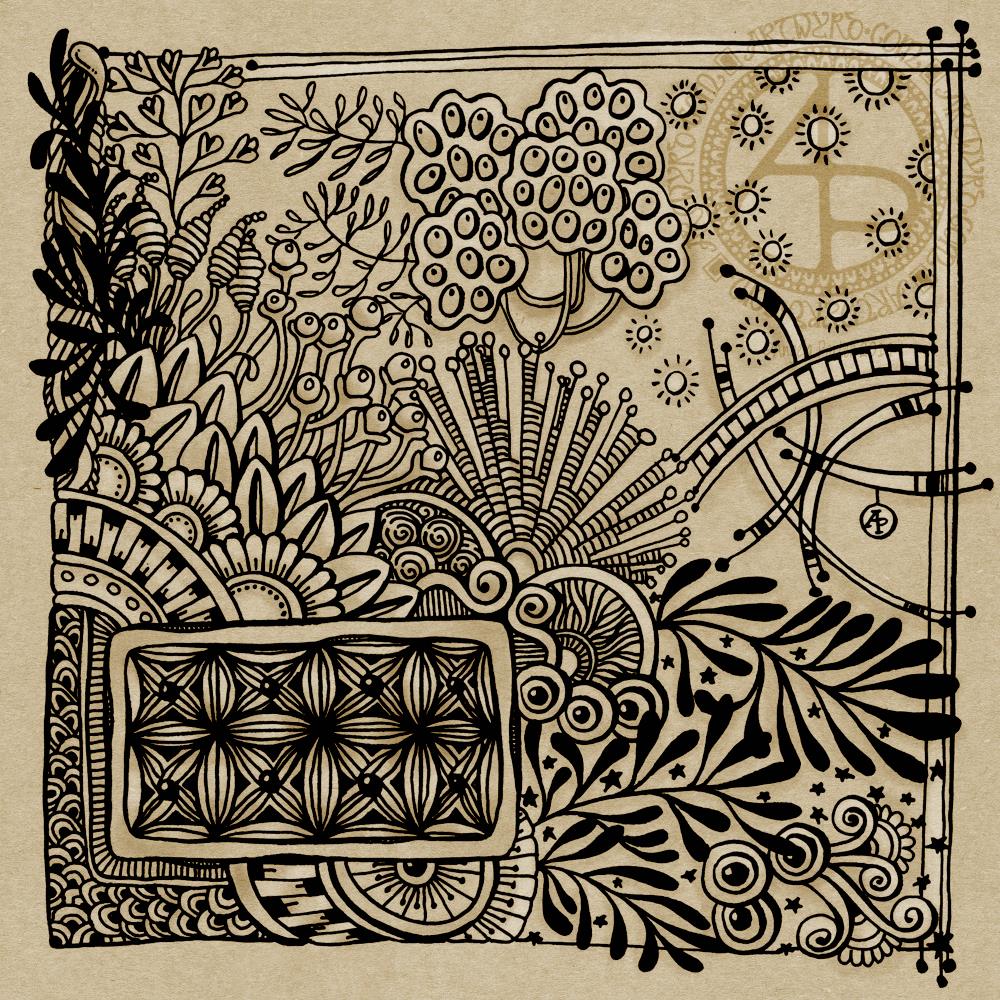
Yesterday evening, I took a combination of Tombow Fudenosuke, Sakura Pigma Micron and Faber-Castell Pitt Artist pens to a 6″ x 6″ piece of Strathmore vellum surface Bristol Board. I ended up with a black and white entangled drawing. This morning, I scanned the image in and added a kraft paper background and then some subtle shading and highlights in Autodesk Sketchbook Pro.
After Inktober and my focus on digital art, it was nice to draw traditionally for a change. My mood and energy levels were such that I needed to slip back into the familiar, comforting entangled style of art to soothe my emotions once again.
This drawing worked out OK. However, I don’t feel it flows at all well, though that does reflect yesterday’s mood and mindset.
The part I really like is the rectangle towards the bottom left. I’m also fond of the arcs to the right. Actually, I like all the design elements, I’m just not happy with how they’ve been lumped together. Maybe I’m just being overly self-critical here.
It’s a sunny Sunday morning in the Valleys of South Wales. I think it’s going to be a quietly artsy day, with a trip out for some essential groceries in a short while I think.
A new month means a new colouring template exclusively for members of the Angela Porter’s Coloring Book Fans facebook group. If you’d like to download, print and colour a template, then pop over to the group, join (it’s free!).
A few, simple terms and conditions apply. All I ask is that you follow them and mention myself and the facebook group when you share the coloured template on social media. Tag me in your posts and I’ll definitely get to see them!
Autumn is well established here in the UK, so I wanted to combine leaves, berries and some acorns in a mandala.
I used an autumnal colour palette to bring the template to life. I think mine looks like a rich, decorative rug. However, I love to see how creative you people are with your colour schemes, particularly those of you who are heading into Spring or who don’t really experience Autumn in your part of the world.
I did draw and colour this mandala digitally, using Autodesk Sketchbook Pro along with my Microsoft Surface pen and the paper that is the screen of my Microsoft Surface Studio.
Hello to November, and farewell Inktober. My blog post today looks a bit bare compared to my Inktober creations. However, I have neglected my dangle designs during October, so now’s the time to get back on track with them
Today, I’ve created a simple and elegant dangle design with an autumn colour scheme that could be used in so many different ways. I’ve also put together a step by step set of instructions how you too can create this design (and hoping that it’s not so simple that I come across as patronising).
This is my first time posting a set of instructions – post a comment to let me know what you think of them and if you’d like to see more of them in the future.
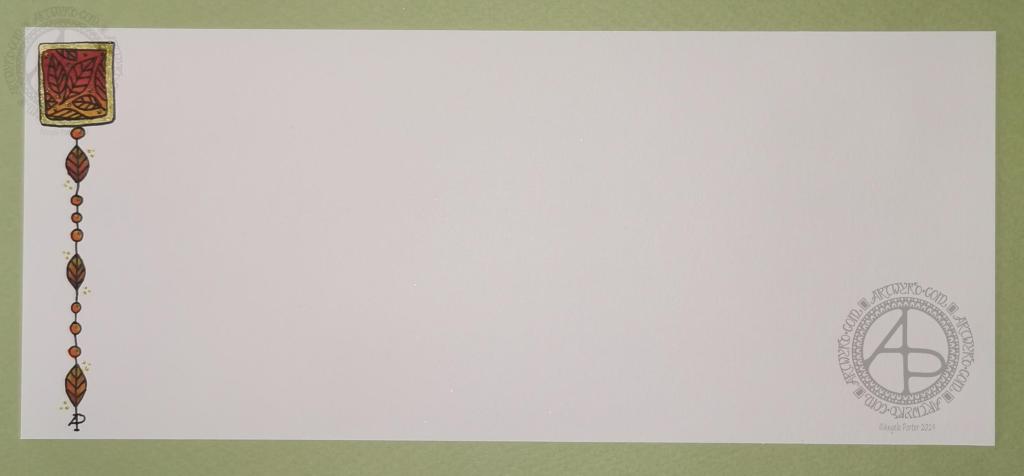
I’ve put the dangle design on one side of a slip of paper that would make a perfect compliment slip or a note to slip in with a gift, or just as a short letter to a friend. It would also be perfect for a coordinating piece of envelope art!
This dangle design would be absolutely charming as an embellishment in a BuJo, planner, scrapbook or art journal. It would also make a darling bookmark.
It would be easy to turn this design into a greeting card as well.
So many possible uses for such a simple design.
I do hope that you will give drawing dangles a go – no matter whether you think you’re good at drawing or not! This design is made out of just simple shapes; it’s the colour that brings it to life and masks all kinds of imperfections.
If you’d like more ideas for dangle designs, then please take a look at my book ‘A Dangle A Day’ – it’s filled with examples of dangle designs with step by step instructions and helpful and encouraging words of advice.
One step at a time to a dangle design.
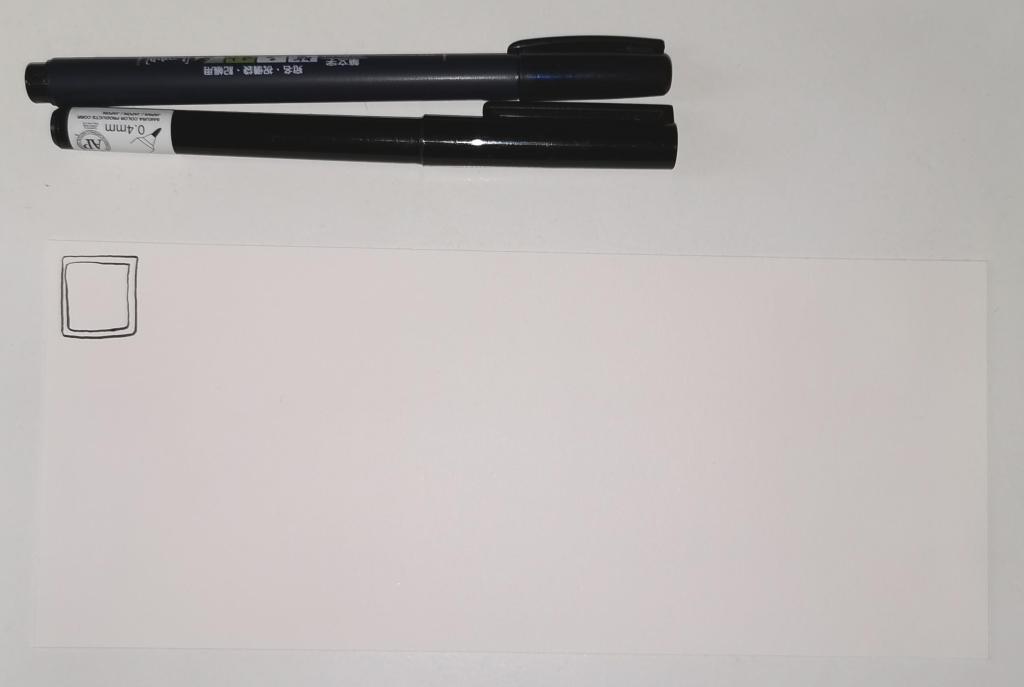
Step 1
Step 1 Draw a square in the top left corner of a piece of paper. I used a piece of paper measuring approx 8.25″ x 3.5″. I used a Tombow Fudenosuke brush pen to draw the box, and outline it. I deliberately made the squares less than perfect to give that human touch as well as a uniquely ‘me’ way of drawing boxes. The Fudenosuke pen allows me to draw lines of variable width quite easily, which adds to the charm of the box. The ink in the pen is also alcohol marker friendly. Letting your drawings be less than perfect is what makes them uniquely yours.
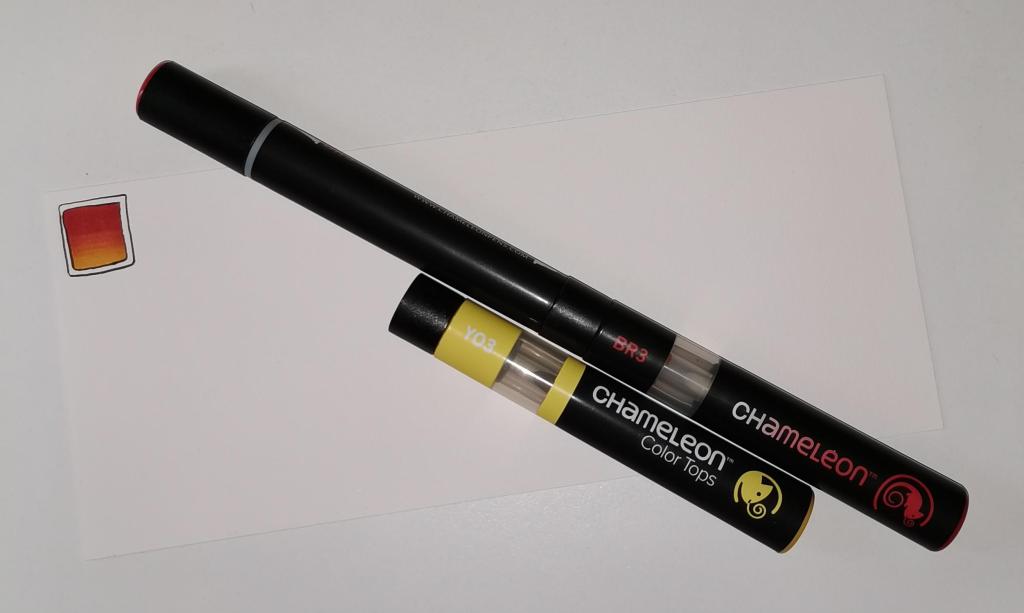
Step 2
Step 2 I used Chameleon marker pens (BR3 “Cinnamon” and YO3 “Warm Sunset”) to colour the inner box. Autumn is definitely here in the UK, and the combination of these colours reminded me of the leaves. However, you could use any colour combination you like and any medium you prefer to use. Chameleon pens make it so easy to create a colour gradient – I prefer them to other alcohol marker pens, even Copics.
Step 3
Step 3 I added a simple leaf pattern to the coloured box using a Sakura Pigma Sensei 04 pen.
Step 4
Step 4 Add the dangle! For this dangle I used the same kind of leaves as in the box for a consistent design. I added some round beads as ‘spacers’. Finally, I added my ‘symbol’ to the end of the dangle. Also, I did draw a faint pencil line with a ruler to help me keep my dangle hanging straight, more or less!
Step 5
Step 5 I coloured the beads and leaves in using the same colours of Chameleon Markers. I then decided I needed to add some shimmer and shine; I used a Uniball Signo gold glitter gel pen to colour in the border of the box and to add some dot highlights here and there. The Chameleons caused the Sakura Pigma Micron ink to smear a little – I always forget that happens! I should’ve used the Tombow pen again. Oh well, you live and learn, eventually!
Happy Hallowe’en to you all and here is my last skully Inktober drawing for 2019.
The skull prompt was ‘duck’, so I just had to draw a duck-billed dinosaur (hadrosaur) skull! I’ve always had a love of dinosaurs and prehistoric critters, so it’s fab I can include one of their skulls.
I wanted to do a woodcut style skull drawing, but I wanted to use white ink as well as black. So, I used some digital craft paper to draw on. I think it’s worked out well, though some areas of highlights look a bit too geometric. I’ve also just realised that I didn’t add highlights/shadows to the teeth. Oh well.
The mushroom prompt was, quite appropriately, Rubroboletus satanus, and you can see outline drawings of the mushroom in the mandala.
The tangle pattern for today was Florz, and that forms the tiled floor pattern.
When I’d completed the mandala on the same kraft paper as the skulls, I realised that I needed a lighter background, so I just added a different kraft paper to the background.
Reflecting on Inktober
I’ve enjoyed Inktober this year for sure. Picking prompt lists that appealed to me helped a lot. I did start off trying out different ways of approaching drawing skulls and the like. However, I settled on combining the skull illustrations with a mandala. I’ve also discovered a great fondness for woodcut-style drawings.
I now need to work out what to do with my Inktober artworks. Some of them will become available as tee-shirts and other products in the days and weeks ahead; I do want to tweak some of them first.
I’m feeling a bit sad at it being over. Having a ‘brief’ to work to certainly helps to focus my sparkly, grasshoppery mind and takes me out of my ‘comfort zone’ (I absolutely hate that phrase!). I’ve certainly found a passion for skulls; so many more to draw, so many different angles too.
It’s the focus that has been the most helpful. This is something I need to sort out, I think. I do have themes for the colouring books I do, but I think I could do with a theme (or series of themes that repeat over a week) that will help focus my creativity outside of the book.
Inktober has taken over my creativity this month. However, I think I needed that to freshen me up.
So, I shall look forward to Inktober 2020, while doing my best to put into practice some of the things I’ve learned from this year’s challenge.
So, Angela, how are you feeling today?
I’m OK today, a bit tired and the grey, gloomy, damp weather isn’t helping much. I have used my light therapy lamp this morning; that did lift my mood somewhat, to be fair.
Yesterday was the toughest day, emotionally, I’ve had for a while. I was really feeling rather low. It had been coming, however, for over a week. I’m not entirely over it; I’m still feeling emotionally vulnerable and fragile today, but nowhere near as bad as I felt yesterday.
I do know what has caused the stormy weather; being aware of such things shows I’ve come a long way from the start of therapy for CPTSD. I also know that these storms don’t last forever, and that self-care and self-soothing is needed.
That will be the order of the day today. I do have an errand or two to run as soon as I post Inktober, and I do have something happening this evening. However, the rest of the day will be self-care, starting with making a hot, nutritious meal from scratch. I’m tending towards a veggie bolognaise, the leftovers of which can be turned into a veggie chilli for tomorrow.
So, I’d better get this social media stuff done and get on with my day!
Yesterday afternoon, I arrived home from EMDR therapy feeling very emotionally drained, fragile and vulnerable. Creating art is one of my self-soothing activities, particularly mandalas.
I’d downloaded a pile of new backgrounds in the past couple of days and wanted to make use of a chalkboard background. It was so dark I knew I needed to make the mandala full of light and colour.
This was a somewhat symbolic choice as my long journey to recovery from CPTSD has been about bringing light into the dark places of my trauma damaged psyche. EMDR has helped me turn the dark into light in terms of my mental and emotional health.
I really enjoyed creating this mandala. Usually, I work with black on white; here I started with colour – the abstract ‘flower’ ring close to the centre. I wanted the colours to glow against the darkness, so I chose lighter shades of aqua and violet. I even added some glowing golden seeds or pollen grains, which is also metaphoric for the personal growth I’m going through in my healing journey.
I then used a white, chalky pen ‘brush’ to draw patterns inside this ring and around it. I decided the white was too plain, so, to break up the white, I blended soft colours into it.
Finally, I added the ring of mushrooms. These had to be my favourite colour – purple. I added some dots to the mushroom caps in lime-green, which is kind of a complementary colour to purple. My last step was to add the stylised foliage behind the mystic mushrooms.
This mandala really helped to soothe me, and it was a pleasure to create. It gave me a break from Inktober and other work that’s ongoing too.
Talking of Inktober, I will be getting Day 29 done later today; I have some things that need doing first.
Oh, the mandala was created digitally using Autodesk Sketchbook Pro and a Microsoft Surface Pen on the screen of a Microsoft Surface Studio (the digital analogues of pen and paper).
Iguana skull, ‘Well, well, who’ tangle pattern and an abstract pattern from puffball mushrooms.
Digital drawing using Autodesk Sketchbook Pro and a Microsoft Surface Pen with a Microsoft Surface Studio.
I’m really not at all happy with this one today. The skulls aren’t what I’d want for them. It may be that they are just plain line art, no texture, no depth, no variation of line.
I may revisit this one at some point in the future, but not for a while. My attention must turn to other things.