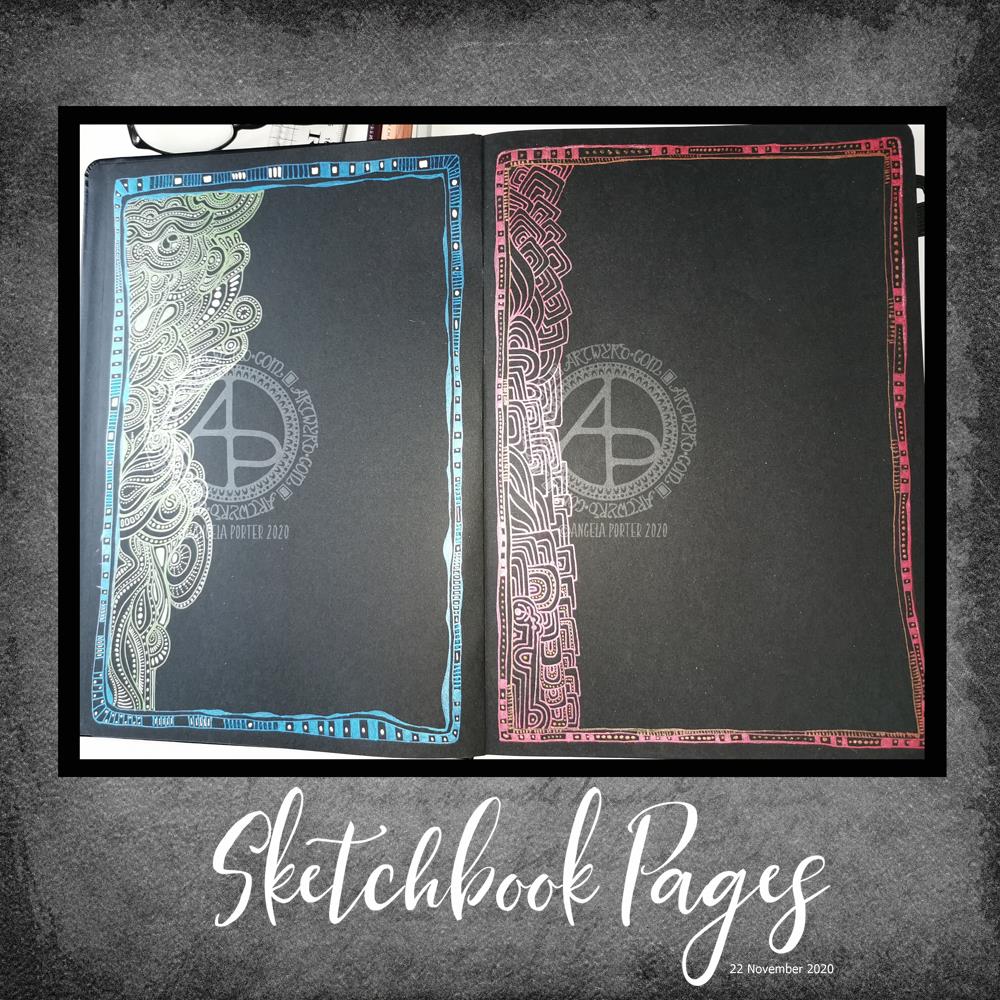
Sakura white, metallic and starlight gelly roll pens in a black Sakura journal/sketchbook. I had a lovely few hours last night, sat in bed, settling down for a good sleep.
What you can’t see in the photos is how the matt white and shiny blue/green inks create interesting weirdness visually. By weirdness, I mean a strange kind of 3D effect that I can’t put into words. That was totally unexpected.
I haven’t decided what to do with these pages yet. Will I fill them in completely with colour/pattern, or will I leave the pages as they are. If I leave them as they are then they can be used for journaling, writing, and I quite like that idea to be honest. As the writing is likely to be very personal, I’m not likely to share that, but maybe I’ll mock something up digitally, see for myself what it’s like and then decide.
And with that last sentence, I may scan these in and use them as templates for a digital journal, which would then take away my worries about making a mess of the page by writing on it!
Of course, they’d work quite nicely as frames for quotes too.
Too many possibilities!
Whatever I decide to do – and it may be all of these things – there is something satisfying about working with shimmer and shine and the contrast with the matt white ink on black. The sparkle and shine makes my arty soul rather happy.
Just a note on the black Sakura sketchbook / notebook /journal. I like it! It has a LOT of pages in it of acid-free, sturdy enough, smooth paper.
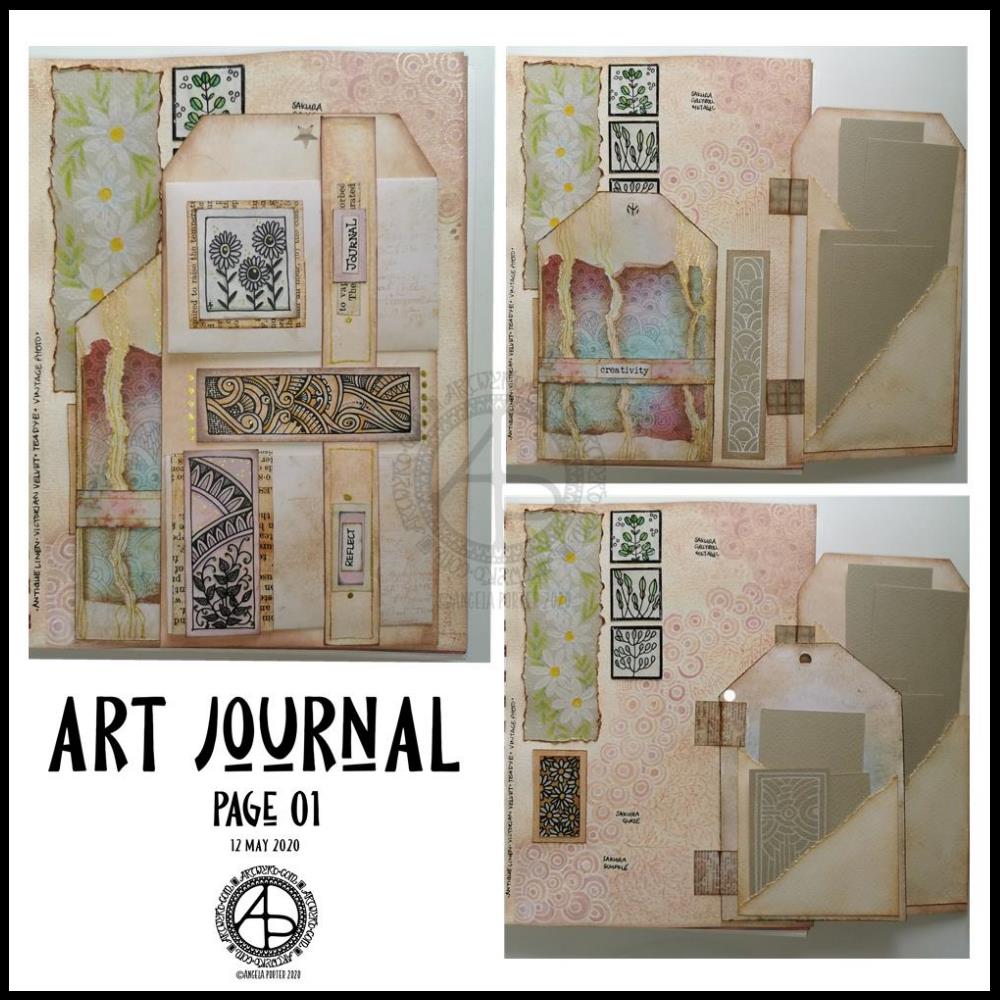
Yesterday I got lost in finishing the first page in my new A5 journal. I’ve put together three photos that show how the page looks as the tags are folded in and as each is opened out.
Every image, pattern, coloured paper, inchie, panel, envelope and tag have been made by myself. Drawing and colouring my own bits of ephemera and the pattern on the page background tool quite a bit of time, but it’s my own work.
I could’ve chosen to use paper from old books, commercially produced designer series paper or digital downloads. Those would’ve saved a lot of time, for sure. The end result would have been my own way of using them. However, I got a lot of pleasure, contentment, peace and calm from creating my own.
I made a note along the edge of the page showing which Distress Oxide inks I’d used to colour the page so that I could use the same for the other elements. Well, mostly the same Distress Ink colours; I did vary them in other places. However, this resulted in a coherent feel to this page – it feels like everything there belongs there!
I also noted on the background what pens I’d used to add the zentangle-style pattern. I then used Distress Inks and a brush and water to bring out that pattern.
Yes, I realise I could’ve used stamps, embossing ink and embossing powder to do something similar. I didn’t want to. I wanted my own, personal touch to this.
I really like how little pretties are hidden behind the tags and only get fully revealed as they are opened. The same is true for the items tucked in the pockets on the backs of the tags. I will replace the pieces of paper with journaling paper or other things as time goes on.
I may very well add danglies to the tops of the tags, possibly little tabs on their sides to help open them.
I’m quietly pleased with this page. It is very much “Angela” in style and feel. I’m feeling a bit more confident about this now, and I’m sure that I will really develop my own style as I go forward.
I really got a a sense of satisfaction and pleasure from creating every little element for this page. When I had it finished (mostly) I knew I’d worked out just how I want to create art journals going forward.
What I do need to remind myself, however, is that I can add to them when I want to – they’re not a full time project. What I could do is combine journaling with them, especially if I include elements that are specifically for journaling.
I do have some other bits and bobs to try making for the journal – little booklets, decorated paper-clips, tabbed cards to fit in pockets (or tabbed booklets, maybe). I certainly want to add quotes, notes, memories and more. And I think I need to work on my hand lettering to do such things as well.
I do plan to build up a library of digital designs I can use for inchies, twinchies, tea-cards, ATCs, panels, quotes, and more. Also, blank ‘templates’ for them, maybe.
Perhaps I should scan the backgrounds in before I add to them so I can use them in my digital art too. I shall think about that going forward. For this page, I really wasn’t sure if my idea of adding the pattern would work. I was pleased it did, I really am. I’m sure to do similar things with the following pages, and now I know what I do like, I can always replicate the background on this particular page, and the notes of which Distress Oxide Inks I used will help me in doing this for sure.
For the rest of today, however, I will be mostly doing other art rather than working on my art journal. I do have some coloring book projects that need some serious attention for starters.
I woke at around 4:30am again today and couldn’t get back to sleep. So, I got up, made tea, and did some work on my art journal / sketchbook.
Making Distressed Paper
I spent a good two or three hours making the papers you can see to the left. I used the following:
printer and layout paper, cut to A6 in size (UK size)
Distress Oxide Inks
5″ x 7 ” Gelli plate
small Brayer roller
water in a spray bottle
heat tool
craft mat
pieces of cut and dry foam
metallic inks and paints
For some of the pieces, I brayered the Distress Oxides onto a Gelli plate and then pulled the print onto a piece of paper. For others, I used the Brayer to apply the ink to the paper. I also used the black side of a piece of cut and dry foam to apply ink to some of the papers.
I sprayed the papers with water to activiate the Distress Oxide, and used the heat tool to dry them. After doing this, I crumpled up a lot of the papers and then used the brayer to flatten them out. Both of these techniques resulted in textured paper. So, I used the cut and dry foam and some Distress Oxide ink to lightly brush the paper to help to accentuate that texture.
Finally I used cut and dry foam to brush metallic paint or ink over the paper to add some shimmer and shine. I used some textured cut and dry foam to add patterns too.
I now have quite a stash of very distressed papers to use in my art journal in the future.
Both the printer paper and the layout paper are much thinner than I would usually use for such a task. The light spritz of water on each, however, created a lovely, bumpy texture. They were also easy to crumple up, adding that kind of leathery texture.
The subtle shine that the gold metallic ink gave is rather lovely, though I do like the bright, shiny gold of some paint I found in my stash.
I can see me using these papers for collage, for making pockets/envelopes and other bits and bobs for a journal, and no doubt for other things I’ve not yet thought of.
Storing my custom papers.
I realised the papers I’ve made over the past couple of weeks have been piling up and I really needed to do something that would let me find them easily. So, the quickest and easiest solution was to use A4 poly-pockets and a ring binder, both of which I had to hand! That certainly has let me have a tidier desk, and I’ll be able to find the papers easily too.
Art journal pages.
I also finished up the two pages shown to the right. I attached inchies, to fill in some gaps.
I used simple paper hinges to attach the ATC cards on page seen in the bottom image. If I ever wish to remove them to swap/share/gift, then I can remove them easily. That simple solution has relieved my anxiety about adhering them permanently into the sketchbook!
I’ve also folded some squared paper, used distress inks to colour the edges and folds, and put them in the vellum pockets I’d made earlier, all ready for me to journal on. Unusually for me, I made use of some washi tape to embellish the pockets.
I’ve also noticed that I’m very ‘regimented’ about how I put things in my art journal. I much prefer carefully cut paper to torn edges most of the time. Everything needs to be arranged ‘just so’ with me. Just as it is with my line-art – precise and neat. I suppose it’s another example of me expressing my personality through my art.
So, Angela, how are you today?
I’m exhausted. I’m practically falling asleep as I type this; that’s what happens when I wake up at stupid o’clock once again. I’m now officially overtired! I may try to get back to sleep soon; I do have work I need to do today!
As far as me being under the weather goes…
Well, I still have a sensitive digestive system and I feel nauseous from time to time. I did wake with a bit of a headache today, but that could just be lack of sleep, as is the tiredness I feel. I have eaten and my tummy doesn’t seem to be objecting as it has done. This all makes me hopeful that I’m almost over this bout illness. I was really quite grumpy about it yesterday, and I’m entirely sure I’m not grumpy today!
Other than that, emotionally I’m doing just fine. The sunshine helps with my mood for sure, as did being able to hear the bird song as the world was slowly waking up this morning.
I’ve been awake since stupid o’clock, which roughly translates to 3:30am BST. While I was trying to get back to sleep I watched a youtube video about making pockets and tuck-ins for an altered book journal.
I thought that could be something good for my sketchbook-journal. I have worried a little about gluing my little artworks into it, but pockets, tuck-ins, see-through envelopes could be a good way to both show the work and store it in a non-permanent way.
So, with my mind now working and sleep eluding me, I decided to have a go at making my own pockets. You can see the result at the top right, with a journalling card popped in one of them for now.
How I made the pockets
I used some ordinary white card, cut it into what I thought would be good sizes to make a set of stacked pockets for the ATC sized cards I’ve been working on.
I then coloured the cards with Distress Oxide Inks. For one of them, I used a brayer to add ink to a gelli plate. Before pulling a print, I spritzed the gelli plate with water that had some white perfect pearls added to it.
For another panel, I used the brayer to add ink directly to the paper. It did that unevenly. So, I used a ball-tool to carve some texture into the black side of a piece of cut and try foam and used that to add colour. That worked really well! Dabbing the foam added a lovely textured layer of colour. A spritz of water activated the dusty, chalky, soft nature of the Distress Oxides.
I enjoyed the look I achieved with the distressed foam that I coloured the remaining pair of paper panels in the same way.
I then tore the top edge of each panel, for added interest, then used a piece of foam and Rich Mahogany Distress Ink to add grunginess to the edges of each panel.
I wanted to add some embellishments to each panel, so I used a copper sparkle Gelli pen to draw patterns on them.
Finally, I used Tombow Mono adhesive to stick the panels together.
When I put the panels on the page in my sketchbook-journal, I thought a panel behind them. So, I coloured a panel of the same card with Distress Oxide inks and the distressed piece of foam and used the same gelly roll pen to add some sparkly patterns. Then, I adhered the back panel and pockets to my sketchbook.
When I tested some ATC cards in the pockets, I realised I need to work out a way for some more ‘give’ in the pockets as they’re too tightly put together to slip more than one ATC card in them. Also, I placed them just low enough down the page so the ATC card doesn’t stick out of the sides of my sketchbook.
I’m not well known for my fore-planning projects like this, though I do try to learn as I go along.
Inchies and Twinchies
My mind was working in weird ways this morning. As I was making the pockets, my mind strayed to inchies and twinchies. I’ve not made any of these for a long, long time. I thought it could be fun to do so and add them to my sketchbook-journal.
I cut two 1″ wide, and one 2″ wide strips of card. I used the distressed foam to apply Distress Oxide inks to them, spritzing with water to add to the distressed look. Then, after drying with a heat tool, I cut them into squares – 1″ x 1″ inches and 2″ x 2″ twinchies.
I decided to use metallic watercolours from Cosmic Shimmer to add a sparkly, shimmery border to each tile. I used rich gold, pale gold or copper on each tile.
Then, I got to draw on the tiles. Teeny, tiny zentangle-style drawings. That was fun to do!
After adding some dots using a white Sakura Soufflé pen, I adhered the inchies into my sketchbook-journal. I’ve left the twinchies for decoration later.
Journaling cards
I realised that I could stored journalling cards in the pockets. All I needed to do was to colour the back of one of the ATC cards I coloured a few days ago. I also just realised that I could have added a layer of squared, dot grid or lined paper to write on too. That’s an idea for another time, maybe.
After drying the ink, I used a rollerball pen to add what notes I wanted to about this mornings creative sessions.
In fact, I’ve just created another journaling card to jot down ideas and notes to self as a result of reflecting on my pre-dawn arty activities!
Over the week I’ve been adding to my sketchbook- notes and images, ideas and reflections.
Each page has been coloured with combinations of Distress Inks, applied using the black side of a piece of Cut and Dry foam, followed with a spritz of water to bring out some water-staining grungy loveliness.
All the little drawings have been done on either Daler-Rowney Smooth watercolour paper (300gsm) or mixed media paper, either from Claire Fontaine or Daler-Rowney. The papers have been coloured with Distress Oxide Inks, Distress Inks, or a combination of them. Most of the pieces have had the inks applied with the foam, but some were made by brayering Distress Oxide inks onto a gelli plate and taking a print of them.
The reflection about what I like, what I don’t like, and ideas that arise is important to me in my sketchbook/journal. I do reflect on my art, a bit too much in my head. When I write it down, it forces my sometimes abstract and swirling thoughts into some kind of order. When I make these thoughts a material manifestation by writing them down, it helps me to recognise the thoughts, sift through that which is useful, and still record those that are not particularly useful at this moment but may be in the future.
I think I need to find a way to do this with my digital art. My mind goes to using One Note to do this. I shall think on this one, and make a note of it in my physical sketchbook/journal.
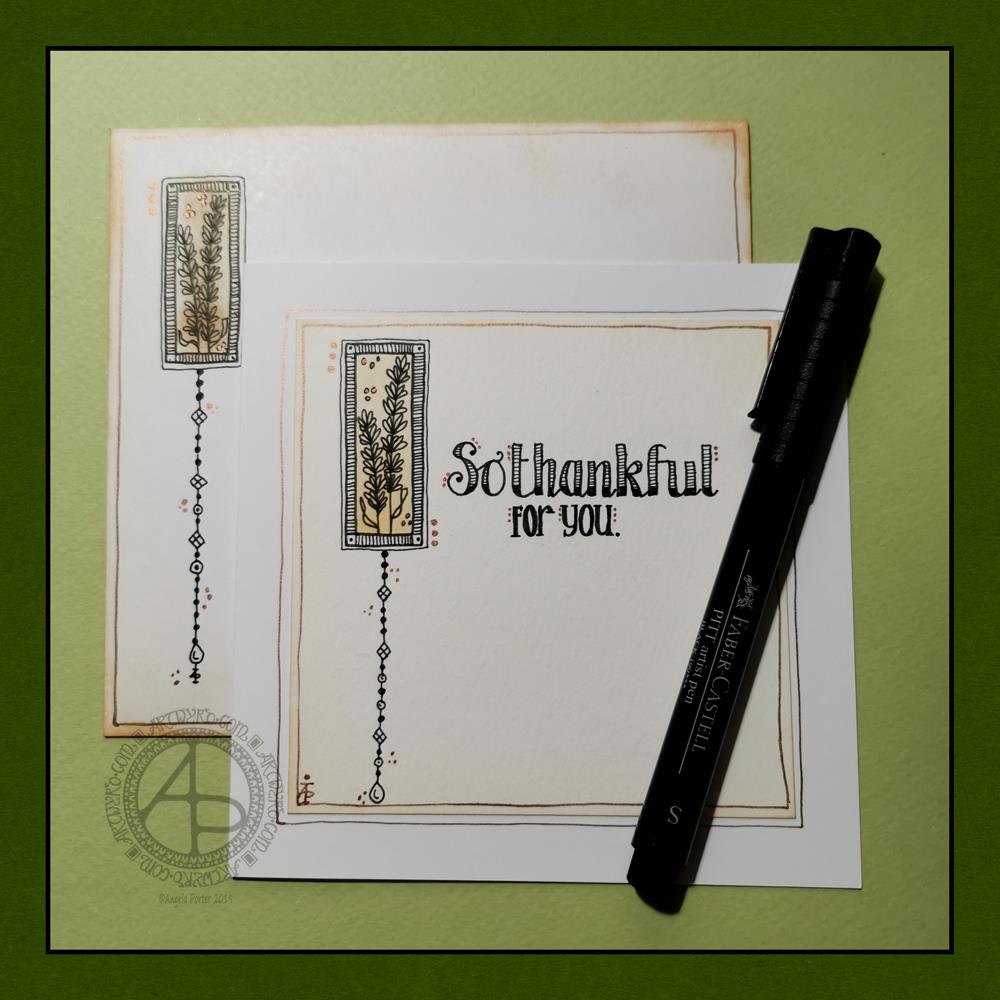
Today, I have a simple dangle design greeting card along with a coordinating envelope. If you’d like some more ideas, inspiration and step by step instructions for drawing dangle designs then my book, A Dangle A Day, is a good place to start.
Materials and dimensions
4″ x 4″ Strathmore Bristol paper with a vellum finish 5″ x 5″ acid-free white card blank White envelope that card will fit in Distress inks in Tea Dye and Rusty Hinge Small piece of foam and a mini foam blending tool A piece of card with a 1.5″ x 0.75″ window cut in it to use as a stencil. Faber-Castell Pitt artist pens in F, S and XS Ruler and pencil Adhesive Glass pen and coppper ink by J Herbin
Making the card.
Use the card stencil and a small sponge dauber to apply a rectangle of Distress Ink in the top left of the 4″ x 4″ top layer. I used Tea Dye to colour the whole rectangle in, followed by a subtle gradient of Rusty Hinge from the bottom up.
Use a mini foam blending tool to add Tea Dye Distress ink to the edge of the top layer.
Use a pen to draw the rectangles around the colour block. I like to do this free-hand as it gives a more organic, human feel to the design.
Draw the sprigs and add the lines to the border. Dots help to add some interest to the more empty parts of the design.
Use a ruler and pencil to lightly draw a vertical line as a guide for the dangle. Also, draw pencil lines as guides for the position and size of the hand lettering. Sketch in the letters of the greeting.
Draw round and diamond shaped beads to form the dangle. I like to finish my dangles with a ‘heavier’ or larger bead.
Ink the letters in. I did some faux calligraphy where I made the down-strokes thicker. I added some lines and shading to the top line.
Carefully erase the pencil lines.
Attach the top layer to the card blank.
I used a glass pen and copper ink to add copper dots to highlight the dangle design and the hand lettering. I also drew a box just inside the top layer and another just outside it on the card blank. Again, I free-handed the lines, embracing the wobbliness.
Making the envelope
I used Tea Dye Distress Ink and a mini foam blending tool to edge both the front and back of the envelope.
I then used a sponge dauber and the card stencil to add a rectangle of Tea Dye ink in the top left.
I drew the design on the envelope as I had on the card, including adding a line border in copper ink.
Finally, I drew similar sprigs on the envelope flap, using the glass pen and copper ink.
Before mailing…
Once I’ve addressed the envelope, I’d apply a thin layer of Distress MicroGlaze to the front and back of the envelope to protect the Distress Ink and drawing from the elements. I’ve done this to other cards and they have traversed the UK and US postal systems with no problems.
Ideas for using the design.
Although I’ve presented this dangle design as a greeting card, which is, I think, a lovely way to share a little bit of artistic loveliness with others, there are many other ways the design could be used, with or without any hand lettering.
In a BuJo, journal, planner or diary it would make a lovely little design to fill in a blank space.
This is a design that would work really well as a bookmark.
I’m sure it would look charming as part of a scrapbook spread.
I also think it would look lovely on a ‘with compliments’ slip or decorating the edge of a hand-written letter.
I’m sure there are many other ways and media that this design would be suited to.
Final thoughts…
I’m really enjoying drawing these kinds of dangle designs. They’re simple and elegant, to my mind anyway. They’re also quite easy to draw.
I do prefer to free-hand the lines and let the wobbliness be part of my signature style. It gives that human, hand-made, hand-crafted feel to the finished project, and a warmth to the finished project.
I work hard at finding a way of drawing digitally that lets me keep this uniquely ‘Angela’ way of expressing myself through line and pattern. I’m still working on it and sometimes get frustrated that, to my eye, my digital art seems too, well digitally perfect.
It’s all part of the process though – learning, developing, experimenting, trying out new ideas, techniques and methods. That’s what helps me grow as an artist.
If you’d like to find out more about drawing dangle designs, then my book “A Dangle A Day” is a good place to start. I’ve created over 120 designs, with step by step instructions, for you to use and inspire you.
It’s Friday, so that means it’s dangle designs today!
I drew these on postcard sized (148mm x 105mm) acid free heavy cartridge paper using a mixture of Tombow fudenosuke and Faber-Castell Pitt Artist pens. I then used Chameleon Color Tones and Color Tops to add some colour to the designs.
Again, I’ve drawn some really simple, cute and whimsical dangle designs that leave plenty of space on the paper for hand lettering or a hand-written note or letter.
Dangle designs are, of course, very versatile. I put these on the edge of a postcard sized piece of paper. However, they could be used as the focal point of a greeting card or note card. Lengthen the dangle, and they’d make cute bookmarks. They’d make interesting designs to fill spaces in a BuJo or scrapbook page. They’d also make interesting focal points on art journal pages.
I’d love to see how you use dangle designs – just tag me in social media!
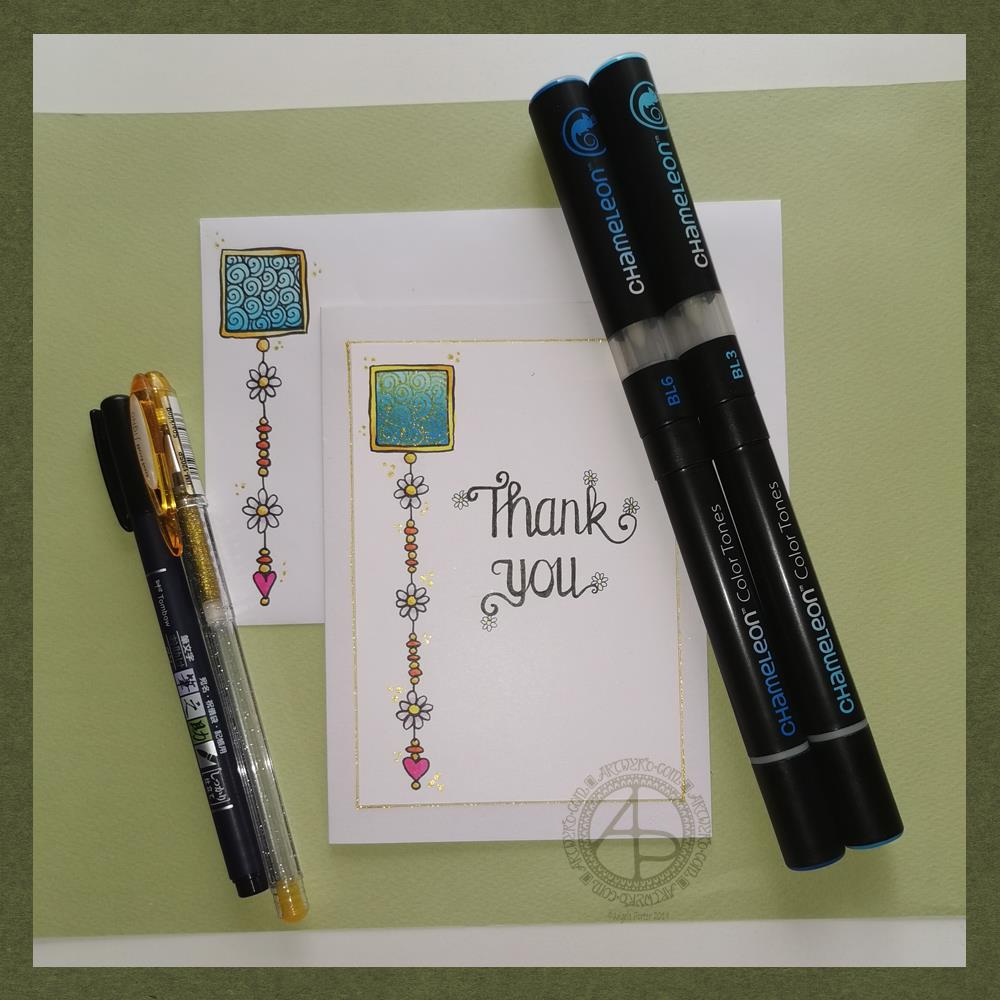
Friday means it’s time for another dangle design, this time a ‘thank you’ card and coordinating envelope.
In previous weeks I’ve had some fun adding patterns to small blocks of colour. So, I thought I’d run with that idea and turn one into a simple dangle design. The steps I used were the same for the card and envelope.
Card size.
The card is an A6 card and I cut a piece of Winsor and Newton Bristol paper to 5″ x 3.5″ for the card topper. The envelope came with the card blank so is A6 in size too.
How to…
I started by drawing a square of colour using the BL3 (Sky Blue) Chameleon Color Tone pen – no gradient, just pure colour.
Then, I added a gradient of BL6 (Royal Blue) over the base colour. I added pure blender to the Royal blue bullet nib using the mixing chamber. I didn’t use the Color Tops to add Royal Blue to the tip of the Sky Blue pen as I wanted a more subtle colour gradient.
Next, I used a Tombow Fudenosuke pen to draw around the block twice. Then, I added a filler pattern of spirals to the colour block. On the card I used a gold Uniball Signo sparkle gel pen. On the envelope I used the fudenosuke pen.
Now the colour block was decorated I turned my attention to the dangle.I decided to draw one dangle as I thought the design would look too crowded if I ad more. Sometimes, less really is more!
After drawing a faint pencil guide-line, I used a combination of beads, daisy-like flowers and a heart for the dangle. I wanted to keep it nice and simple.
Then it was time to add colour to the outline and design elements. I used the Chameleon Colour tops to add very simple colours. I didn’t do any gradients as the designs were so small. Instead I coloured them in the lightest colour, added a touch of darker colour where I wanted shadow and blended that out with the lighter colour.
I decided to hand letter ‘Thank you’ on the card using a soft nib Fudenosuke pen. I also added some tiny daisies to some of the loops and swirls to tie the hand lettering in with the dangle design.
I then mounted the card ‘topper’ on the card blank and added some gold glitter gel dots around the designs. I also added a gold line around the card topper.
Before I post the card, I’ll use some Micro Glaze from Ranger on the envelope to protect the Tombow pen from water damage.
Reflecting on the project…
Overall, I’m quite pleased with this. In hindsight I wish I’d used the Tombow Fudenosuke pen to draw the spiral pattern on the card. I think it’s a cute, simple and versatile design.
It would make lovely stationery, such as note paper or note cards, along with coordinating envelopes. There are lots of ways the design could be used in BuJos, Planners, Journals, Scrapbooks, and Art Journals. The vertical nature of the design means it would make a lovely bookmark.
How would you use this design? I’d love to hear, so leave a comment!
If you have a go at drawing and using this design then please share your finished products with me – I’d love to see how people use dangle designs!
If you want to learn more about drawing dangle designs then my book ‘A Dangle A Day’ is a good place to start. There’s over 120 designs for you to use as they are or for inspiration for your own designs.
Nearly every Friday I publish a new dangle design on my blog for more inspiration.
Hello to November, and farewell Inktober. My blog post today looks a bit bare compared to my Inktober creations. However, I have neglected my dangle designs during October, so now’s the time to get back on track with them
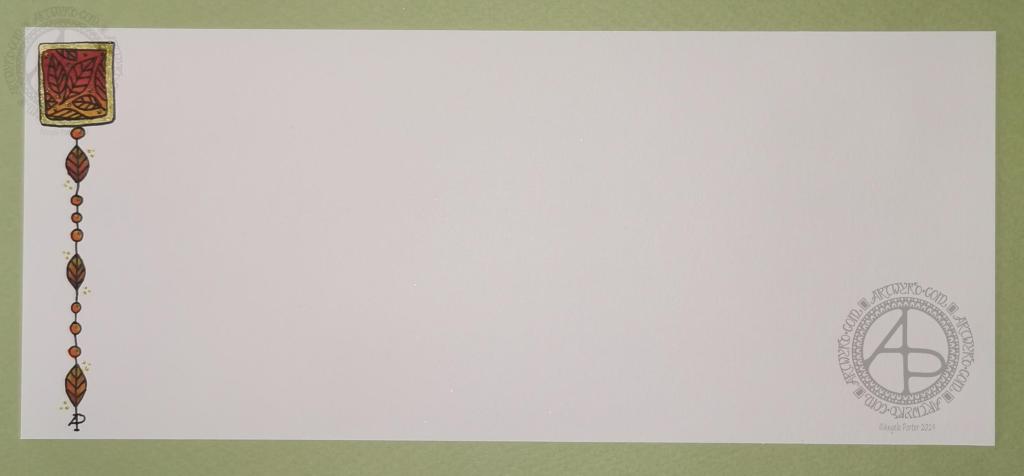
Today, I’ve created a simple and elegant dangle design with an autumn colour scheme that could be used in so many different ways. I’ve also put together a step by step set of instructions how you too can create this design (and hoping that it’s not so simple that I come across as patronising).
This is my first time posting a set of instructions – post a comment to let me know what you think of them and if you’d like to see more of them in the future.
I’ve put the dangle design on one side of a slip of paper that would make a perfect compliment slip or a note to slip in with a gift, or just as a short letter to a friend. It would also be perfect for a coordinating piece of envelope art!
This dangle design would be absolutely charming as an embellishment in a BuJo, planner, scrapbook or art journal. It would also make a darling bookmark.
It would be easy to turn this design into a greeting card as well.
So many possible uses for such a simple design.
I do hope that you will give drawing dangles a go – no matter whether you think you’re good at drawing or not! This design is made out of just simple shapes; it’s the colour that brings it to life and masks all kinds of imperfections.
If you’d like more ideas for dangle designs, then please take a look at my book ‘A Dangle A Day’ – it’s filled with examples of dangle designs with step by step instructions and helpful and encouraging words of advice.
One step at a time to a dangle design.
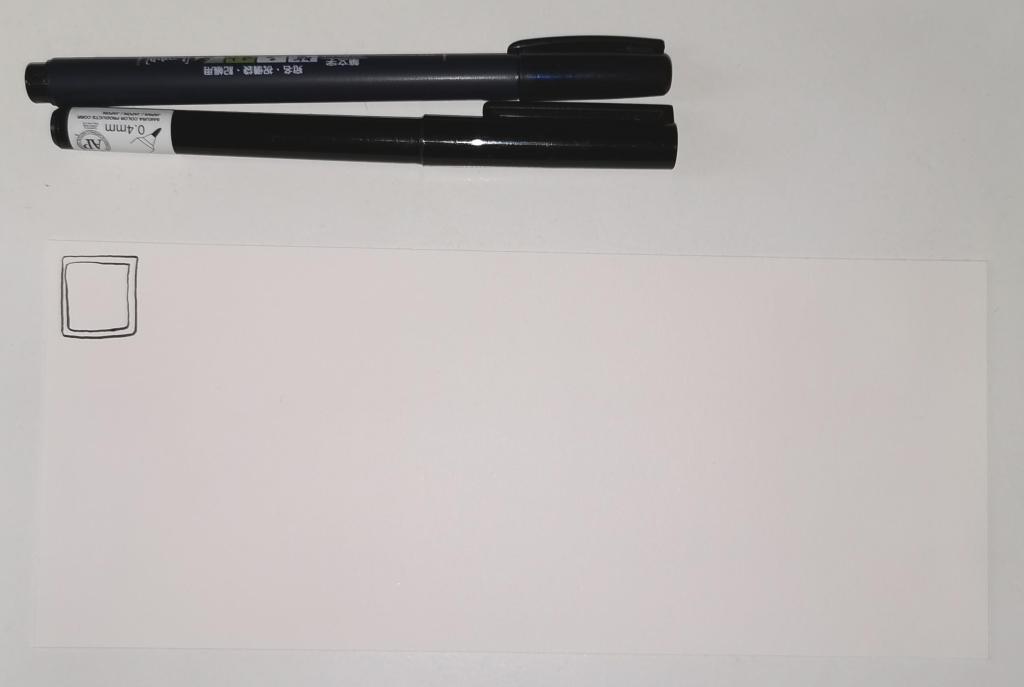
Step 1
Step 1 Draw a square in the top left corner of a piece of paper. I used a piece of paper measuring approx 8.25″ x 3.5″. I used a Tombow Fudenosuke brush pen to draw the box, and outline it. I deliberately made the squares less than perfect to give that human touch as well as a uniquely ‘me’ way of drawing boxes. The Fudenosuke pen allows me to draw lines of variable width quite easily, which adds to the charm of the box. The ink in the pen is also alcohol marker friendly. Letting your drawings be less than perfect is what makes them uniquely yours.
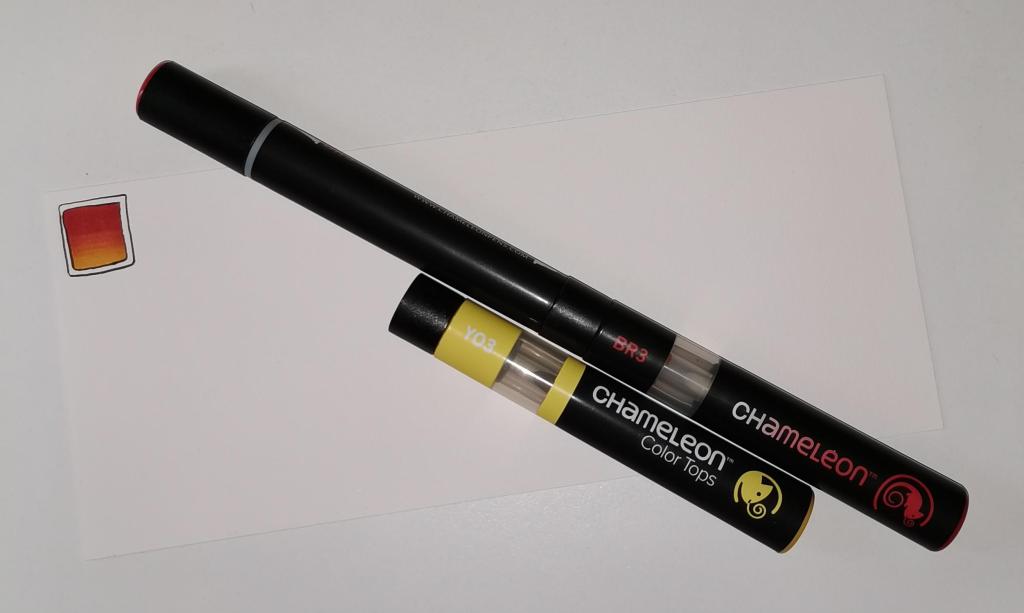
Step 2
Step 2 I used Chameleon marker pens (BR3 “Cinnamon” and YO3 “Warm Sunset”) to colour the inner box. Autumn is definitely here in the UK, and the combination of these colours reminded me of the leaves. However, you could use any colour combination you like and any medium you prefer to use. Chameleon pens make it so easy to create a colour gradient – I prefer them to other alcohol marker pens, even Copics.
Step 3
Step 3 I added a simple leaf pattern to the coloured box using a Sakura Pigma Sensei 04 pen.
Step 4
Step 4 Add the dangle! For this dangle I used the same kind of leaves as in the box for a consistent design. I added some round beads as ‘spacers’. Finally, I added my ‘symbol’ to the end of the dangle. Also, I did draw a faint pencil line with a ruler to help me keep my dangle hanging straight, more or less!
Step 5
Step 5 I coloured the beads and leaves in using the same colours of Chameleon Markers. I then decided I needed to add some shimmer and shine; I used a Uniball Signo gold glitter gel pen to colour in the border of the box and to add some dot highlights here and there. The Chameleons caused the Sakura Pigma Micron ink to smear a little – I always forget that happens! I should’ve used the Tombow pen again. Oh well, you live and learn, eventually!
Today, I have a dangle design card along with a coordinating envelope for you. I’ve kept the construction of the card simple with just one layer on the card blank. The dangle design and hand lettering are also quite simple as well as whimsical in character.
If you’d like to find out more about drawing dangle designs, then A Dangle A Dayis my book about dangle designs with plenty of inspiration and suggestions.
Materials and dimensions of the card and envelope
The yellow card blank is 5½” x 4″ in size with a top fold. So, I started with a piece of card measuring 11″ x 4″.
I also cut a piece of Winsor and Newton Bristol board to 5″ x 3½” for the top panel.
Next, I used some thick printer paper to make an envelope. I used the We R Memory Keepers Envelope Punch Board. The size of paper needed and the position of the first score line are printed on the board. This tool from WRMK makes it so easy to create custom envelopes.
To make an envelope to fit a 5½” x 4″ card I needed to cut a piece of paper measuring 7⅞” x 7⅞”. I used 120gsm white printer paper for the envelope.
Pencil guide-lines
Before I started, I used a ruler and pencil to draw in some faint guide-lines for the banner ribbon and the hand lettering on the top layer. I also pencilled in the hand lettering.
On the envelope, I added some guide-lines on the left and bottom to give me a border.
Hand-lettering and drawing the design
I started by hand-lettering the sentiment, then I drew the ribbon banner around it.
My next task was to draw the dangle comprising of beads and hearts.
Finally, for the top layer, I drew in the arrangement of plants and added some shells and butterflies.
I didn’t use a pencil to sketch the design before I drew it in ink simply because I’m confident in drawing these kinds of designs. However, it is a good idea to do so if you’re less than confident. I started with the central flower pot and let the design grow out from there.
I then took my attention to the envelope. I started by drawing in the ledge on the bottom. Next, I added the plants, flowers, shells and butterflies. I then drew a black border around the envelope, just inside the edge. This line gave me something to hang the dangle from; I added a dangle similar to the one on the card.
Adding colour
With all the drawing complete, it was time to add some colour.
I’d received my Chameleon fineliners yesterday, so I thought I’d try them out as there are lots of small areas in this design. I love my Chameleon markers, but using them to add colour to tiny spaces can be a little tricksy.
I did try the Chameleon fineliners out yesterday for drawing lines and hand lettering. I found that they give a very long gradient, even with the shortest of touches of the cap to the pen. I thought this might work well in colouring the flowers in. I achieved a pleasing change of colour of the petals on each bloom from just one blending process. This blending also worked well for the butterflies.
What I did notice is that the fineliners moved some of the black pigment from the Uniball Unipin pens that I used to draw the design with. That was a bit disappointing. It may be that in the future I will need to draw, scan and then laser print the design out. That’s a bit of a faff, but it’s doable.
I’ve never been a fan of fineliners for colouring; I find they leave lines and tend to pill the paper. This is just a personal gripe about all fineliners.
The Chameleon fineliners are pleasant and comfortable to write with – comparable to other fineliners. So, unless I want to add colour using lines and cross-hatching, writing is going to be my primary use for these pens.
To colour the pots, banner, leaves, cacti, shells and ledge, I used some of my Copic Ciao markers. I chose to use these as the brush nib lets me colour tiny areas. Also, I wanted to use pastel-ish colours to tone in with the colouring from the Chameleon fineliners.
I did add some very simple Copic shading to the design.
The Chameleon fineliners had spread the black dots I’d added to the flower centres. So, I broke out a gold Uniball Signo pen to colour in the centres of all the flowers. I also used it to add a sprinkling of little dots around the design.
Reflections
I enjoyed creating this card and envelope. It was a quick, simple project. I also do enjoy drawing whimsical designs.
I like the sunshiny yellow card blank; it makes me smile, especially as it is currenty a grey and rainy day here in the valleys of Welsh Wales.
I think the card may benefit from the use of a bit of Wink of Stella to add some shimmer and shine to the wings of the butterflies and maybe the hearts.
I could’ve ink blended a background to the design using Distress Inks. I also could’ve added a drop shadow around the design to give it some dimension. Today, I chose not to do these things to keep the card relatively simple.
I also only added one layer to the card. I could’ve cut a piece of contrasting colour to go beneath the top layer to give a bit more of a layer. Alternatively, I could’ve used amarker to colour the edge of the layer to give a border, or ink blended some distress ink around the edge. Again, I chose not to do so; I wanted to keep the card simple and easy to do.
I think the result is cute and whimsical. I now have to find someone to send it to! I think that I’ll use some Distress Micro Glaze to protect the artwork on the envelope before posting it though.
Hand writing matters!
In a blog post called “Handwriting matters!”by Marie Celineshe discusses why she thinks handwriting still matters in this age of digital communication.
I agree that handwriting does matter. Handwriting is as unique and individual as the person creating it. It’s also a much more personal way to communicate with others. It takes longer to handwrite a letter, note or memo and then deliver it either to the person or the post office.
It’s always nice to receive chatty, friendly emails from friends, and of course this is a quick and instant communication. However, there’s something to be said about the slower nature of communication by traditional post and that personal touch that handwriting gives.
I make these cards but rarely send them to another person, let alone include a handwritten note or letter. The cards sit around my home and never get shared with another person.
I think that needs to change, don’t you?
Not sure how to go about it, but if anyone who reads this would like to receive one of my cards and maybe a letter then leave a comment or contact me via social media or email.
I actually do love to hand-write; I always have and I’ve always taken a lot of pride in my handwriting. I remember making a huge effort to change it when I realised it was looking like my mother’s writing.
My preferred way of learning was to write and re-write my notes, condensing them into just a few lines of ‘memory joggers’. If my notes in lessons or lectures were messy, I would make it my task to tidy them up as soon as I could, which was also a way for me to review, consolidate and learn.
I have the facilities to hand-write digitally. I could keep a journal by writing on the screen. However, such activities frustrate me as I can’t turn the writing area to the angle I like to write at!
Also, as much as I love working digitally in so many artistic pursuits, there’s nothing quite like the feel of pen on paper, and I do love pens! I have a bit of an obsession with stationery, even though much of my work is digital these days.
Handwriting and therapy
Nowadays most of my handwriting is in my journals. It’s not as neat as I’d like it to be. I make mistakes. I like to hand-write my journals as the process of putting pen to paper slows my mind down. It gives me a chance to reflect and review what’s been going on in my life and also with my emotions.
Of course, reflecting on my thoughts and emotions, catching them in action is important to me as I continue with my journey to recovery from CPTSD. It also helps me to record events, emotions and thoughts that need to be discussed in EMDR therapy.
Handwriting vs Hand Lettering
Handwriting is that almost unconscious way we write things down – thoughts, notes, memos, to-do lists etc, as well as our signatures.
Hand lettering is a much more deliberate activity. It is like drawing the shapes of letters, not writing the whole word in one go. It’s consciously deciding what the shape, size and embellishments of a letter should be.
I enjoy hand lettering and I do tend to use the shapes of letters that I use in my handwriting. But that’s where the similarities end for me.
Do you still hand-write? How do you make use of handwriting? Do you think it’s still an important skill?
Leave a comment, I’d be really interested to hear what you think?