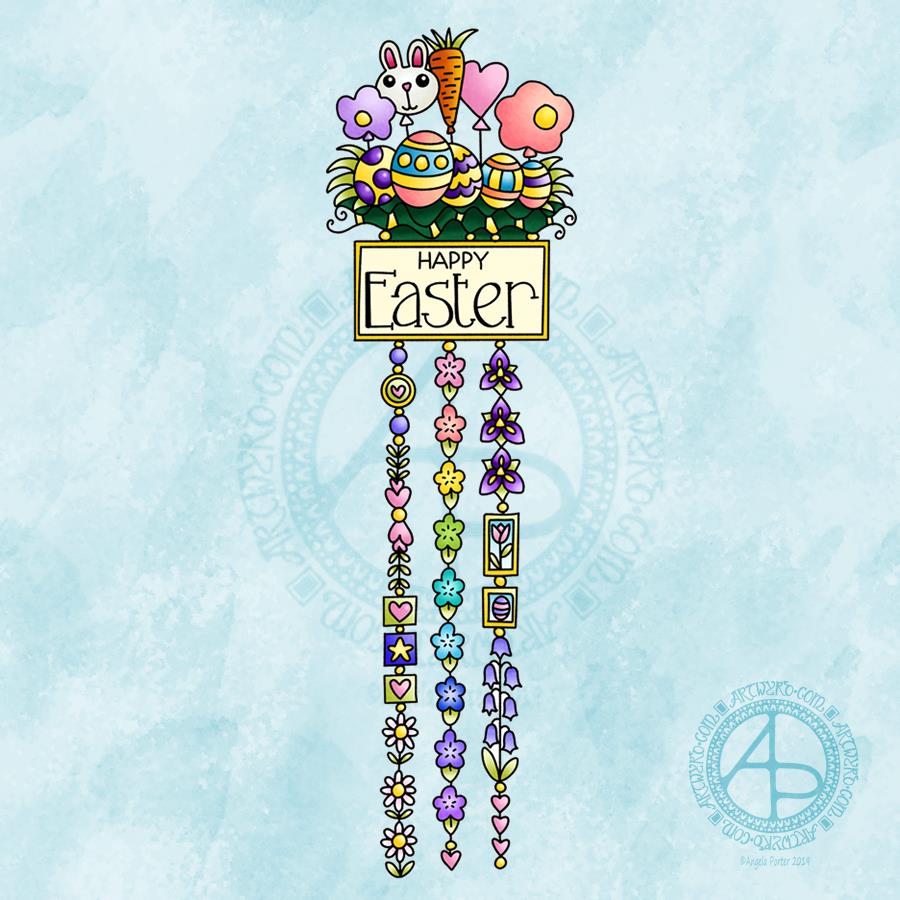
This cutely whimsical dangle design is from my tutorial book ‘A Dangle A Day’, which has the step-by-step instructions for drawing this design. They really are simple to draw, and the hand lettering is based on your own writing style too.
For this design, I chose spring-time colours, more pastel than bright. Of course Easter eggs and a bunny balloon had to feature, along with all the lovely spring flowers and a sprinkling of hearts. I even snuck a star in, hearts and stars being some of my favourite motifs to include.
This design would make a really cute greetings card or notecard. The dangles can easily be drawn shorter. It would also make a lovely bookmark. As a BuJo page, planner page or an element on a scrapbook page it would be lovely.
Using Nuvo drops or Ranger’s Stickles or similar to make dots where the beads are as well as a sprinkling of them around the top of the design would add some lovely dimension and sparkle for sure.
I do hope you give drawing dangle designs a go. They are so much fun and a lot easier to do than you think they are. They can also be used in many, many ways, especially when it comes to sharing love with others at different times and events throughout the years of our lives.
About the drawing…
When it came to designing the dangle designs and monograms for A Dangle A Day, I started off by sketching the idea out on dot grid paper using either a pencil or a pen. I could then adjust the lines and draw guidelines in to help me with the design quite easily.
When I was happy with the sketch, I scanned it in and then re-drew it in a digital form. For drawing digitally I use a Microsoft surface pen directly on the screen of a Microsoft surface book or surface studio. This is like drawing with pen or pencil on paper, or even painting or colouring.
So, although my designs were created in a digital environment, they were still very much drawn by hand.
I used very little in the way of smoothing lines – only enough to remove the wobbliness that comes from the great sensitivity of the pen and screen position sensoring stuff, and never used the predictive line tools available in Autodesk Sketchbook Pro. I worked out how to set up pens that would leave a line texture similar to the pens I like to use to draw on paper with. I determined I wouldn’t make everything perfect, that there would be that perfectly imperfect human touch to everything that I created. I also made sure I included examples of dangles drawn and coloured on paper and turned into cards, bookmarks and BuJo pages too.
Working digitally to draw and then colour the designs allowed me to edit, erase, adjust and keep the image free of smudges and blots that would require re-drawing. It also made it a lot easier to make the edits my lovely editors suggested to improve the work.
It certainly saved a lot of time scanning image after image in – something I find extremely tedious.
Although I may have used digital tools to draw with, the techniques I used were the same as if I’d drawn on paper with pen and then coloured with various traditional media.
I also have to say that the year to year and a half ago when I was colouring these I was only just starting to explore the realms of digital colouring and I hadn’t quite worked out exactly how I’d like to do it. They worked out good enough, but now I think I’d approach it a bit differently.
I had such a lot of fun creating the dangle designs season by season, month by month, celebration by celebration and I hope you have the same amount of fun doing this too.
Another cute and whimsical drawing with some hand lettering this day before I start on work for the book and then off to EMDR.
Line art drawn with a Lamy Fountain pen, coloring done digitally with Autodesk Sketchbook Pro, Microsoft Surface Pen and Microsoft Surface Studio.
My mood is back to being fairly content. However, the past week has been quite tough and emotional. It’s on days where I struggle to push the inner critic that tells me I’m stupid, horrible, unloveable, useless, a failure it can be hard to look for rainbows or stars. Yet, it’s on these days that it’s important to try to find just one spark of colour in the rainbow or just one teeny, tiny star that is barely visible to the inner eye.
I think I may need to make a list of things in my BuJo about myself that are small stars and little rainbows on my good days. A list that may bring little glimmers of light in the darkness that descends on my soul on the bad days.
Little reminders of the good things about me, the positive things I have done and do do, the kind words people have said to me. Little reminders that this dark time will pass. Little reminders that the inner critic hasn’t won, even though it’s trying to break me. Little reminders that I’ve survived time and time again. Little reminders of the progress I am making.
Little sparks to help ignite the light once again.
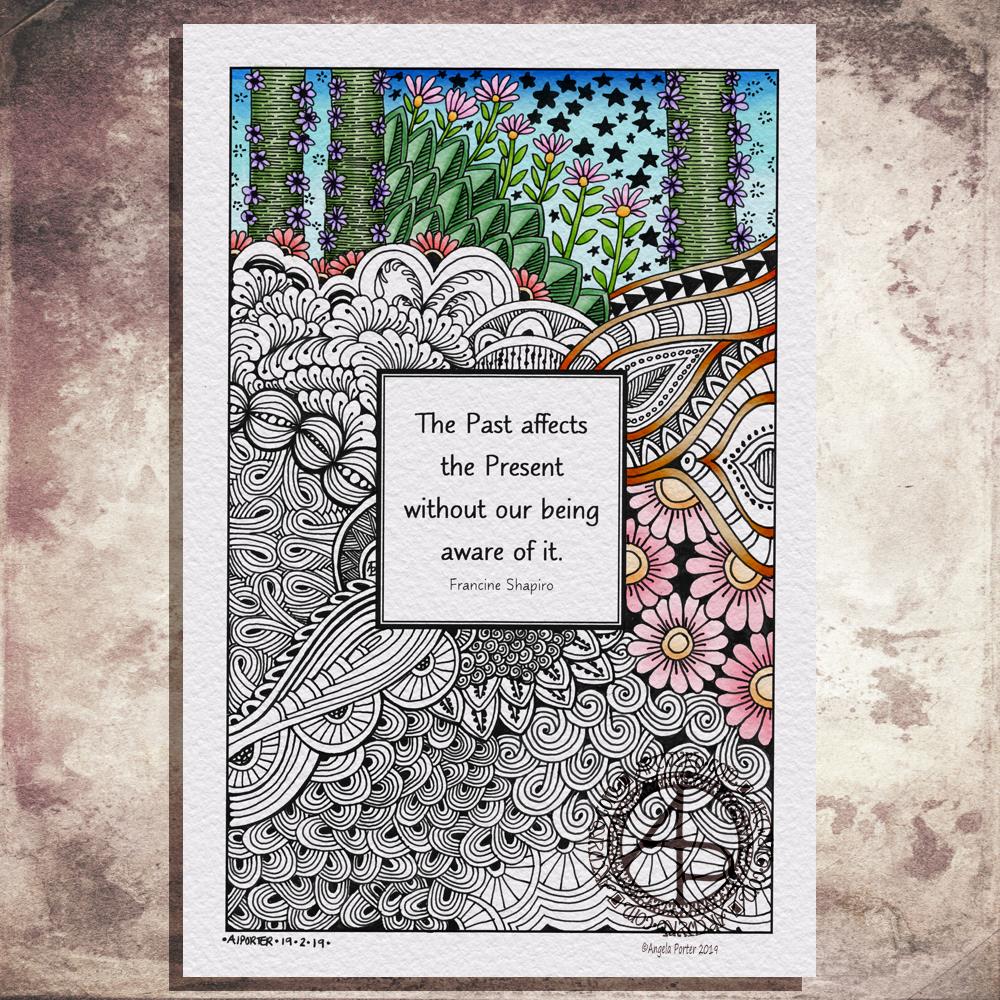
Francine Shapiro is the person who developed EMDR therapy and this quote from her exemplifies what I’ve becoming more and more aware of through my three and a half years of EMDR.
Today, I am really ‘not with it’ and feeling quite spacey and vague and very tired. I had a broken night’s sleep with very, very weird and disturbing dreams. This often happens after EMDR.
I know that I need some self-care time today, and maybe tomorrow given how I’m presently feeling. I’m also in need of a walk outside, but I’m awaiting a delivery from Amazon. I hope it arrives soon so I can get a walk in early this afternoon.
EMDR yesterday
There were two particularly significant moments during my session yesterday.
The first one was a result of a suggestion by my therapist that I’m keeping secrets about things that have happened to me, particularly in my adult life. There are things I’m too, too ashamed and embarrassed about to talk about even with her. My throat closes up and becomes painful. I feel burning in my cheeks. There’s terror and huge anxiety in the pit of my stomach. She went on to say that in the article she had read it was suggested that clients write about these experiences. She suggested I do that. She added she did not need to read them or be told about them, that she can act as a ‘blind therapist’ where we just assign a code to the particular traumatic event and work with it that way. She even suggested I can burn the things I write after writing them so no one else can ever read them.
The relief I felt with this suggestion and discussion was immense. The discussion that ensued was enlightening in another way. That I’ve never ever really spoken to anyone about my feelings, especially when I was the one upset, hurt, abused in some way. I always put a smiley, brave face on and brushed all the emotions to one side, defaulting to the happy, funny, quick to laugh, person who chatters about faff and fluff.
By pushing away all that hurt and upset and so on I’ve also tried to tell myself that it’s ok, I can cope with this, that I’m incredibly caring about other people and their feelings and want them to be happy. Scared that if I spoke truly about how I was feeling that I would be rejected or that the other person(s) would become angry and would hate me and think badly of me.
So, instead, I brushed it all aside and swallowed it down, often with food, using the food to fill the emptiness within me, to hide the feelings of shame and fear and more. I’ve done this so much in my past that I’m having to learn what emotions feel like and what they are called as they crop up during EMDR.
I was with my older sister and younger brother visiting the British Museum and we stumbled upon the Sutton Hoo treasures. I was entranced by them, only having seem them previously in books. It was hard work to drag me away from the to go visit the mummies in the Egyptology section. My older sister said she’d never seen me so emotional and excited about something; she actually called me an ice maiden as I rarely showed any emotion at all, other than the happy, smiley, funny persona I put across. I was in my twenties then. No idea of emotions or how to express them, swallowing them down all the time.
So, writing about these experiences now, from a position where I understand more about myself, am more aware of emotions and feelings will mean that they are no longer secret, it doesn’t matter that others don’t know about them, but it’s important that I don’t keep secrets from myself and face up to the traumas and feelings I have suppressed from these events.
The second insight was during EMDR when I had a vision of myself looking into one of those mirrors that reflects things to infinity, but in this case it was like the reflections went around and around in a circle. The insight was that this is what has happened to me. I’ve got caught in a cycle of the same kind of things happening again and again – different but the same effects on me, the trauma they’ve caused me and continue to cause me as instead of knowing how to process them in a healthy manner I learned from a very young age to suppress anything I needed to talk about or needed help with because I was upset as no one wanted to know. I was bothersome. A whiner. An attention seeker. A liar. When I was upset the people supposed to care got angry with me. Or just ignored me. Or sent me away.
I am unaware of much of my past, particularly my childhood. I have few memories at all. That bothers me, but my therapist tells me I need to let it just be. People like me, who’ve had quite traumatic lives, often forget what has happened to them as a way of protecting themselves from that particular trauma, especially when there is no one they can talk to about it to help them work through it.
My past really does affect my present. However, I’m becoming more aware of the ways in which it has affected me, more aware that I do have emotions, and I’m trying to believe I deserve to think better of myself, that maybe I didn’t deserve any of this, and that although I’ve allowed things to happen to me I shouldn’t be so hard on myself as I need to understand why, what brought me to that point, why I can’t say ‘no’ easily.
So the quote is very appropriate.
About the art
This is very much a work in progress at the moment.
I printed out the quote and borders on Bristol Board. The design is a little less than A5 in size (4.5″ x 7.25″ approx). Then, I added the patterns around it using two Pilot Kakuno fountain pens – one with a medium nib and one with a broad pen.
After scanning the design in, I wanted to add colour to it, so I used my trusty trio – Microsoft Surface Pen, Microsoft Surface Studio and Autodesk Sketchbook Pro.
I think the dark stars at the top could symbolise those parts of me I’d like to ignite after they were extinguished a long, long time ago – confidence, self esteem, the ability to say no, valuing myself, being a good friend to myself, and more …
The tangled nature of the design, with many parts seeming to blend one into another, sometimes not in a very comfortable manner, is like all the trauma and experiences I have had – a tangled mess where I pull on one thing in EMDR and a whole host of others come along with it, all linked by a common effect or effects they had on me.
Flowers blooming, leaves all signs of growth though, even if some are hidden at the moment.
I’m sure there’s more that could be said about it in terms of my journey of recovery from cPTSD along with developing mental and emotional wellbeing. However, not today as the chap from Amazon has delivered the parcels to me. In them are some basic things for me to try my hand at paper quilling.
I’ve been fascinated with some youtube videos on paper quilling, particularly the more modern forms and I was also struck at how some of them seem to be similar to my kind of drawing that has lots of spirals and swirls in it. So, I thought I’d have a go and see what I can do with it!
But first, it’s time for a walk … to see if that can help clear my head a little. I think a little trip to Barry Sidings is in order.
designed a template for Time To Talk day which is 7th Feb 2019 – a day where people are asked to start a conversation about mental health
designed and coloured a dangle design for the lunar new year
got my emotions, feelings, thoughts somewhat back into near balance after a brutal EMDR session yesterday for my cPTSD; as is often the case the session appears gentle, but it’s not till afterwards I feel the exhaustion, upset, and so on of the traumas being processed
get my Instagram account disabled for a breach of their rules, guidelines or something.
I’m not sure which is the most noteworthy or the biggest success!
I have no idea why Instagram have disabled my account. I’ve tried to contact them but the email address just bounces back, though the Messenger message has gone through. I suspect it may be to do with my rant about copyright infringement, but it was never directed at Instagram or anyone on instagram that I know … sheesh.
So, I guess if Instagram no longer want me there, then so be it. I shan’t be setting up another account with them that’s for sure if I don’t get some idea about what it is I’m supposed to have done!
Anyways, it’s Lunar New Year and the lucky colours for the year are red, green and purple, so that’s why that’s the colour scheme for the dangle. I thought a gold background would go with the opulence of the colours; I’m not so sure about that now!
It was a very quick drawing and colouring session for the dangle design.
Talking of dangle designs, my book A Dangle A Day is now published. In the book I show how to create dangle designs, one step at a time and there’s a whole host of different dangle designs you can use for various celebrations and events throughout the year.
Friday is dangle day! Well, it is for me. I like to finish the working week off with a cute dangle design, and today I chose to do a greetings card or note card with a decorated envelope.
The media I used were :
pencil and ruler
05 Uniball Unipin pen
Copic markers
Kuretake Zig Wink of Stella brush pen
Claire Fontaine mixed media paper
Distress ink and sponge applicator
Kraft card and envelope
Sticky foam squares
Two self-adhesive gems
White Uniball Signo gel pen
As it’s still winter I thought some snowdrops would be appropriate, along with some crocus buds along with an evergreen wreath. Stars and hearts are always favourites of mine to include, as well as some swirls and spirals.
I chose quite cool and pastel colours for the design, along with very simple shading. The Wink of Stella added a little sparkle to the hearts, stars, beads and snowdrops in the design. A couple of self-adhesive gems added a touch of interest to the ribbon banner.
I used faded jeans Distress Ink to edge the paper panel, which I adhered to another slightly larger panel which I found in my stash of Distress Ink coloured papers ready to use. This one was also edged with faded jeans Distress Ink.
I then used Tombow Mono glue to stick the panel to the card blank.
I drew a simple arrangement of snowdrops and buds on the envelope in white ink and added some spirals and swirls to ‘ground’ the pot. I’m not happy with the spirals/swirls though, but it’s only an envelope so if I send this card to someone I can always decorate another envelope!
Replace the wreath with a photo of the recipient and you’d have a lovely, personalised keepsake of a card.
This design would also make a lovely page in a bujo (bullet journal), planner, scrapbook, or journal too.
My hand lettering is a little rusty; I’ve not done much in the past week or so as my focus has been on mandalas and work for my next book.
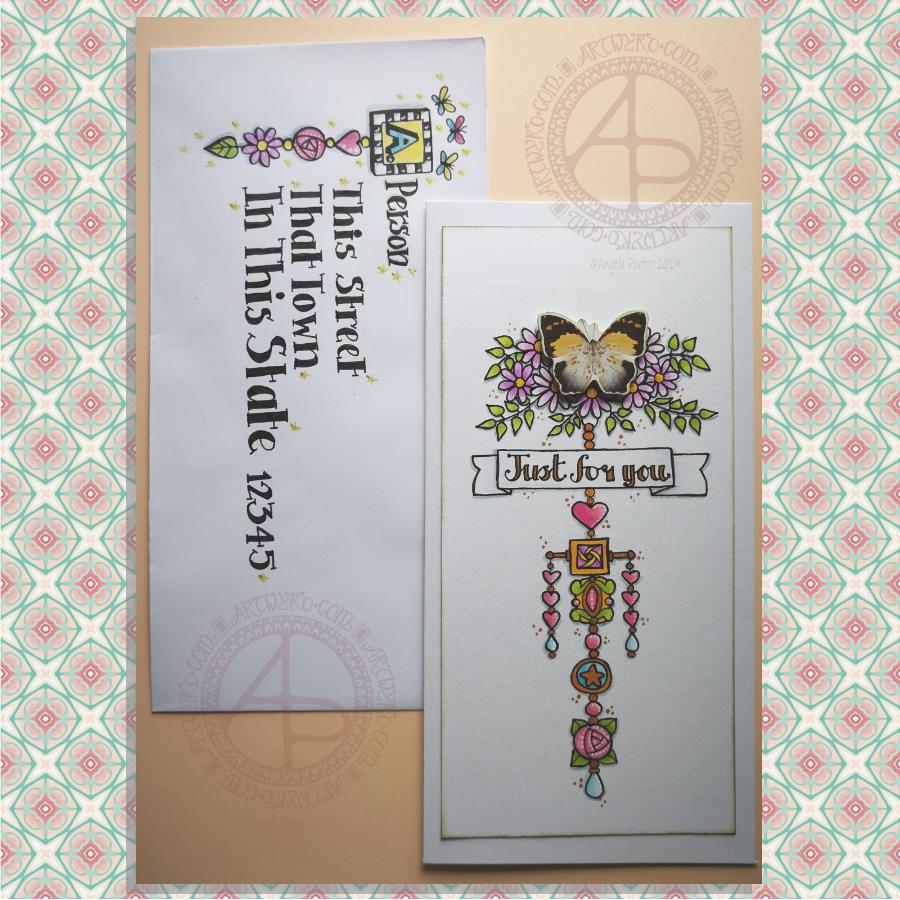
Here’s a pretty pair of whimsical and cute dangle designs card and envelope.
For the focal point of the card I used a butterfly from a pack of Ephemera from Tim Holtz called Botanical. I added some metallic gold ink highlights to the butterfly as I knew I’d be adding gold to the design. I also edged the butterfly with some Peeled Paint Distress Ink using a sponge ink applicator.
I then cut my paper to fit the card blank I wanted to use; I learned my lesson from the the last card I made! The card blank measured 8½” by 4¼”. So, I cut a piece of Claire Fontaine Mixed Media paper 7¾” by 3¾” to create the dangle design on.
I used the butterfly as a guide as to where I wanted to add some flowers upon which it could alight. I also drew pencil guidelines in for the centre of the design and the sentiment banner.
Then it was drawing the design. I used a 05 Unipin pen from Uniball.
I started by drawing the flowers at the top of the design.
Next, it was the hand lettering for the sentiment ‘Just for you’.
Flowers, hearts, stars and spherical and teardrop shaped beads are my goto choices for dangles. I did add a charm that was based on some jewellery, as well as a square charm with a geometric pattern inside it.
When I’d drawn the main dangle I realised I wanted to add a bit of width to it. So, I added two bars stretching out from the side of the square charm and used the ends to hang dangles made up of hearts and beads.
Colouring was the next task. I used Tombow Dual Brush pens to colour the design in. The colour gradients weren’t strong enough for me, so I used Chameleon Duotone Pencils to add depth to the colours.
Then, it was time to attach the butterfly using some foam squares.
I then used a dip ink pen to add some dots of gold FW Pearlescent ink around the design. I also used gold to fill in the lettering of the sentiment and various elements of the dangle design.
Next, I added white dots highlights to some of the design elements using a Sakura Souffle pen.
I also used a blue-grey Chameleon pencil to add shadows to the design at this point.
Before affixing the design to the card blank I used a sponge ink applicator and Peeled Paint Distress Ink to edge the design. That was the card done.
I then thought it would be fun to create an example of an addressed envelope using a dangle design as a monogram. I used some of the charms from the card for this design. I also drew some simple, whimsical butterflies above the monogram. I used Chameleon Duotone Pencils to colour the dangle design and to add a shadow to the dangle.
Pencil guidelines helped me to keep my lettering evenly spaced and of a consistent size. In this case I just guesstimated them, but in future I think I will need to measure the spacing of the lines!
Finally, I added some glittery golden stars with a gold glitter Uniball Gel pen as well as some white dot highlights using a white Sakura Gelly Roll pen.
One thing I realise I didn’t do was to make the colours in the dangle more harmonious with the butterfly. The color tones of the butterfly are quite antique and grungy and I used rather bright, clean colours to colour the design with. I also am not happy with the monogram on the envelope; it’s too small and the lettering style doesn’t seem sympathetic to the rest of the lettering.
I’m going to put these down to me still suffering the lingering effects of the stinking cold I’ve had for the past three days. It’s definitely broken now, but I’m still not 100%.
It’s also a learning experience. I’m not a wonderful card maker; I do dabble in it from time to time, however dangle cards are fun to make and with the decorated envelopes it’s double the fun! I think I need to start sending happy mail to people! I’d be happy to receive this card with a letter inside – how would you feel about it?
I’m now feeling a little better this evening and I thought I’d create a dangle mandala (dangle-dala?) to mark the publication of ‘A Dangle A Day’ today.
I drew this using my Microsoft Surface Pen on the digital paper that is my Microsoft Surface Studio screen using Autodesk Sketchbook Pro. I then coloured it using the same tools.
If you’d like to print and colour this design in, please follow the link and join the group. You’ll find some other coloring templates there too that are only available to members of the group.
Dangle designs are a lot of fun to create. They’re whimsical, cute and a lot simpler to draw than they look! I take you one step at a time through how to draw well over 100 different dangle designs in the book, as well as making suggestions about where you can use dangle designs and with words of encouragement.
If you do have a go at drawing dangle designs, and colouring them of course, I’d love to see what you create and how you use them!
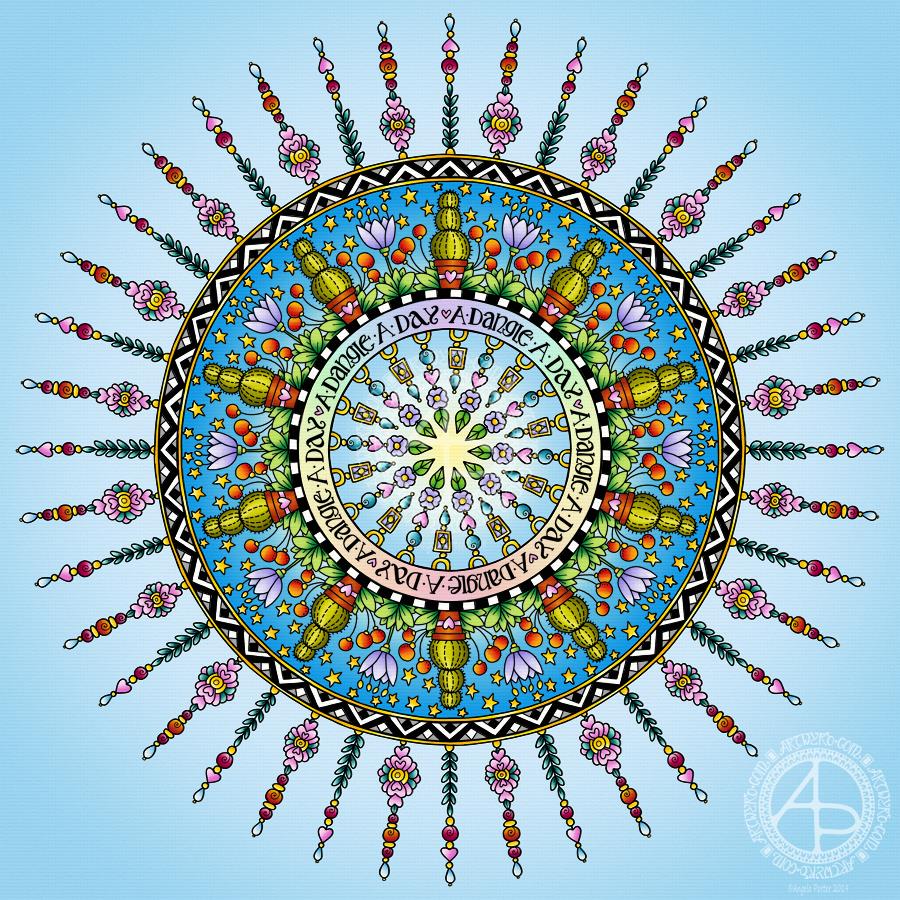
Today has been a funny kind of day. I have a stinking cold and I had an appointment late morning. When I came home this afternoon, I decided I’d do another mandala made up of dangle designs and design elements from my book ‘A Dangle A Day’.
I just let the design flow from the tip of my Microsoft Surface Pen and onto the virtual paper that is my Microsoft Surface Studio screen. As always, Autodesk Sketchbook Pro is the app that lets me draw and colour naturally on the Surface Studio screen.
I incorporated some of my favourite design elements – hearts, stars, sun, moon, flowers, leaves – into the mandala. A big mug of tea and a nicely sweet cake could be most welcome, though I’m not entirely sure the cold would let me enjoy them.
I also included some of those graphic black and white squares that I like so much, as well as a rainbow pattern of little arches. A morning sky and a night sky as backgrounds to the rings in the mandala completes this rather cutely whimsical mandala design.
Although I don’t show how to create dangle-dalas in the book, they are easy enough to do using dangles and design elements from the book.
It goes without saying that I’m all excited about my book being published tomorrow. I’m really hoping some of you will share your dangle designs with me – I really am curious and interested in how you use dangle designs!
Dangles can be turned into mandalas! And ‘dangle-dalas’ satisfy my love of symmetry in an unusual way.
In this one, I have two rings to which dangles are attached. In the centre ring, they point towards the centre of the mandala. On the outer ring, they point out into space.
Then, there’s two central rings. One, I coloured in a pastel rainbow and added ‘A Dangle A Day’ in my weird take on hand-lettered uncials. The lettering isn’t perfect, but then neither am I, and neither were celtic/anglo-saxon/medieval manuscripts.
Ok, the manuscripts are more perfect than my hand lettering, but it’ll do. It’s perfectly imperfect. That is an idea I’m becoming to embrace more and more easily as time goes on, and an idea that I encourage you to adopt in my book ‘A Dangle A Day’.
I used rather graphic black and white geometric designs to separate the three main rings of the design. This contrasts nicely with the brightly colourful design elements.
I felt the need to draw cacti, flowers and some weird seeds today, so that’s what I did. Of course it goes without saying that I’d have to include stars and hearts in my design! There’s some beads in there too, particularly those teardrop shaped ones that remind me so much of medieval jewellery.
Mind you, medieval in character this design is not. It is rather cute and whimsical, which is one of my signature styles – the other is intricacy.
For this design, I hand drew and coloured it digitally using a Microsoft Surface Pen on the screen of my Microsoft Surface Studio. As always, my chosen art software was Autodesk Sketchbook Pro.
Yes, I really do draw on my Surface Studio with the Surface Pen as if I’m drawing with, say, a fountain pen on paper. Colouring I often do as if I’m colouring with traditional media, though sometimes I do use gradient fills. It just depends on the feel I want in the final artwork.
Being able to work in layers means I can do things that would be very difficult or time-consuming working traditionally. It also means that I can play with colour combinations – I love colour, but I don’t always make good choices of colour palettes, see yesterday’s Q monograms for evidence of that!
Of course, there’s so much more to digital art than this, and I’ve not discovered everything yet. But over time my experience is that I discover, workout or learn how to do what I need to do at that time when I’m ready to do that.
While checking out the release date (which I’ve been getting a tad wrong, oops!) I noticed there were some reviews of the book. I’d like to say thank you to all the reviewers who wrote such lovely words about the book! It’s filled me with a bit more confidence and belief in myself as this is my very first art tutorial book.
There’s some hand lettering with the letter A. The letter A has dangles forming the inner part of the mandala. Then, the outer ring has simple and cutely whimsical doodle designs and yet another dangle forming it.
Of course, hearts and stars had to appear; they are my favourite design elements for many of my projects. I also like beads and gems too. Flowers and foliage are also favourite motifs, as are spirals.
I decided the ring of A’s need to be in a rainbow colour scheme and I chose a bright colour scheme for the design elements.
It looks complicated, but if you look at just one A and follow the dangle towards the centre and the design out to the outer rim you’ll see that it really isn’t all that complex.
Of course, drawing mandalas on paper can be time consuming. I usually draw mine digitally.
Autodesk Sketchbook Pro is now free and it’s my drawing software of choice. It has a symmetry tool that is really easy to use. You only draw one segment of the mandala which is then automatically repeated around the circle. I find Autodesk Sketchbook intuitive to use, and it’s easy to use almost straight away. It also has some rather sophisticated features on it and it does all that I need it to do, and more. I use a Microsoft Surface Pen along with Microsoft Surface Studio to draw and colour digitally, and they work wonderfully with Autodesk Sketchbook Pro.
I do colour my designs digitally. However, sometimes I will print out the black line art and then use traditional media (often Chameleon markers) to bring the line art to life with colour.
I do hope you will have a go at creating your own dangle designs. They look complicated, but they really aren’t! If you do have a go, then please share your designs with me on any of my social media homes – facebook, instagram, twitter or here!