This morning, I finished drawing the entangled design on parchment and started to add colour. I did a really untidy job of using masking tape to hold down the curled parchment. It worked though. I’ve not completed adding colour, yet. I may do so through the day today, once I’ve done other errands.
Then, I have to decide what to do with this small piece of art. Do I mount it on black or white? Do I turn it into a card or something else? Or should I just let it live in a sketchbook of some kind of mine? I dunno.
It’s nice, every now and then, to do something a little different. There are things I learn and realise, especially as memories of the last times I created something with parchment come back to my awareness.
Monday is definitely mandala day! I’ve been working on this mandala for the past week, on and off. It’s taken me lots of attempts to get the colours and brushes to work the way I’d like. I’m quite happy with it now.
I like the combination of warm and cool violets and teal-ish greens. They’re close enough together on the colour wheel to work harmoniously together.
I’m just adding colour at the moment. I will think about adding patterns to the various areas once the colour is all complete.
Although the black lines are quite bold in this design, the colour seems to make them almost disappear. They seem to become, almost, the darkest shadows that separate the different colour areas, deep cuts that delineate the different sections. I’ve never really noticed that before, and I think it’s a nice observation.
I’ve been enjoying, as always, adding shadow and highlight to give that sense of volume and layers to the design. It’s always fascinating to me how such simple use of colour can add so much interest.
Vlogging
I’ve worked out that all the youtube videos I’ve been creating are really vlogs. I can be incredibly dense at times about such things. I do talk about different things in them than I do on this blog. My thoughts are different when I write and when I talk it seems. Or perhaps the process of writing slows my thoughts down in a way speaking out loud doesn’t.
Anyway, I’m enjoying creating the vlogs. As I draw every morning just for fun and to warm up my muscles, joints and creative mind and heart, it’s nice to share that process with others. I hope people gain inspiration and insight from the vlogs.
It’s been heart-warming and humbling for the lovely comments people have left there. I really appreciate every like and new subscriber.
In today’s vlog, I draw on vellum, and then paper when the vellum curls too much to be easy to hold down.
Zoom get togethers
Saturday I hosted a Zoom get together for any members of the Angela Porter’s Coloring Book Fans facebook group who’d like to join in. Last night, I was chatting to Brett, one of the founders of the group and the person who keeps everything running smoothly there. She often has trouble getting onto Zoom, and so we decided to give it a go and we worked out the best way for her to join in.
So, after a short chat, we both suggested about the same time that we could open the meeting up to the group. One member joined us and we chatted until just past midnight for me.
I’ve also set up a meeting for Tuesday tea-time, UK time and the details will be posted in the group for members to join in.
Anyway, I didn’t really settle down to sleep until around 2 am, and I’m really feeling the lack of a good night’s sleep now. I suspect another nap will be on the cards sooner rather than later. However, I do want to get out for a walk again today. I’ll be trying to time it to dodge the heavy rain showers we seem to have.
Yesterday, I mentioned some things I’d like to try out after my experience creating a greeting card using vellum and Distress Inks along with some die-cutting.
So, rather than take the nap I’d said I was likely to, I endeavoured to make another card in the same kind of entangled art style. This time, the two Distress Inks I used were Peacock Feathers and Mermaid Lagoon.
I used these inks to colour the reverse of the vellum and to add colour to the card base – Mermaid Lagoon at the top, Peacock Feathers at the bottom and blending them in the middle.
I used the piece of card I’d cut the frame from as a stencil for the addition of colour, so I was sure it wouldn’t bleed out of the edge of the frame.
After dry embossing the design on the vellum, I passed it just once through a hot laminator. The vellum became flat without losing too much of the definition given by the dry embossing.
I trimmed the vellum panel so it would fit neatly under the frame. I adhered the vellum to the frame using strong double-sided tape.
I wanted to lift the vellum above the card base. I doubled up some double-sided foam tape, using thin strips. In hindsight, I would’ve been happier with just one thickness of the foam tape.
By applying the Distress Inks to the card base the colour has been intensified, and the dry embossing stands out better. I’m quite pleased with the result of this card.
I do wish I hadn’t added the gold dots around the frame though; I thought I needed some to complement the gold dots that I added to the entangled design.
On the whole, I’m much happier with the entangled in blue card.
I’ve just thought that it could be relatively easy to turn that panel into a shaker card by making sure the space beneath the vellum is completely sealed by the foam tape at the edges and then adding some sequins and/or glass beads — something for me to try another time maybe.
Comfort art.
The drawings in both of these panels are an example of me slipping into ‘comfort art’ mode. I tend to draw this way when I’m feeling emotionally vulnerable or fragile. Entangled art like this is familiar to me, like a comfortable pair of old slippers, and it soothes me somewhat.
Entangled art is very much my ‘style’ of art. Digitally, I’m pushing my boundaries with it by not using black outlines or outlines in any colour. When I feel the way I have in the past few weeks, it can be tough for me to settle into art that challenges me even a little bit and digital art has been doing that. That’s why I’ve started many projects and not finished them; I get dissatisfied with what I’m doing and just stop it. That’s a sign that I really am not feeling as balanced as usual.
In the past, I’ve mentioned that redrawing my favourite patterns and motifs in a zibladone ( a mixture of journal and random notes or interesting things) is comforting, soothing to me. I have only just noticed that drawing in this way is also so.
The challenging thing in these cards is the die-cutting and the use of various adhesives. And scissors. Scissors always cause me problems. Although I’m mostly right-handed, I use scissors in my left hand. I use right-handed scissors, and I find that problematic, but left-handed scissors are even worse for me! Craft knives have their own added issues for me.
A little more of a challenge.
Today I received two die sets in the post, both from Lawn Fawn and from Seven Hills Crafts. They’re the foursquare landscape and portrait backdrop die sets.
I want to try to make a pair of dangle design cards with these for tomorrow. So that’s one of my tasks for this afternoon.
So, Angela, how are you feeling today?
I’m OK. I’m tired; I drove for over four hours yesterday, and when I got home, I was not only exhausted but cold as well. I didn’t sleep all that well as I didn’t warm up until around 6 am and I kept waking up shivering.
I’m experiencing a lot of anxiety and even fear about the current state of the world; I feel tearful about this a lot of the time and not very optimistic.
Other than that, I think my life is settling down into a new kind of ‘normal’ after spending time with my friend and his partner last week. I still have lots of things to sort out that were stirred up from the pandora’s box of trauma within me. But now they’ve been identified they can be processed in EMDR.
Being tired makes me a lot less resilient to all this.
The card measures 4½” x 5½” (approx. 10cm x14 cm). The outside of the frame measures 3″ x 3¾” (approx. 7.75cm x 9.5cm).
The vellum panel.
I started with a piece of vellum die cut to the size of the frame. To add colour to the vellum, I applied Twisted Citron and Pine Needles Distress Inks with a foam ink blending tool to what would be the reverse side of the vellum panel.
This was something new to me and a bit of an experiment to boot. The inks blend very smoothly on vellum, though you do have to be extra careful not to bend the vellum. That leaves a noticeable crease in it that can’t be removed or easily disguised. I managed to bend a corner; however, as I was going to trim the vellum down later, I wasn’t at all concerned.
I was surprised at how quickly the inks dried on the vellum, and I was soon able to work on adding my embossed design.
To do this, I used some ball ended embossing tools on the reverse side of the vellum. I drew an entangled art design with them as I would when using a pen on paper.
Once I’d drawn my design, I added some shading using a Pergamano shading tool as well as some dots in the upper part of the image.
Dry embossing on vellum causes the vellum to curl somewhat. So, I passed the piece through a laminator. That corner that I’d creased while ink blending got firmly creased during this process. However, I knew I’d be able to hide it with the frame I’d planned to make.
At this point, I added some gold dots to the ‘sky’ part of the design. To do this, I used a Uniball Signo gold glitter gel pen. I can’t resist adding sparkle when I can.
My last step was to trim the vellum to ¼” (7mm) smaller than the frame.
Making the frame.
To make the frame, I used some stitch edge rectangle dies from Gemini by Crafter’s Companion along with a Sizzix Big Shot machine along with some white card. I cut three frames out, doing my best to centre the inner die to the outer die.
I used some Tombow Mono Liquid Glue to stack the three frames. It was then I noticed I’d not centred the inner die precisely the same on each frame. I can see where they don’t quite perfectly match up.
I decided to use them and learn from the process. I’ve never made a frame like this before, and this card really was, in many ways, an experiment.
Assembling the card.
The next task was to attach the vellum to the frame. I carefully applied a very thin layer of the Tombow glue just inside the inner edge of the frame. I carefully added the flattened vellum to it.
The vellum, though, had started to curl again and try as I might to flatten it out, it just wasn’t going to play ball. In hindsight, it may have been better if I’d trimmed it and run it through the laminator just before attaching it to the frame. Then, to keep the vellum flat on my worktable and apply the frame to the vellum.
The last step was to use glue to attach the frame to the card base.
Thoughts on the card.
Even though I’ve bungled a couple of things, I’m quite pleased with how the card has turned out.
Flattening the vellum through the laminator has decreased the intensity of the white embossed lines. However, I didn’t pass it through once, but a few times to see if I could get the corner to stay down. When the vellum got stuck in the laminator, it took me a while to dig out a pair of tweezers to pull it through. That introduced a bigger curl in the paper than I had to start with! I decided then that the only way to flatten the vellum this way was to use a folded piece of paper to act as a carrier for it.
It was a good idea in principle. In practice, I made mistakes and will learn for the future.
Die-cutting and stacking multiple frames. How to get the inner die centred the same as the others? I don’t know. Maybe I should try washi or craft tape the dies together. I will work it out as I like the look of the frame!
I do like the look of the embossing on the coloured vellum. The white lines are quite soft, though less prominent than I wanted them to be as I reduced them by trying too often to flatten the vellum through the laminator. It’s a rather ethereal looking design, and I like that. Sometimes I find my usual black line-art too stark against colour.
The white background of the card doesn’t help the white to stand out. Maybe I’ll try to add colour to the card base and then apply the coloured vellum over it. That’s an experiment for another day, perhaps. Or maybe soon when my mind is still on it. I think I have time before I need to head off out this afternoon.
So, Angela, how are you today?
I’m feeling tired and a bit spaced out, yet contented.
Therapy yesterday was emotional and distressing. No EMDR was done as I was too emotional for it, and I needed to talk about somethings that I’ve touched upon in recent blog posts.
My weighted blanket arrived yesterday, and it is rather lovely. I don’t know about making you feel you’re being hugged; I’ve only laid down under it so far. However, it feels so lovely that I just wanted to stay there this morning. I will try wrapping it around my shoulders and so on to see how it makes me feel that way.
I mention this as I slept in the evening under it, and through the night. Although I still feel tired, I know I had a good sleep. I may get in another sleep before I need to head out later today, depending on how lost in art I get. I do have a relatively long drive (around 2 hours) to where I need to be, and another 2 hours home, so a good sleep is perhaps in order.
Despite some good sleep, I’m still quite tired. The emotional rollercoaster of the past two weeks or so is taking it’s toll on me, even though I’m making sure I’m practising self-care and self-soothing.
Doing a short art project this morning – the greetings card – is a self-soothing activity. The style of art I created – my entangled art – is familiar enough to me that it is comforting to do. It’s comfort art, which is healthier for me than comfort eating.
Talking of eating. The emotional upsets of the past few days have taken their toll on my digestive system too. I had a badly upset stomach yesterday, and I’m still feeling quite tender in my abdomen today.
This is not an uncommon side-effect of either therapy or emotional rollercoasters for me. As I feel emotions so much in my abdomen, particularly fear and anxiety, then it’s no surprise I end up with sudden trips to the loo!
As I settle down, so my digestive system does, and things return to normal, eventually.
I’ve said this before, and no doubt I’ll say it again, this is part of the healing journey. Events sometimes seem to conspire to shake up the next layer of trauma from the past so it can be processed and I healed.
A few days or a few weeks of painful emotional turmoil is a small price to pay for the eventual years and years (I hope) of a life untroubled by and not held back by my past. A future where I can form those healthy relationships of all kinds with others that I yearn for, a yearning that has recently been reawakened, along with its attendant traumas.
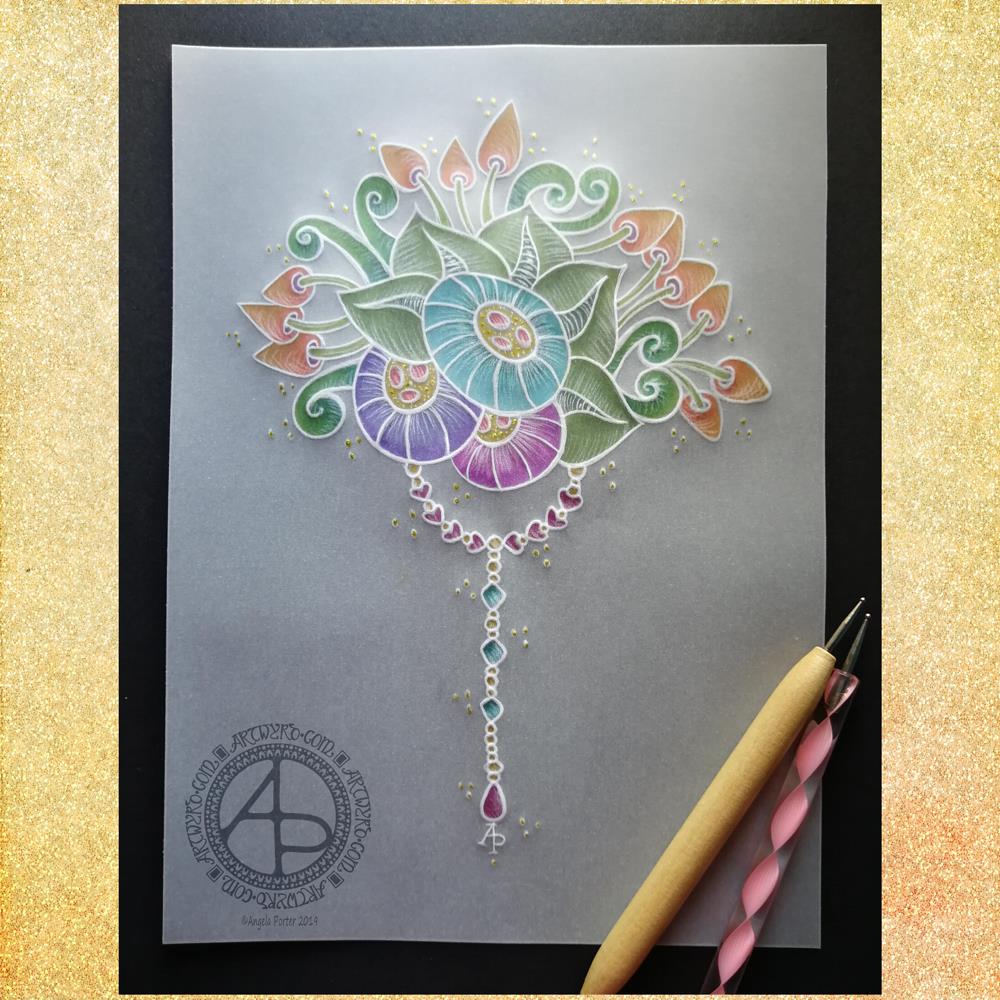
It is the Summer Solstice here in the Northern Hemisphere, the longest day of the year and from here on in the days will slowly get shorter. Still, it’s lovely to have daylight well into the evening with the sky still being fairly light at 10pm or so.
Yesterday evening I had a bit of an idea to try creating a dangle design on parchment, and this is the result. I needed a bit of a break from digital art after the hours and hours spent on my most recent mandala.
Parchment craft, or Pergamano, is an old craft and a lot of the work done, while beautiful, is really not my style. So I thought I’d try my style of art with it.
I used some ball tools to emboss the parchment with my design and then to add some shading. I drew the design directly onto the parchment with the embossing tools.
I started with the stylised flowers and worked out from there. Once I was happy with my design, I added a simple dangle consisting of round, heart-shaped and diamond shaped beads with a tear-drop bead to add some weight to the dangle.
I then added colour with some Kuretake Zig Writer pens on the reverse of the design. I chose colours that remind me of summer – the mature greens of summer foliage along with the bright colours of tropical flowers. I thought these would work well for the Solstice. Of course the hearts needed to be pink and I added some teal-blue to the small diamond beads for a bit of variety.
On top of the dots around the design I added tiny dots of gold glittery loveliness using a Uniball Signo glitter gel pen. I also added some tiny dots in the centres of the stylised flowers.
To give an idea of the size of this design, the black paper behind the parchment is A4 (approx US letter) in size.
Adhering the parchment to the black paper was a problem as glue shows through, so I had to use some tiny dots where the white lines were thick enough to disguise the glue.
I really think that the white lines of the parchment create something that is equally as lovely and maybe a bit more delicate than my usual black line art.
The uses of this design are many – greeting cards, note cards, framed artwork or used in Bullet Journals, journals, planners, scrapbooks, and more. In fact, I may replicate the design for my July cover spread in my BuJo.
If you’d like to learn more about drawing your own dangle designs, then my book “A Dangle A Day” is, perhaps, a good place to start.
So, Angela, how are you feeling today?
I’m feeling quite content today. Tired still, but content.
It seems the anti-stigma talk for Time to Change Wales and the anxiety I had around doing it on Wednesday has taken it’s toll on me just a bit. I do know, however, that I will recover in the fullness of time for sure.
This is part of the emotional/mental weather that is part of life. Beneath this weather is a calmer, more content Angela. I find this version of me from time to time; indeed I’m content in myself on many more days than I am discontented. Even with the bout of anxiety on Wednesday there was still a sense of being content.
It’s a strange thing to feel both at the same time. A bit like feeling the firm ground beneath my feet as a wild wind is buffeting me and trying to blow me down. I can feel that firm footing even when my emotions are a bit on the wild and windy side.
That’s progress on my journey to recover from CPTSD. Even more progress that I can recognise and describe this feeling.
This realisation makes me smile.
It’s progress, but it’s not where I want to be. I want to be able to go out and about without being scared of my own shadow. To be able to travel to unfamiliar places and actually get out of my car when I don’t have an appointment of some kind. To be able to go into an unfamiliar cafe or eatery when I’m by myself when I’m hungry and thirsty. To not go into full flight mode when something small has spooked me. To not be startled by loud noises. I want to be able to reach out to people without fear of rejection or to allow people into my home. To have all kinds of relationships with healthy boundaries where my needs and boundaries are respected by myself. To be able to go shopping without being overwhelmed by the choices available so I end up leaving without getting anything that’s needed.
These are but a few of ways that CPTSD affects my life and that I’d like to change through the healing journey I’m undertaking with the help of EMDR and therapy.
I’ve never been anything other than this permanently scared, extremely self-conscious person. Different events and places result in different levels of fear/anxiety in me. Even sat here, at my familiar desk, I feel anxious about writing about it.
The progress is that I recognise it now. I have identified it. Although it’s still there, it’s slowly being dis-empowered. Slowly means it’s being done properly and that I have time for the new level of anxiety or the increased self-awareness has time to become familiar to me before the next step forward is made. Familiar means it’s the more healed me. Healing bit by bit.
Here’s two dangle designs for dangle day Friday. Simple designs, perfect for getting into the weekend vibe.
These are both experiments where I’ve worked on vellum/parchment, the kind that is used for Pergamano.
The one on the left – the monogram A – is nowhere near as garish in colour in real-life; I really don’t know what the scanner has done to the colours. I drew the design with a metallic gold Sakura Gellyroll pen. I then used Tombow Dual brush pens to colour the design on the reverse. I used shades of yellow, orange, red and magenta, but the scanner seems to have removed much of the red. I also managed to smudge the colours too. I don’t think I’ll be using Tombows on Vellum again.
I do like the gold linework and I think I’ll draw this design out again and colour on the reverse with coloured pencils, like in the dangle design on the right.
You may recognise the design on the right as last weeks dangle design. I traced that design onto vellum using a white Uniball Signo pen. I altered some of the details and the style of lettering.
Next, I did a little bit of ‘whitework’ on the reverse. This gave the highlights on the design that help to give the illusion of dimension as well as some texture. I let the design rest under a heavy book for an hour or so.
Finally, I used my Chameleon coloured pencils to colour the design in, again doing this on the reverse.
I like the colours on this one. The vellum mutes the colours somewhat, but it also softens any imperfections in the colouring.
I’m not sure about the white lines though. I need to try this one with some coloured paper underneath to help the lines stand out a bit more. I’ll post an image of it if it works.
I’d like to draw this design in gold and see how that looks. I may try black too. As well as using coloured pencils, I want to try using Copic or Chameleon markers to colour the designs in, to see how they work on vellum.
These certainly were experiments, which I’ve learned from. Not only that, I’ve got some ideas to try out the next time I use vellum. I’m trusting I’ll find the combination of line colour and colouring medium that works for me and my style of working.
What would I do with these designs? Well, they would both work really well as spreads in Bujos, planners, journals and scrapbooks. I also think the monogram would make a lovely bookmark. They’d both make nice greetings cards or notecards. I’m sure there’s lots of other things they could be used for, such as framed pictures.
If you have any suggestions for how they could be used, leave a comment.