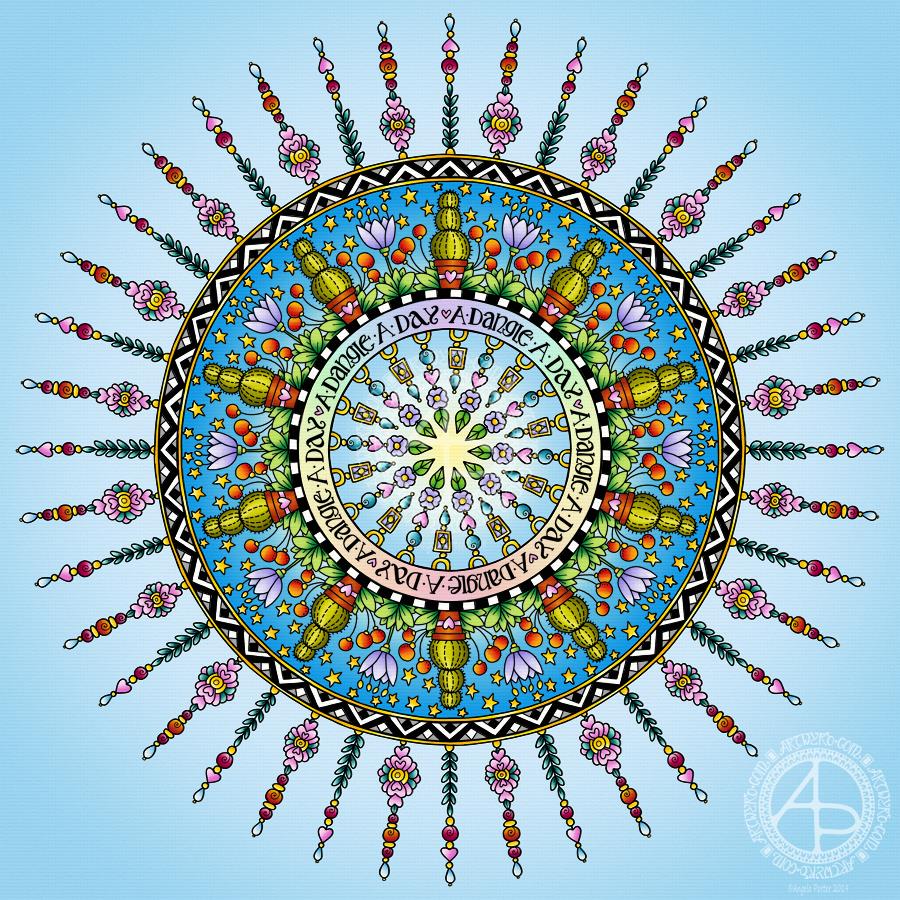
Today has been a funny kind of day. I have a stinking cold and I had an appointment late morning. When I came home this afternoon, I decided I’d do another mandala made up of dangle designs and design elements from my book ‘A Dangle A Day’.
I just let the design flow from the tip of my Microsoft Surface Pen and onto the virtual paper that is my Microsoft Surface Studio screen. As always, Autodesk Sketchbook Pro is the app that lets me draw and colour naturally on the Surface Studio screen.
I incorporated some of my favourite design elements – hearts, stars, sun, moon, flowers, leaves – into the mandala. A big mug of tea and a nicely sweet cake could be most welcome, though I’m not entirely sure the cold would let me enjoy them.
I also included some of those graphic black and white squares that I like so much, as well as a rainbow pattern of little arches. A morning sky and a night sky as backgrounds to the rings in the mandala completes this rather cutely whimsical mandala design.
Although I don’t show how to create dangle-dalas in the book, they are easy enough to do using dangles and design elements from the book.
It goes without saying that I’m all excited about my book being published tomorrow. I’m really hoping some of you will share your dangle designs with me – I really am curious and interested in how you use dangle designs!
Dangles can be turned into mandalas! And ‘dangle-dalas’ satisfy my love of symmetry in an unusual way.
In this one, I have two rings to which dangles are attached. In the centre ring, they point towards the centre of the mandala. On the outer ring, they point out into space.
Then, there’s two central rings. One, I coloured in a pastel rainbow and added ‘A Dangle A Day’ in my weird take on hand-lettered uncials. The lettering isn’t perfect, but then neither am I, and neither were celtic/anglo-saxon/medieval manuscripts.
Ok, the manuscripts are more perfect than my hand lettering, but it’ll do. It’s perfectly imperfect. That is an idea I’m becoming to embrace more and more easily as time goes on, and an idea that I encourage you to adopt in my book ‘A Dangle A Day’.
I used rather graphic black and white geometric designs to separate the three main rings of the design. This contrasts nicely with the brightly colourful design elements.
I felt the need to draw cacti, flowers and some weird seeds today, so that’s what I did. Of course it goes without saying that I’d have to include stars and hearts in my design! There’s some beads in there too, particularly those teardrop shaped ones that remind me so much of medieval jewellery.
Mind you, medieval in character this design is not. It is rather cute and whimsical, which is one of my signature styles – the other is intricacy.
For this design, I hand drew and coloured it digitally using a Microsoft Surface Pen on the screen of my Microsoft Surface Studio. As always, my chosen art software was Autodesk Sketchbook Pro.
Yes, I really do draw on my Surface Studio with the Surface Pen as if I’m drawing with, say, a fountain pen on paper. Colouring I often do as if I’m colouring with traditional media, though sometimes I do use gradient fills. It just depends on the feel I want in the final artwork.
Being able to work in layers means I can do things that would be very difficult or time-consuming working traditionally. It also means that I can play with colour combinations – I love colour, but I don’t always make good choices of colour palettes, see yesterday’s Q monograms for evidence of that!
Of course, there’s so much more to digital art than this, and I’ve not discovered everything yet. But over time my experience is that I discover, workout or learn how to do what I need to do at that time when I’m ready to do that.
Following on from yesterday’s blog post (One dangle design, four colourways) I thought I’d do another monogram dangle design, but this time adding some embellishments.
The design for the Q monogram comes from my book ‘A Dangle A Day’ (published on 15 Jan 2019). I printed the design out on heavyweight printer paper and used a combination of Chameleon markers, Copic Markers and Chameleon pencils to colour the designs. The original drawing was hand drawn using a Microsoft Surface Pen on a Microsoft Surface Studio using Autodesk Sketchbook Pro.
Once I’d finished the colouring, I then added some embellishments. I’m not a good photographer and sparkly and shiny elements are not easy to photograph, and even worse to scan!
Here’s the details of the embellishments I added:
Aqua coloured Nuvo Glitter drops can be seen dotted around and within the design. These really sparkle and catch the light; they also dry raised, like a sparkly water drop. I also used a Wink of Stella brush pen to add subtle sparkle to the hearts and flower. Then, I realised that the Q was lost in the blue background which was similar in tonal value to the letter. So, I used an extra fine fountain pen to add a pattern made of various sizes of tiny circles to the background.
I just used gold Nuvo drops to embellish the design as well as Wink of Stella to add some subtle shimmer to the hearts and flower.
I used a Spectrum Noir clear sparkle pen to add shimmer and shine to the letter and the hearts. Dots of silver Nuvo glitter drops were added around the design. I also used a gold glitter Uniball Signo pen to add dots to the letter and the centre of the flower. Finally, I used an extra fine fountain pen with black ink to add the patterns in the frame. This helps the letter to stand out in the design. I also used Sakura Stardust Gelly Roll pens to colour in the arrow feathers. These pens allow the underlying colour to show through in a subtle way.
Orange-gold Nuvo glitter drops were added around the design. The clear Spectrum Noir sparkle pen was used to add shimmer and shine to the letter and the dark blue ‘bars’ in the frames around the Q. Finally, I used the extra fine fountain pen with black ink to add patterns to the bars and the letter as well as a solid drop shadow to the left and bottom of the design elements to help them stand out.
These designs could be used for note cards or greetings cards, bookmarks and more. However, they’d make a beautiful ‘drop capital’ at the start of a quote or message.
Of course, it would be easy to substitute the Q for another letter or numeral, or even a cute doodle drawing. Instead of a drawing, you could affix an object such as a dried flower, a metal charm, a dimensional sticker, an inchie, or anything else you can think of. You could even put a small photograph in the frame instead of the letter, and this would make a unique, charming card or feature on a scrapbook, journal or bujo page.
Your options are only limited by your imagination and creativity!
What a bright, sunshiny morning it is here in South Wales in the UK. The first sunshine of the new calendar!
I’ve been up for around 3 hours and have had a fairly artsy time.
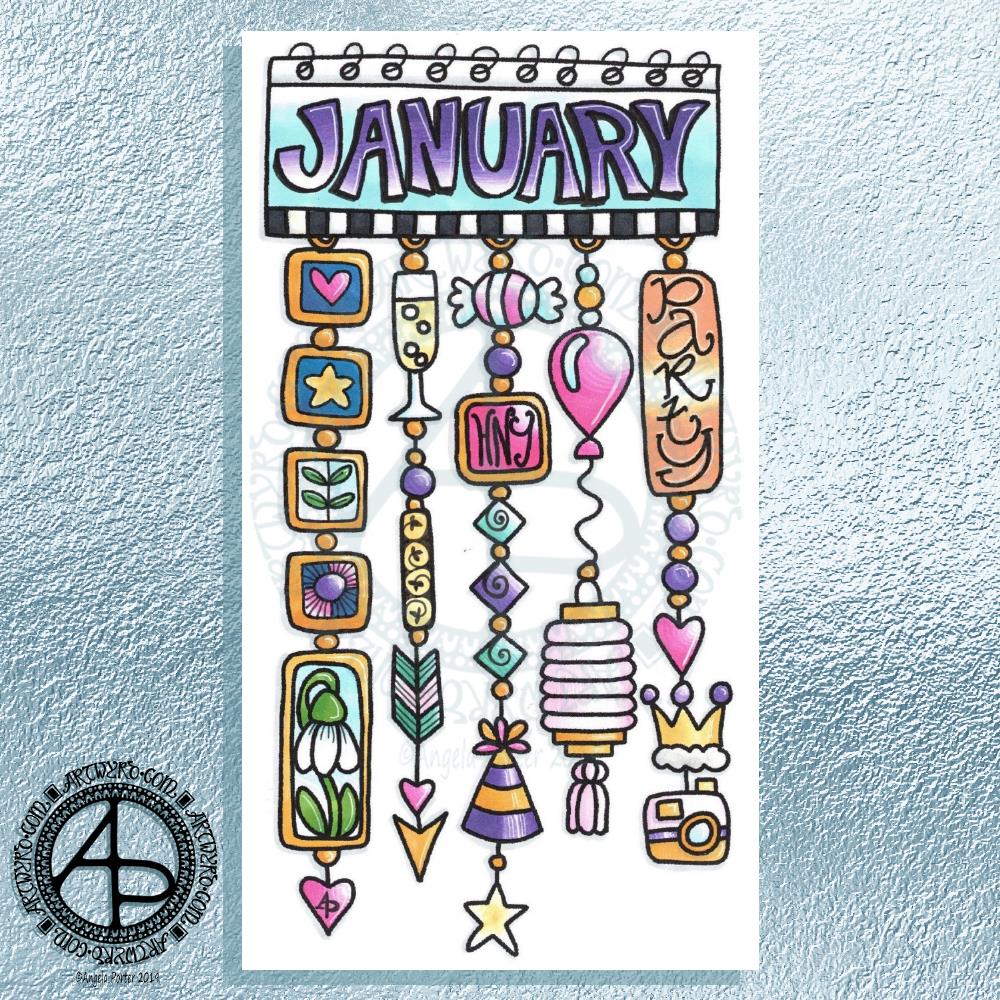
My first job was to print out the lineart for this dangle design, which is one of many in my book ‘A Dangle A Day’ which is due for release on 8 January 2019 – just a week away!
In the book, I take you through how to draw this design, one step at a time. Not only this design, but well over 100 more – designs for all seasons and many, many celebrations and occasions.
This design I drew in Autodesk Sketchbook Pro using a Microsoft Surface Pen and Microsoft Surface Book. For the book, I coloured it digitally. Today, I printed out my black and white lineart and then coloured it using Chameleon Color Tones and Color Tops marker pens. I also added some details to some elements of the design using a 08 Uniball Unipin pen and a white Sakura Gelly Roll Pen.
Yesterday, I said I need to to spelunking through my stash of mixed media and cardmaking supplies to find forgotten supplies I could use to embellish my designs.
This dangle design would make a lovely monthly cover page for a BuJo (bullet journal), planner, diary or journal. It would also make a pretty greetings card or notecard to drop a line to a friend wishing them a wonderful January. Change the words and colours to suit the occasion or recipient! It would also be a lovely, whimsical, cute design for a winter party invitation.
I realised then that my old watermark wouldn’t do for this year. So I hand lettered a new one. I made my symbol, the one I hide away in my artwork, part of the design, along with a little intricate but simple geometric pattern around it. A little touch of the uncials for my blog address, along with a typed copyright statement and it’s done and saved! I may end up changing it a little, or having variations on the theme, as time goes on. But I’m fairly happy with it.
So, I’ve already had a productive morning! It may be a Bank Holiday in the UK, but I really do need to focus on those templates that need colouring for Entangled Forests…and I may venture forth into the peopley world later on today, maybe.
It’s Friday so it’s #dangleday. Today, I wanted to share a Christmas Dangle with you from my book ‘A Dangle A Day’. In the book I show how this design was drawn, step by step.
When I created this design, I first drew it in pencil on dot grid paper. The next step for me was to scan it in to the computer and then re-draw it step-by-step, saving each step as I went. For the book, the final step was to colour the design and then write the instructions to go with the images. My tools for this were a Microsoft Surface Book, a Microsoft Surface Pen and Autodesk Sketchbook Pro.
I wanted to include as many Christmas-themed charms to create the dangles as I could and still keep the design balanced. I also kept the length of the dangles uneven. The waviness in the ends of the dangles echoes the waviness of the fairy lights above the hand lettered word ‘Christmas’.
What I did this morning was to print the black and white line art design on an A4 sheet of paper. Then I used Chameleon Duo Tones and Color Tops markers to colour it in.
These pens make it easy to create gradations of colour, such as on the hand lettering. These gradations add ‘dimension’ to the charms and dangles. I keep the darker shades to the left and bottom of the designs so that there’s a consistency across the whole image. I also used a pale grey marker to add drop shadows to the left and bottom of the design elements; again this helps to add dimension to the design.
Finally, I added some highlights with a white Sakura Gelly Roll pen. I also added some sparkles around the fairy lights and individual stars with a gold glitter Uniball Signo gel pen. After all, it wouldn’t be Christmas without some sparkle!
Used individually with a monogram or Christmassy image the dangles would make lovely book marks. Printed at A5 in size, the design would make a fabulous BuJo page for the big day itself. It would also make a lovely design for greetings cards or note cards.
Of course, it would be easy to change the word at the top to, perhaps, Winter or Yule and use fewer dangles to suit the length of the word. Personally, I like to use an odd number of dangles wherever possible – it gives a more balanced design.
A knock at the door, a Fed-Ex delivery driver asking me for a signature before handing over a parcel. I saw it was from Lydia at Quarto so knew it would be a copy of ‘A Dangle A Day’. So excited to open the package and see the book in a solid, tangible form.
I’ve seen the pdf versions of the book as it was put together before going to print. But, it’s never, ever the same as having that book in my hands.
Even more so today as this is my first book with words and art done by myself. I trust it won’t be the last.
About the book
I had a lot of fun creating this book. I’m so excited about helping others to create their own dangle designs and to gain confidence that they, too, can create lovely designs for use in all kinds of ways – BuJo pages and spreads, greetings cards, note cards, framed pictures, scrapbooks, planners, journals, bookmarks, place cards, and more.
I’ve done my best to show you how to create monograms and dangle designs in easy steps both visually and with some supporting words.
Suggestions about how to approach hand lettering is scattered throughout the step by step instructions for the dangle designs.
Examples of dangle designs in use in bullet journals and more are included – with all their imperfections. Remember, work created by each of us will be perfectly imperfect. It’s those imperfections that make it uniquely ‘you’.
There’s lots and lots of examples of designs and dangles and charms that you can use as they are or as inspiration for other designs. There are designs for all seasons and many, many different events throughout the year.
I’ve included suggestions for color palettes, media to use.
A short primer for bullet journals is included; I’m no expert on bullet journaling but I do make use of one and find it very useful not just in organising my tasks for the day but in recording ideas, reflections, memories and more.
This has put a big smile on my face this morning, and that smile will continue for a long while. I never thought I’d write and illustrate an art tutorial book. I’d thought I’d like to, but didn’t have the confidence to think it would be so.
Why I chose to use digital tools
I made great use of my Microsoft Surface Book and Microsoft Surface Studio along with a Microsoft Surface Pen and Autodesk Sketchbook Pro to draw many of the designs. Working digitally made editing designs, breaking the design process down into simple steps so easy.
I used to think, as many do, that digital art is simpler, easier than traditional forms of art.
It’s not.
The skill set required is different. I wanted my digital drawing and coloring to look like I’d done it with traditional media.
Digital drawing is no easier than drawing on paper.
What is easier is correcting mistakes, smudges and removing pencil lines. It removes the frustration I experience in scanning images in and spending a lot of time cleaning the image up for the publishers. Scanning can be a frustration for me too, which would’ve been worse if I’d had to scan in step after step after step. And having to re-draw if I’d missed a step out, or re-scan would’ve driven me nuts.
What I didn’t want was artwork that looked too perfect, too inhuman. I wanted digital drawings that looked like I’d drawn them on paper. So, I worked hard to set up pen ‘brushes’ that would mimic how my favoured drawing pens would look when drawn on paper.
Also, I rarely used any line smoothing tools for any of the work so it has that slightly ‘wobbly’ line appearance that my pen and ink linework has. I also kept the design elements, called charms, imperfect just as they would be if I’d drawn them with pen on paper.
In fact, each and every design started out as either a pen or pen drawing on paper which was scanned in so I could re-create it, step by step, digitally, saving a file for each step to the computer.
There were plenty of revisions/edits required and colour changes. Again, working digitally make this a less onerous task than if I’d had to do everything with pen and ink on paper, scanning in each step all the while worrying I hadn’t missed a step as I got engrossed in the process of drawing.
Working digitally did not make the drawing any easier or simpler, what it did was allow me a different way to draw the steps.
Coloring the designs digitally was no quicker than with traditional media, in fact it took me longer! I learned a lot about this process by doing this book, and I think it was the book that allowed me to become more comfortable with digital art and how to make it look like I’d drawn with pen on paper, in my own style.
Of course, I can print out the line art and colour it with any media I choose. I also can redraw any using traditional media. And of course, adjusting the size is so easy.
It’s Friday, so that means it’s #dangleday! As it’s the last day of November it seems appropriate that I design a dangle design that would look fantastic as the monthly title page for a BuJO, journal, planner or just a fun design to color and frame or, printed out smaller, used on a greetings card.
As usual these days, I sketched the design out on dot grid paper and then scanned it in. I used Autodesk Sketchbook Pro and a technical drawing pen ‘brush’ to ink the design, as well as make adjustments to the design.
The final steps were to add a background colour and watermark it for sharing on the internet.
Naturally, I used my Microsoft Surface Pen along with my Microsoft Surface Studio to do the digital drawing. I think I’m going to print this design out so it will fit in my BuJo and colour it with traditional media.
I’m going to make this available as a coloring template in the Angela Porter’s Coloring Book Fans facebook group. So, if you’d like to download and print the template, pop along to the group and join in!
This is quite a complex dangle design to look at, but it’s not that complex to create. In my book ‘A Dangle A Day’, released on 8 January 2019, I take you step by step through the process with loads and loads of examples of monograms and dangle designs for all seasons and all occasions, along with ideas of how to use them. There’s also a fair number of tips and encouraging words within the book.
If you do download, print and colour this design, I’d love to see how you’ve coloured and used it! You can find me on twitter, Instagram and facebook.
Day 28 of the Inktober challenge and I’ve done another kitty dangle design, with a rather surprised looking kitty in a gift box with a party hat on.
How cute would this be as a greetings card for the human of a kitty?
I sketched the design in pencil on dot grid paper then scanned it into my Surface Studio. I then drew the design using a pen brush and the symmetry tool in Autodesk Sketchbook Pro. After drawing, I added colour and texture as well as a bit of a drop shadow.
This image makes me smile just a bit. It was a nice thing to do this morning. I’m tired today.
Yesterday, I was absolutely shattered after the Hallowe’en Coffee Morning and being in charge of the craft corner. The little monsters (read little darlings dressed up in their Hallowe’en finery) kept me nicely busy and they seemed to have a lot of fun making pumpkins on glow sticks and paper pumpkins and other things. I had a lot of fun too.
At the end of the morning, it was lovely to have some help to clear up; thankfully my plans on using glue dots and double sided sticky tape and paper fasteners and staples rather than glue sticks helped greatly with this. As did the washable marker pens and the like.
I came home and had some lunch and then slept. On waking I had time to have more tea, shower and get ready to pop out in the evening.
As lovely as my couple of hours out were, I was glad to get home. It was really chilly last night here in South Wales. The cold got into me even in my short journeys; I chilled right off in the morning too. So, today my hands and feet are a tad achy and stiff with arthritis.
Using the Microsoft Surface Pen on the Surface Studio certainly helps my finger joints – so little pressure is needed. The pen is a tad weighty, but it’s rather well balanced so I can cope. On days like today I could do with a slightly thicker barrel, so I need to find some grippy things that I could slide on my pen for days like this.
I do want to work on my sketch of the viking kitty that I did for yesterdays’ Inktober prompt. I need a quiet day of self-care today. Not only was yesterday a busy one for me in terms of interacting with people it was also the end of British Summer Time and the clocks went back by an hour some time during the night. This means we got an extra hour of sleep, in theory. In practice I slept the same amount of time! The change in the clocks will cause confusion for a while I think.
I am an introvert, though people seem to assume I’m an extrovert. I learned at a young age that I had to be loud and seemingly outward going like my very loud brothers to have even a chance of being noticed or listened to (that didn’t happen often). I have a fairly extrovert mask I wear when out and about and with people, until I get to know them and then the introvert can relax and come out. I like people, but I also recognise that I need alone time to recharge my batteries. Being with people both lifts me and drains me. So, today is a day for some quiet time, before I have to head out this evening for a couple of hours to be with people again.
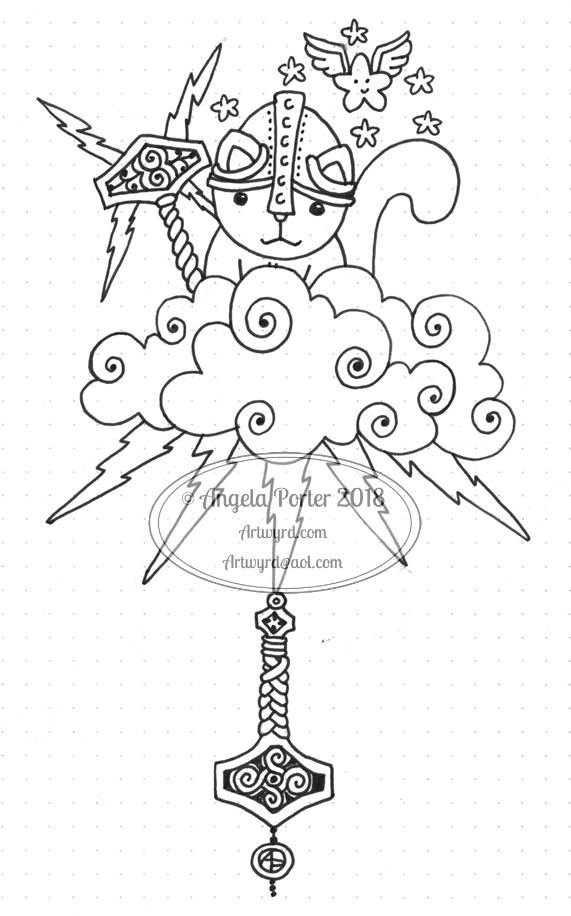
A very quick one today. No finesse, No refining. Just Thor the thunder kittie…
Why very quick? I have a busy day. Soon to head to shower to dash out to run a craft corner at a Hallowe’en Coffee morning. I’m really nervous about it and scared that what I’ve chosen to do in terms of crafts won’t be good enough. I’ve most probably bought way too much in the way of materials and so on..but I hope it will be good enough.
Then it’ll be home for a bit before heading out this evening to do a talk.
I’m also feeling really tired – that’s down to the stress involved in the craft corner. I’ve not done anything like this since I was a teacher and that was over 3 years ago now. As well as worrying about not being good enough, I’m worrying about being overwhelmed, finding it all too noisy, having too many demands made on me by too many kids or adults at the same time.
I want to do this. It’s for a good cause. But I also worry that I may have volunteered too quickly without thinking through things taking into account my introvert nature and the CPTSD.
I suspect this afternoon will involve a long, long nap.
Anyways, I drew a Kitty Thor as it was just what popped into my head when I saw the prompt ‘Thunder’. It’s following on in the theme of whimsical kitties. It’s also a bit of a dangle design with an Angela ‘take’ on the design of Thor’s hammer, with another nestling behind the kitty sparking madly!
I did sketch quickly in pencil and inked in with a Faber-Castell broadpen.
This was a fun one to draw – Faber-Castell Broad pen on paper. Scanned in to the Surface Studio to clean it up and print it out so I could colour it using Chameleon Color Tone and Color Tops marker pens.
I added some highlights with a white Sakura Gelly Roll pen.
I’m a bit later than usual posting the Inktober image today. I had quite a few errands to run today, including a slightly worrying recall to the opticians for photographs or my eyes, even though I only had them done around 4 weeks ago. It wasn’t pictures of my retina and optic nerve the optician wanted – it was images of the front of my eyes due to me having a wobbling blood vessel in one.
I had planned on popping into the opticians as I’d managed to drop one pair of distance glasses on a tarmac floor and had chipped the lenses (which I’d had for less than a week!) and so needed to have replacement lenses. That was the easy part…
They had trouble getting the camera to work to take pictures of the front of my eyes, so I have to have the process done on Saturday when I pick up my glasses with the new lenses in as the optician will have set the camera up. If it still won’t work, she’ll inspect my eyes with a ‘slit test’ I think it was.
I’ve never had such thorough eye tests/examinations before. I’m well impressed! And it’s with Specsavers! I’ve never had an optician comment on my differently pigmented eyes before either – one eye is mostly a light brownish-green with a small wedge of brown, the other is about half brown and the rest the same light brownish-green as t’other eye.
Someone I met a long time ago described me as having ‘mutant eyes’ and asked if he could use them for a character in a sci-fi book he was writing. I didn’t have a problem with that!
Oh, they have no effect on my vision at all. It’s just a different level of pigmentation that has been, as far as I know, always there.
I also found out this time that my optic nerves are tilted a bit more upwards than is usual but it doesn’t affect my vision, just something noted of curiosity.
Perhaps this is why there’s an eyeball or two appearing in my latest drawings!
Anyways, my eyesight functions very well, apart from the need for glasses as I’ve aged. I’m sure the wobbling blood vessel isn’t anything to worry about either.
I’ve also ordered some beaded ‘chains’ to attach to my glasses so they don’t fall off my nose when I’m looking down again!
So, an unexpectedly extended visit to the opticians along with some shopping in the local town put me all out of sync today, but if nothing else I got my Inktober challenge of the day done!