Saturday Entanglements

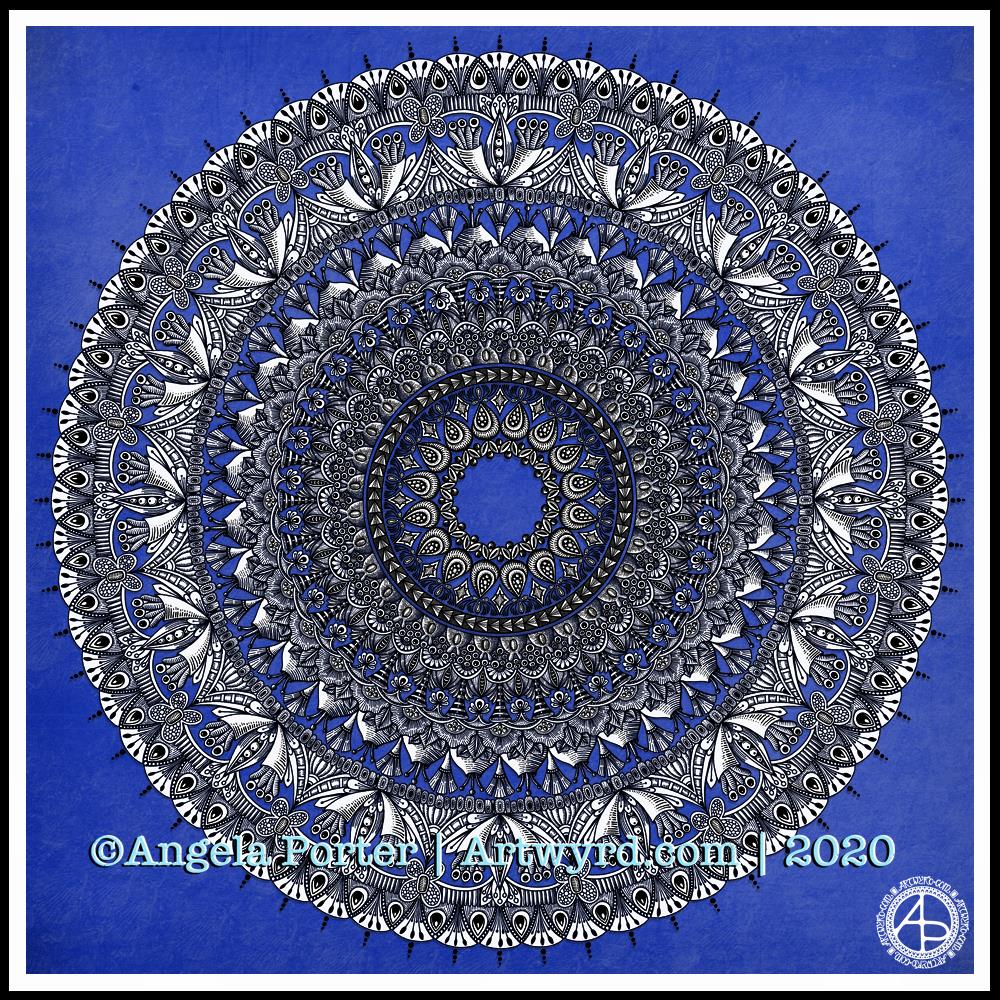
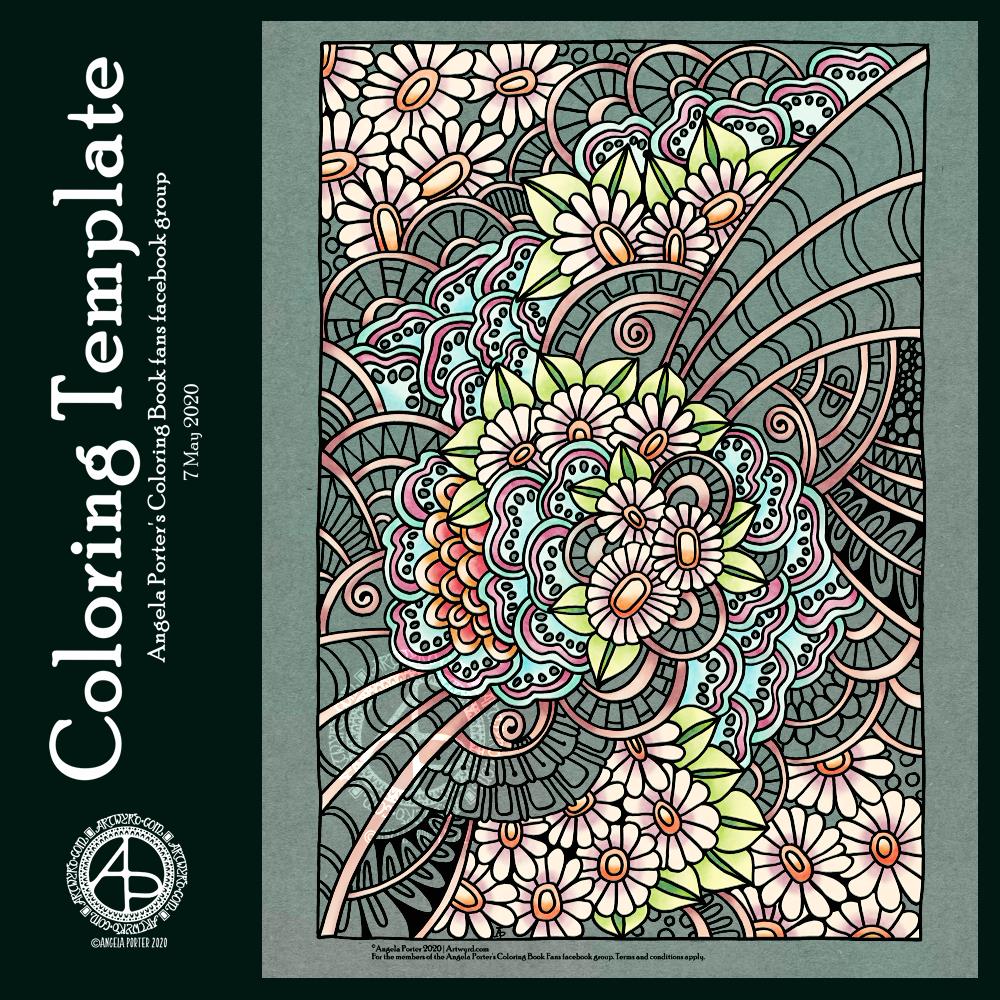
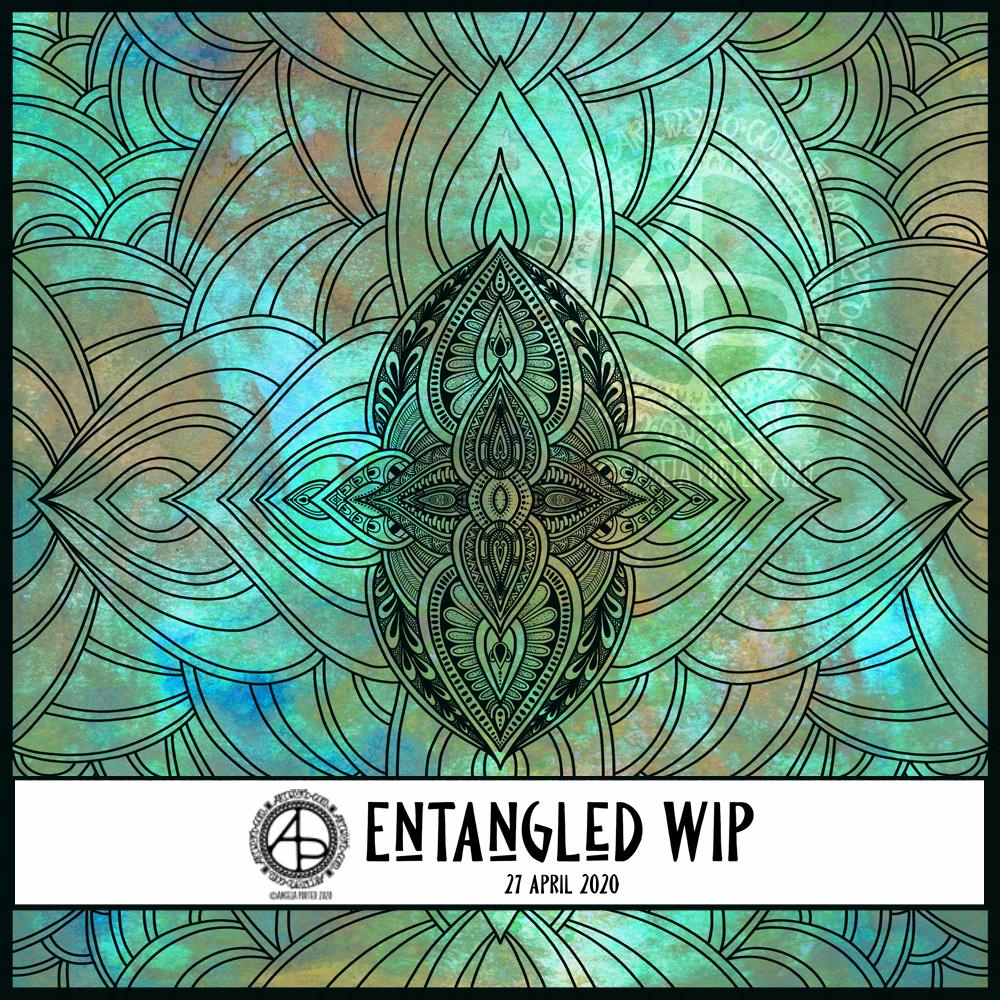
Today’s art is a selection of the small, detailed, intricate and fairly abstract drawings I’ve done over the past day or so, all in varying states of completeness.

Sometimes, just sometimes, I have a need to immerse myself in something that’s kind of familiar. Call it ‘comfort drawing’ if you like. But that’s what this has been; drawing to comfort and self-soothe.

My emotions are out of sorts. I’m dissatisfied with almost everything I do artistically at the moment, so I stepped back in time to do entangled zentangle-style drawings, with a twist here and there. Small projects. Pens and pencils on various paper. If something doesn’t work out, well it’s not great shakes, I just carry on and try to accept it for what it is, and learn a bit more about what works and what doesn’t.

I’m tired today. Not just physically but emotionally. The sun is shining and that is helping my mood somewhat. But I’m still tired.

Past experience tells me this will pass. It’s just emotional weather. I’m aware of the source of it, and I just need time to process, heal and learn from it.

I don’t really sit and think my way through things in the way people describe how they think. With me it’s all abstract and difficult to communicate in words. It happens on a more intuitive, subconscious level. When I’m ready, I’ll write about it, and give form to the abstract and symbolic processes of my inner self.

I’ve never really been able to express my emotions artistically. Sometimes they creep out in terms of colour choice. I do think my choice of more geometric, repetitive patterns in these artworks is an expression of my need to build a new structure in my emotional self.

My EMDR therapist was always saying I was too much in my head, not much in my body. A lot of the work we did was very somatic and a process of learning I did have emotions and recognising what these emotions are. It’s a troublesome realm, but an important one, even if it gets rather messy at times.

Messy. That’s something my art never is. Something my emotions rarely are. Everything so tightly controlled and precise; at least that’s how I seem to the outside world.

My older sister used to call me the ‘ice maiden’ as I never showed much enthusiasm or reactions to anything. I learned early in life that if I showed that I loved something or that it was valuable to me, then others would go out of their way to wreck it. I learned if I showed ambivalence, that things may not be wrecked by others.

The first time I can remember showing awe and wonder was on a trip to the British Museum, with my older sister and youngest brother. We went to see the mummies, but took a wrong turn and ended up at the Sutton Hoo treasures. I couldn’t help expressing the awe and wonder I felt on seeing them in person for the first time.

I feel a sense of awe and wonder often now, some thirty or more years on from that day. That day cracked open the seals on those emotions and I was able to share them with others through my teaching career and beyond. But not with everyone. Some in my life didn’t want me to be excited about anything. So I learned to choose how and when they were shown.

Now, I feel no embarrassment at showing awe and wonder. I’m able to lose myself in the beauty of nature, the grandeur of architecture, the magic of music, and more.

But other emotions are still a bit tricky for me. Messy. Confusing. Troubling.

And when I feel messy, confused and troubled emotionally, I fall back to comfort art. Often entangled style art, like these. And entangled is an apt way to describe emotions and life.

Just as one small drawing comes to a close, it being good enough for now, so will my confused and troubling emotions work their way to a good enough state of resolution, leading to contentment and peace.

Template Thursday

It’s that day again – Template Thursday!

Each Thursday throughout the pandemic I’ve designed a colouring template for the members of the Angela Porter’s Coloring Book Fans facebook group.

This week, the design has one big focal point motif of a zentangle-inspired Christmas Tree. It’s cute and whimsical, and is surrounded by holly, mistletoe, gifts, stars and baubles. Of course there’s some hearts there too.

Although the drawing is quite detailed, it’s split into smaller sections. This is great if you only have a bit of time or feel overwhelmed by the whole image. This way you can do one section at a time.

There’s a couple of reasons I usually only colour part of the template. One is a question of time when I have other things that have to be done. The other is that it shows the difference colour makes to the drawing, how it brings it to life.

I love to see how colourists bring my drawings to life with colour and how unique each person’s approach to colouring is. Every time I see one coloured it brings a smile to my face. I have so many colouring books published, so many templates drawn that I don’t have time to colour them all myself.

But when I see a template I wasn’t happy with all coloured in and how wonderful it looks, it not only makes me smile, but it gives me a little confidence boost that my drawings may be just good enough after all.

Yes, I suffer with imposter syndrome and a lack of self-confidence still.

For the rest of the day I really do need to get on with my Christmas card design for this year and get the moonpig ones sorted out and sent off.

Moth

Finally finished! The moth with mandala and entangled background. A4 in size.

It’s taken quite a few hours work to complete this one, but it’s nice that it is finally done.

Lots and lots of my favourite motifs/patterns used in the entangled background – flowers, seeds, seedpods, leaves, arches, spirals and geometric patterns.

Plenty of line work to add depth and volume to the design.

I like that the white area behind the moth means the moth isn’t lost in the background. There are some areas where the resulting values aren’t sufficiently different, but I can live with that.

No colour (other than my watermark). A very graphic design.

Blue Entangled Mandala

I have been awake since stupid o’clock, so rather than toss and turn for hours I decided to do some art. And another mandala appeared from the tip of my pen.

For this one, I thought I’d make the ‘white space’ areas in the design transparent so that the vibrant blue background could show through.

I’m not sure how well this works; I’m now too tired to think clearly. I do think it has potential for future mandalas, maybe.

Journal Making – 16 May 2020

The Cover

On waking this morning, I wanted to work on the cover of my journal.

Yesterday evening, I managed to get a coat of gesso on to the cover and painted edge closest to the wire binding with gold. In hindsight, that may not have been the best idea.

I knew I wanted to use my silhouette iris drawing on the cover. Irises are my favourite flowers. Also, my aim for my journal is to use my own art as much as possible.

So, I printed out an arrangement of three irises, tore them out and coloured the paper with Distress Inks.

For the background, I used a piece of Claire Fontaine mixed media paper. I coloured it with Distress Inks – Old Paper, Tea Dye, a touch of Iced Spruce and a dusting of Vintage Photo around the edges and here and there on the main sheet.

This I adhered to the cover. I’d cut it narrower than the cover so that I didn’t have to butt it up against the wire binding. That’s why I wanted a gold border there.

Anyway, I decided to put some old book paper behind the irises. I added some ink to the edges of this paper too. I then glued them in place, along with the flowers.

I drew a border around this page with a copper-coloured Sakura Metallic gelly roll pen. Then, I used a gold glitter Uniball Signo pen to fill the background with tiny spirals.

I wanted to add the definition of ‘journal’ to the front cover. So, I did the typography in Affinity Publisher and printed it. After tearing the meaning out, I used Old Paper and Tea Dye Distress Inks to colour the paper, followed by Vintage Photo to ink the edge.

I then glued this to an old book page, tore that out and edged the paper with ink once again.

Before adhering the page to the cover, edged the paper with Ground Espresso Distress Ink as I didn’t think the edge was dark enough. I also coloured the edge of the journal cover with the same ink to hide the white.

An application of Distress Micro-glaze to seal the page and I could stick it to the cover.

I love the subtle sparkle of the spiral pattern on the cover. The micro-glaze picked up some of the fine glitter. It also makes the cover sheet feel very smooth.

I’m not happy with the gold edge to the journal, but I will, no doubt, find a way to make it look much better. Otherwise, I’m quite happy with the cover. I think it needs something else there, but I’ll work out what that is in the fullness of time.

The first three pages.

Page 1 I’ve shown before, and it’s now complete (apart from me adding journaling to the envelopes and other spaces.)

On page 2, I’ve added an experiment I did with Tombow Dual Brush Pens and a blender pen to draw designs on paper. I have some ATC cards coloured in the same blues/purples as the background of this page, so I’ll be finding a way to display them on the page when I’ve finished them.

Page 3 is a tiered series of simple pockets. I made them by tearing the paper of each page and layering them to create the pockets. The inserts are pieces of Claire Fontaine Mixed media paper that have been coloured in the same colours of Distress Inks as the pockets have been. I used Distress Oxide Inks for the pockets.

I’m not really sure what I’m going to do with the third page, yet. It will come to me, I’m sure!

Adobe Spark

I thought that I’d use Adobe Spark to make a short video rather than posting a montage of photos. I uploaded it to my channel on youtube so I could share it via social media more easily.

Adobe Spark is straightforward to use, and it does have a free option, though I pay about £10 per month for it. It makes creating simple content for social media really easy.

How am I feeling

I’m feeling much better today. The headache and light-headed/dizzy/drowsy feelings were with me for the whole day, including upset tummy and digestive system. I had weird pains in my right eye too. I slept a lot during the day, and just took it easy when I was awake. I wanted to crochet in the evening but found it hard to do even something familiar to me.

My digestive system is still uncomfortable and not quite right today, and I’m now beginning to feel rather tired. Like I’ve already done too much today. So, I’m going to be taking it easy for the rest of the day.

Coloring Template – 7 May ’20

Coloring Template © Angela Porter | Artwyrd.com

Yet another week has gone by in lock-down, so it’s time for another coloring template for the members of the Angela Porter’s Coloring Book Fans facebook group.

Flowers always cheer me up, and I thought they’d make a nice motif in the design. I kept to the same kind of flowers. In fact, although this drawing is still quite detailed and complex, there’s far fewer motifs and patterns in it than I’d usually use.

I also like to partly colour the template – it helps to bring it partly to life to show on social media. Today, I’ve chosen a fairly pastel color palette. I think that reflects how I’m feeling today.

I drew the design on quadrille (squared) paper with a 06 Sakura Pigma Sensei pen. This is an unusual choice for me; the nib is broad and a bit more flexible than I’d usually use. The result is a bold design with bold lines.

I scanned the design in and used some digital wizardry to remove the quadrille grid. I also corrected an error and removed some smudges. All this was done in Autodesk Sketchbook Pro, which I continued to use to colour the design in.

So, Angela, how are you doing?

I’m so tired today. I couldn’t sleep past 4:30 am, and after a long while waiting to go to sleep I got up an started doing some arty stuff.

As well as feeling tired, my digestive system is uncomfortable still and I’m feeling a bit icky-sicky too. No headache today, thank goodness.

I am feeling a bit fed up today – fed up of feeling under the weather and tired. Hopefully I’ll have a nap later on today, and that may help my mood a little.

Until then, I’m going to do some arty stuff, most probably in my art journal, or maybe some work for the Mattias Adolphsson Domestika course, “The Art of Sketching: Transform your doodles into art.”

I thought I’d try it out to kick start my imagination and perhaps discover new ways of working, stretching myself somewhat. So far, I’m enjoying it. I work at my own pace.

Sketchbook Page

Sketchbook Page © Angela Porter | Artwyrd.com

I’ve been awake since stupid o’clock, which roughly translates to 3:30am BST. While I was trying to get back to sleep I watched a youtube video about making pockets and tuck-ins for an altered book journal.

I thought that could be something good for my sketchbook-journal. I have worried a little about gluing my little artworks into it, but pockets, tuck-ins, see-through envelopes could be a good way to both show the work and store it in a non-permanent way.

So, with my mind now working and sleep eluding me, I decided to have a go at making my own pockets. You can see the result at the top right, with a journalling card popped in one of them for now.

How I made the pockets

I used some ordinary white card, cut it into what I thought would be good sizes to make a set of stacked pockets for the ATC sized cards I’ve been working on.

I then coloured the cards with Distress Oxide Inks. For one of them, I used a brayer to add ink to a gelli plate. Before pulling a print, I spritzed the gelli plate with water that had some white perfect pearls added to it.

For another panel, I used the brayer to add ink directly to the paper. It did that unevenly. So, I used a ball-tool to carve some texture into the black side of a piece of cut and try foam and used that to add colour. That worked really well! Dabbing the foam added a lovely textured layer of colour. A spritz of water activated the dusty, chalky, soft nature of the Distress Oxides.

I enjoyed the look I achieved with the distressed foam that I coloured the remaining pair of paper panels in the same way.

I then tore the top edge of each panel, for added interest, then used a piece of foam and Rich Mahogany Distress Ink to add grunginess to the edges of each panel.

I wanted to add some embellishments to each panel, so I used a copper sparkle Gelli pen to draw patterns on them.

Finally, I used Tombow Mono adhesive to stick the panels together.

When I put the panels on the page in my sketchbook-journal, I thought a panel behind them. So, I coloured a panel of the same card with Distress Oxide inks and the distressed piece of foam and used the same gelly roll pen to add some sparkly patterns. Then, I adhered the back panel and pockets to my sketchbook.

When I tested some ATC cards in the pockets, I realised I need to work out a way for some more ‘give’ in the pockets as they’re too tightly put together to slip more than one ATC card in them. Also, I placed them just low enough down the page so the ATC card doesn’t stick out of the sides of my sketchbook.

I’m not well known for my fore-planning projects like this, though I do try to learn as I go along.

Inchies and Twinchies

My mind was working in weird ways this morning. As I was making the pockets, my mind strayed to inchies and twinchies. I’ve not made any of these for a long, long time. I thought it could be fun to do so and add them to my sketchbook-journal.

I cut two 1″ wide, and one 2″ wide strips of card. I used the distressed foam to apply Distress Oxide inks to them, spritzing with water to add to the distressed look. Then, after drying with a heat tool, I cut them into squares – 1″ x 1″ inches and 2″ x 2″ twinchies.

I decided to use metallic watercolours from Cosmic Shimmer to add a sparkly, shimmery border to each tile. I used rich gold, pale gold or copper on each tile.

Then, I got to draw on the tiles. Teeny, tiny zentangle-style drawings. That was fun to do!

After adding some dots using a white Sakura Soufflé pen, I adhered the inchies into my sketchbook-journal. I’ve left the twinchies for decoration later.

Journaling cards

I realised that I could stored journalling cards in the pockets. All I needed to do was to colour the back of one of the ATC cards I coloured a few days ago. I also just realised that I could have added a layer of squared, dot grid or lined paper to write on too. That’s an idea for another time, maybe.

After drying the ink, I used a rollerball pen to add what notes I wanted to about this mornings creative sessions.

In fact, I’ve just created another journaling card to jot down ideas and notes to self as a result of reflecting on my pre-dawn arty activities!

Entangled WIP

Entangled WIP 27 April 2020 ©Angela Porter | Artwyrd.com

This morning started early and I played around with metallic paints along with Distress Oxide inks in my sketchbook / art journal. I have some interesting backgrounds as a result.

I also created a background for today’s artwork. I have tweaked the colours a little, digitally. I don’t know what WordPress does to the colours, but they look different in Autodesk Sketchbook Pro. I used Distress Oxide inks and have ended up with a rusted, weathered, kind of distressed/grungy texture.

Of course, I can always alter the background later on, if I wish.

I used the symmetry tool to reflect my drawing. You can see I’ve laid out the bare bones of the design and have started to fill the sections in with texture and pattern. I have a lot more work to do to complete the drawing. Then, I’ll think about shadow and highlight to help to bring the design to life some more. Or perhaps I’ll make it look like a stencilled design on the background, one that has some dimension to it.

Kindness

Kindness © Angela Porter | Artwyrd.com

I’m really not sure the colours work.

The border was a design I drew back in January using Uniball Unipin and/or Sakura Pigma micron pens on dot grid paper. I’ve added colour and texture digitally, as well as the typography.

Poppy Pods WIP

Poppy Pods WIP ©Angela Porter | Artwyrd.com

I’ve had a lovely, soothing, creative Saturday morning drawing, and this is the result so far.

I’m working digitally as I really wanted to give my new Microsoft Surface Slim Pen a workout. I have to say that I love it as it is so much lighter than the original Surface pen. It also has a different shape, which surprisingly sits well between my fingers. The lightness of the pen really does make it a pleasure to hold and use.

I am also in love with the way the nib glides across the screen. That’s one of hte issues I have with the interchangeable nibs that come with the original Surface pen – all but the ‘2H’ one is just too sticky for me to find pleasurable to use. I also don’t like the way the wear down relatively quickly either.

The Slim Pen is as responsive as the original Surface Pen and just as accurate.

All in all, it gives me a drawing experience that is very much akin to drawing on paper with a Sakura Micron, Uniball Unipin or Faber Castell Pitt artist pen. Having said that, the Surface pen does so too, except that it is much heaver than these pens and I prefer a lighter weight pen. Indeed, my arthritic-y joints seem to be happier with the Slim pen.

So, I’m a happy bunny with the purchase.

Unusually, I did a quick sketch to lay out where I wanted the pods and stems. And by quick sketch I mean the basic shapes using a digital brush.

Once I inked in the basic outlines of the poppy seed pods, I deleted the sketch layer and started to add detail with a flexible nib digital brush/pen. I still have a lot to add to this, but I’m quite happy with how it’s progressing.