Friday work in progress

The artwork

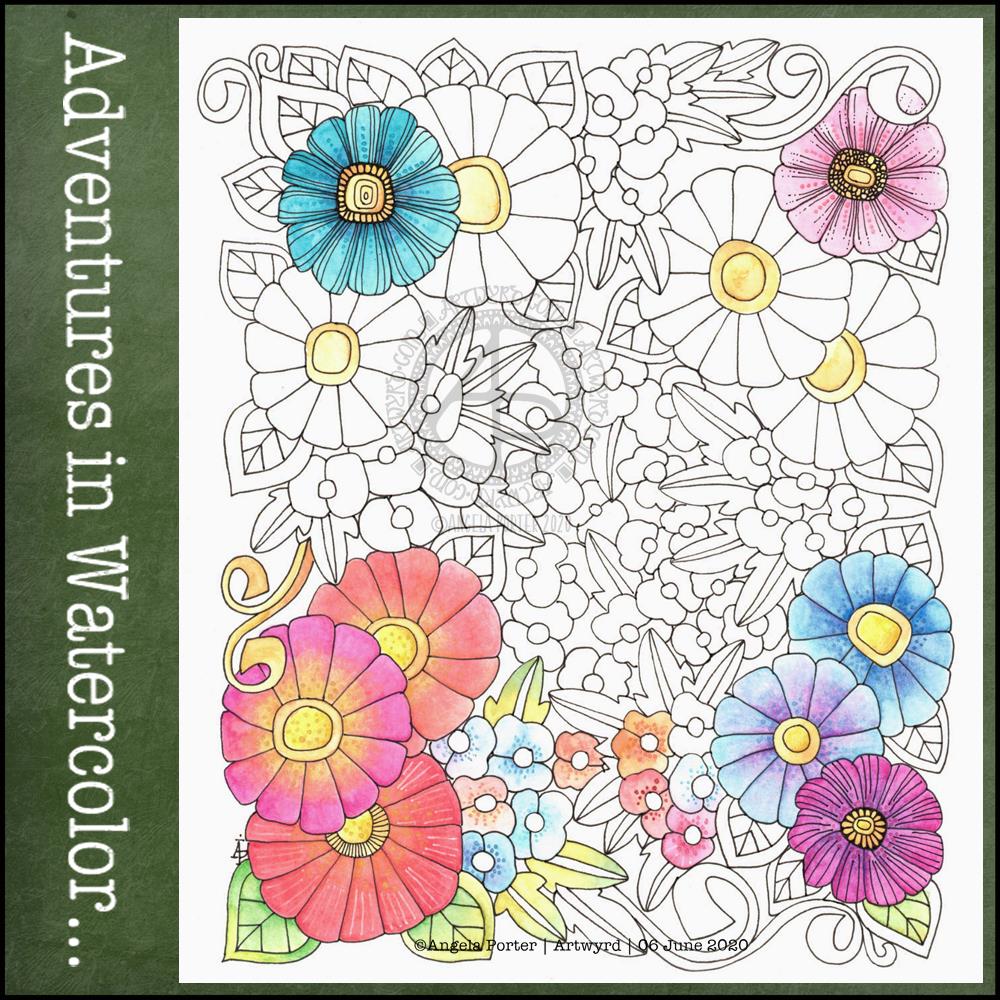
Started yesterday evening, worked on during my hours of mid-night waking, and on waking this morning, this measures 21 cm x 21 cm (approx 8.25″ x 8.25″) The paper is natural coloured Claire Fontaine Paint-On mixed media paper coloured with Aged Mahogany Distress Ink. The design is being drawn with a mix of 03 Unipin and 01 Sakura Micron pens.

I’m using a mixture of Stadedtler Triplus and Chameleon Fineliner pens to add colour to the design, along with a barely damp waterbrush to spread the colour out. Interestingly, some of the colour lines added remain visible, to a greater or lesser extent, depending on how much I work the colour with the waterbrush. Also, I’m finding that I really enjoy adding colour and texture like this.

The finishing bright white highlights are added using a Sakura Gelly Roll pen.

I find the fineliners used in this way give me much greater control over how much the colour spreads in the small areas in my drawing. They also don’t spread as much as, say, Tombow Dual Brush pens or Inktense pencils. That helps to control the spread of colour too.

I rather like the vintage-y look that the palette of browns and olive greens confers on the design, helped along by the background colour and texture of the paper.

Oh, I do intend to leave a ‘hole’ in this first layer of designs. I’m not sure I’ll do inside the space; a quote, more layers of design. For now I’m not sure. But once this first layer is done, I can scan it in and use it in different ways digitally.

There are lots of my favourite motifs appearing in this one, rather organic ones for the most part. What will appear from the tip of my pen in the rest of the design? I don’t know yet! It could be more of the same, or not. All I know is that the intricacy, detail and revisiting old favourite motifs is making my arty crafty heart smile.

Cognitive dissonance

“The state of having inconsistent thoughts, beliefs, or attitudes, especially as relating to behavioural decisions and attitude change.”

Finally, the penny dropped as to why I’m feeling so out of sorts. Oddly, it was while I was listening to a documentary about the cult NXIVM as I was drawing during the stupid o’clock hours of drawing. Don’t worry, I’m not a member of a cult! However cognitive dissonance was mentioned and that was the ‘ta-da!’ moment for me.

Cognitive dissonance causes emotional distress related to holding contradictory beliefs or values. I’ve experienced this before during breakthrough moments in therapy where I’ve had to accept that I was a victim of trauma, that I really do have CPTSD and I’m not (as my mother would tell me) making it up, for example.

I’m poised on a knife edge, wanting to make a decision to leave something, but feeling guilty about thinking that way. I need to find a way to find some clarity to help me make that decision, and it has to do with my core values and beliefs.

Recognising this doesn’t make me feel any better, but it helps me understand what is going on, and that understanding will help me work my way through it! Making a decision won’t make it any easier for me to act upon it as there’ll be a lot of guilt and the old reactive feeling of believing I’m letting other people down.

However, I can’t put other people ahead of my own mental and emotional well-being. It’s never been easy for me to say ‘no’ to people, to leave organisations or people who are contributing to emotional and mental distress in myself. But I have done so occasionally, more so in the last year or two. And I will do so this time if it’s what I need to do to find that sense of balance, harmony, peace in myself once again.

Small, entangled drawings.

I really needed some structure to my artwork yesterday and early this morning. This kind of work has really hit the mark. The smaller size also meant I wasn’t feeling overwhelmed by the task. The symmetrical nature of the patterns/designs really soothed me. All these things let me find that sense of peace and contentment that I needed from art.

Making square ’tiles’.

I cut some 100% cotton watercolour paper into squares of different sizes, trying to get the most out of each sheet. These squares are either 4½” x 4½” or 3½ x 3½” in size (approx 11.5 cm x 11.5 cm or 9 cm x 9 cm).

Next, I used Tea Dye, Old Paper, Vintage Photo, Rusty Hinge, Gathered Twigs, and Old Burlap Distress Inks to colour the tiles. I used one colour only on each tile. On the watercolour paper the colour wasn’t even, and I really like the aged, distressed look that gives, along with the darker edge.

I set out a net of pencil lines to help keep my designs fairly symmetrical. I did draw the lines free hand rather than using a ruler. The result is perfectly imperfect symmetry. I then set to creating patterns/designs with 05 and 01 black Pigma Micron pens.

Other materials used.

In the bottom left tile, I used Carbothello pencils and a Prismacolor Ebony pencil to add colour and shadow to the design, smoothing them with a paper tortillon.

In some of the other tiles, I used Chameleon and Triplus fineliners to add detailed patterns to the design. A happy accident resulted in me using a waterbrush to see what I could do with it. The ink flowed to colour the space, but the pattern was still visible, but more subtle. I liked the effect! So, I made use of it in the designs.

That led to me experimenting with Inktense pencils and a waterbrush. These pencils are great for adding intense, waterproof colour to areas.

A white gelly roll pen was used to add highlights to all the designs. Also, a gold gelly roll pen was used to add metallic highlights to a couple of the designs.

Reflections

I like all of these tiles for different reasons. But I can see how I could add more shadow and highlight to the designs to bring out an illusion of depth and dimension. I may turn my attention to that in a short while.

There’s an antique feel to all the tiles, which is an unusual thing for me. But I do like it! Working on a coloured background really prompts me to play with shadow and highlight.

I do want to scan in the blank, coloured tiles to use as backgrounds in digital art. It’s the distressed nature of the colour along with the darker border that really appeals to me.

Now, I need to work out what to do with these little works of art. Also, my mind is trying to work out how I can convert these designs to coloring pages/templates. But, these will have to be looked at later on today. I’m really needing to sleep. I was up at stupid o’clock again, and I’m now beginning to flag, a lot.

Zentangle – y art

The result of a duvet day…zentangle entangled type of art. Lots of botanics and abstract patterns.

Materials:
6″ square Strathmore Artists Tile – Smooth Bristol Vellum coloured with Distress Inks
05 and 01 Sakura Pigma Micron pens
Sanguine, light sepia and white Daler-Rowney Artists Sketching pencils and some tortillons.

Adventures in Watercolor

I’ve had a stressful couple of days to say the least and all my plans to edit templates and create new ones went out of the window. It was like I had ‘ants in my pants’ and I just couldn’t settle to anything that required concentration and focus.

Last night I was beginning to settle a bit. I’d had some news that had helped to calm me a little, but not enough. While I was attending an online talk, I drew this design on watercolour paper. I used a 05 Sakura Pigma Micron pen. I also scanned the finished drawing into the ‘puter. I really like this drawing, I have to say.

This morning, I wanted to start the day with something relaxing and meditative, so I broke out the watercolour pencils. I have a collection of Derwent Aquatone and Faber-Castell Albrecht Durer. I used them to colour the trios of large flowers at the bottom left and bottom right. For the small flowers, leaves, tendrils and the large flowers at the top I used White Knight watercolours.

I found the watercolour perncils slow and laborious on such a large scale, and I had to lay down layers to get the intensity of colour I like. However, they did mean I could control the gradients a lot more.

On larger flowers, watercolours frustrate me a bit. I can’t seem to get to the right amount of dampness so that colours will flow one into another.

I also found that by drawing the flowers to begin with, I felt compelled to paint each petal one at a time, and I found that may work against me in terms of making the most of watercolour.

Watercolour has always been a medium that vexes and frustrates me, and it’s continuing to do so at times, even as I explore adding colour. I think I’m realising that the best way for me to work with watercolor is by using it for backgrounds which I then draw upon and add more colour to the drawings.

Or, its where I make use of the randomness of loose watercolour, droping colours into a damp surface where they can bloom, flow and blend as they will, without me trying to make them anything in particular. Then, I can draw on this, picking out shapes and colours, bringing structure to where there is none, and I can get intricate with the details too.

Anyway, with the flowery drawing above, I tried to add details using some Paul Rubens metallic watercolours to add patterns of dots, as well as drawing more black or white lines onto the drawing. I really don’t feel they worked out at all well.

I knew this was going to be a bit of an experiment, and I have plenty of flowers to try out different media, such as Inktense pencils, and maybe adding more lines to to add more detail before I start coloring.

It’s been a nice way for me to spend Saturday morning, lost in art whilst listening/watching season 1 of The Clone Wars. I think I’ll continue to watch that this afternoon as I turn my attention to drawing.

Abstract Botanical 19 September 2018

Angela Porter 19 September 2018

It’s a lovely, sunny late summer morning here in the UK and it’s been a perfect time to finish this design off.

Yes, it’s another abstract, zentangly, entangled botanical design, which seems to be my signature style of art, though I do dabble in other styles, as you know, particularly my kind of dangle designs.

This one, like many of my previous ones, was completed in these stages:

  1. Draw the black and white line art on Rhodia dot grid paper using a black 08 Sakura Pigma Micron pen.
  2. Scan the drawing into GiMP. Use tools to remove the dot grid and remove the noise. Save with a transparent background.
  3. Import the image into Autodesk Sketchbook Pro. Any edits to lines can be made here using a pen ‘brush’ that mimics the texture of the Micron pen on the dot grid paper. Then layers are used to create the background, add colour to the design before adding texture and highlights.

It takes a day or more to create a piece of art like this. The drawing of the design alone can take anywhere from 2 to 10 hours, depending on the intricacy and size. This one was A4 in size and isn’t very detailed; I let the colour and texture add details to the design in this instance. I want the colours to shine. The colouring etc. has taken a few hours to do.

It takes me at least as long to create a piece of digital mixed media art as it does to draw and colour the design using traditional methods such as Chameleon markers or Inktense pencils.

What I love about working digitally is the ability to change the colours I use for the elements, and then being able to add texture and highlights/shadows. I can see where I need to go back to the image and add or deepen shadows to increase the sense of depth in the design. A drop shadow on the background isn’t really needed as I think the background is like a sunset sky or alien sea.

The other thing about digital work, is the ability to use the black and white outline to re-work the design using a different colour palette, different textures. I also have the option to print the design out and colour using other media, such as marker pens, perhaps changing the size of the image so that I can create, say, a greetings card or note card, or even a page for my BuJo.

I spent some time on Monday playing with Repper Pro and had some fun creating repeating patterns using the last couple of abstract botanical images. Just from a couple of artworks, I have more than a hundred seamless tiles for patterns; it’s just sorting through them and working out which are the best. I may post some of the best ones later today or tomorrow, and maybe create some based on today’s art above too.

I actually think some of the tiles would, with a border, make amazing patterns for square cushions/pillows worked in tapestry, canvaswork, cross-stitch or similar. You can decide for yourselves when I post them.