Six small tiles

angela-porter20170224_0003

I’ve completed the six tiles I cut from a single piece of mixed-media paper that I had coloured using Distress Oxide inks.

Next, I used Faber-Castell Pitt artist pens to draw the designs and add the patterns on each tile.

To add depth to the designs, I used Inktense pencils and Faber-Castell’s Albrecht Durer Watercolour pencils with a water brush.

Finally, I used either iridescent/metallic watercolour paints or a metallic gel pen to add some shimmering, shining details to each.

I really enjoyed doing these; again, they’re a little different to a lot of the work I’ve done for colouring books, so it’s nice to explore different ways of creating.

The thicker black lines I’m using at this time mean my art reminds me a little of stained glass and also of lino cuts.  I do like the very bold lines; it almost seems like I’m making a statement.

Distress Oxide Inks – my first play.

angela-porter20170217_0022

Today, I picked up the first 12 colours in the new Distress Oxide inks from my fabulous local art shop – Dandie Crafts. I’ve been looking forward to getting them since I saw them launched by Tim Holtz just prior to and during the Creativation 2017 craft show.

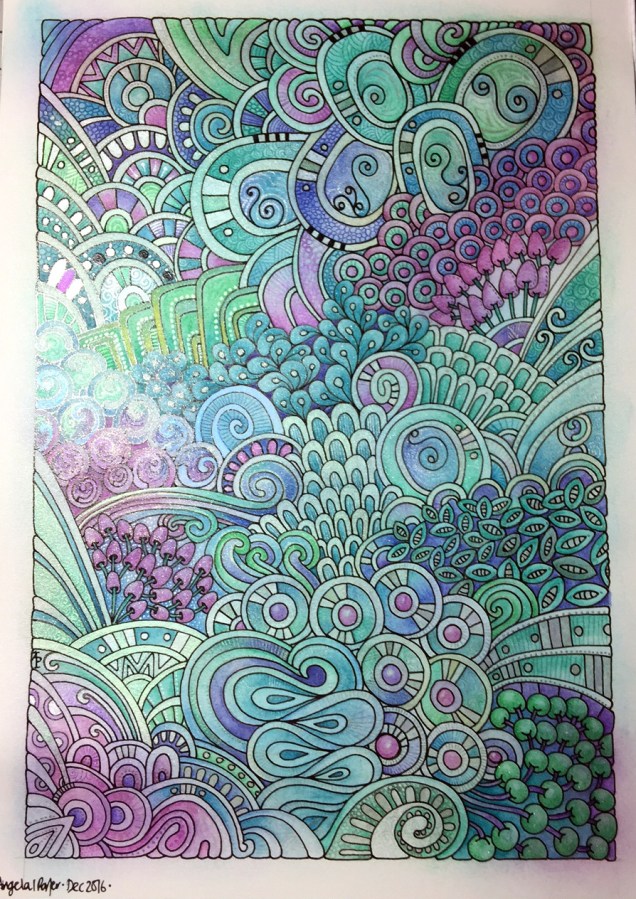
The above image is a typical ‘Angela-doodle’ drawn using Sakura Micron and UniBall UniPin pens on a background prepared using the new Distress Oxide inks.  Before I let you know what I think of them, here’s a little bit about them.

The Distress Oxide inks are designed by Tim Holtz and made by Ranger. This is the description of them from the Ranger website:

Tim Holtz Distress Oxide Ink Pads are water-reactive dye & pigment ink fusion that creates and oxidized effect when sprayed with water. Use with stamps, stencils, and direct to surface. Blend using Ink Blending Tools and Foam. Re-ink using Distress Oxide Reinkers.

My first job on opening my ink pads was to test them out on different papers so I gained an idea of the colours they’d be, as well as how they react with water.  To create these test swatches I stamped two ‘feathers’ with each colour on the paper/card.  I then used an ink blending tool to smear some colour onto the paper.  Next, I used a wet paintbrush to add water to the second feather before swiping the paintbrush across the smear and adding droplets of water to it.

Here’s the inks on watercolour paper:

angela-porter20170217_0019

Secondly,  here they are on Kraft card:

angela-porter20170217_0020

Finally, I made test swatches on black paper:

angela-porter20170217_0021

The first thing I noticed was how easy it was to stamp with the Distress Oxide inks.  The original Distress Inks tend to stamp ‘blotchy’ – that’s the nature of them though!  These, because of the pigment portion of the formulation, stamp with a more solid line.  Not only that, the Distress Oxide inks are much more opaque than Distress Inks.

Blending the Distress Oxide inks using a mini Smoothie blending sponge by Crafter’s Companion was an absolute dream!  The inks went on so smoothly and, because they stay wetter for longer than Distress inks.  Admittedly, I may not have picked the best paper for applying the Distress Oxide inks to, and there was some unevenness in the blend/smear, but it was much better than I’d manage to get with Distress Inks, unless I used a stencil brush to apply the Distress Inks very thinly and build the layers up.

I don’t think I let the inks dry for long enough before adding water as I did note that some of the pigment moved when I brushed the feather with a wet brush, and the smear.  That may be because I used a brush rather than using a spray bottle to mist water on them.

It took longer for the Oxide effect to develop as I’d added more water than a misting would have, but the colours kind of soften on the white watercolour paper, and brighten on the Kraft and black papers.  The opacity of the pigment ink is increased by the addition of water, and the colours really seem to glow.

I then just had to go and create a background using the Distress Oxide inks.  I used mini ink blending tools this time, and I used Strathmore Bristol paper with a vellum surface.  The inks didn’t want to blend all that smoothly on this surface, however I wasn’t really too concerned as I just wanted a background to draw on.  When I was happy with the colour blend, I did mist the surface with water to bring up the Oxide effect, as well as to have a few small water splatters on the surface.

The Distress Oxide colours are much more ‘me’ than the original Distress Inks. They’re so creamy and rich in colour thanks to the pigment part.  I also love the suede-like feel that results after a light misting with water.

I’m really happy with these new inks and I look forward to experimenting with them more.  I plan to use them like watercolour paints, I want to try using stencil brushes with them to blend the colours out, and no doubt I’ll find other ways to make colourful backgrounds for me to draw upon.

Finished art

angela-porter-3-january-2017

This is now finished!  It’s taken a lot of time over the past few days, but I’m happy with it now.

It’s been completed on A3 mixed media paper using a variety of media.  Details have been added using coloured pencils and iridescent/metallic paints, hence the shimmery, shiny spot to the left.  These details are a nightmare to photograph, but hopefully you’ll get enough of an idea from what you can see in the image.

Adding the iridescent patterns was a bit like using ithildin; I had to have the light at the right angle so I could see what I was doing and that also involved me cricking my neck at awkward angles!

My only problem now is to put a price on my work to sell it; so any sensible help/advice would be greatly recieved!  Oh, I also need to find a name for it too…

Give Away!

Heart Card by Angela Porter

This card is 6″ x 6″.  The design is on watercolour paper and it glitters and glimmers with gold embossing, sparkling spots and patterns. The central heart and the outer layer are raised and shiny, thanks to the use of Ranger’s Glossy Accents. The green, pink, red and purple colours were added using Tim Holtz’s Distress inks, also from Ranger, with a waterbrush, and all relate to love, peace and harmony.  The design is mounted on a craft paper card and comes with a plain envelope.

If you pop over to my facebook page then you can enter a free draw to win this card!  I will draw the winner at random at 8pm UK time (GMT) on Tuesday 10th February.

Good luck!

Dragonflies and the New Year

Dragonflies_AngelaPorter_Artwyrd_1 January 2015

It’s the first day of a new calendar.

Happy 1st of January 2015 to you all and may this day and all that follow be filled with all the love, joy, creativity and good things that each of you deserves so much.

This isn’t quite my first piece of art for this new year; I spent time today completing two pieces of Scandinavian art for Michael O’Mara Books.  I got the 1960s work for them done on Tuesday.  Yesterday was a day where I did some mandalas for the third ‘Color Me’ book to follow on from the huge success of Color Me Calm and Colour Me Happy.

I’m certainly being kept busy with art!

The winter break is nearly over, and all too soon.  It took me over  week to calm down enough that the palpitations from work related stress calmed down and for me to sleep properly once again.

No doubt the manic-ness that is teaching will have me stressed out again, especially as it’ll be crazy with an Estyn inspection in three weeks time.

Taking time to meditate, to create, to write will be so important for me, as it always is, but more so with this added pressure and the fact that I didn’t realise how stressed out I was with work, and how exhausted I was too.

I hope I can stave the exhaustion off for a longer time this coming school term …