Mixed media cards – shells and fish

AngelaPorter_Cards1_10June2017AngelaPorter_Cards2_10June2017AngelaPorter_Cards3_10June2017AngelaPorter_Cards4_10June2017

Over the past few days I’ve been drawing shells, flowers, fish and fungi and sorting them out to be digi-stamps, work all done on my Microsoft Surface Book.  Some have been printed, coloured using my Chameleon Color Tones and Color Tops pens, cut out and mounted on mixed media backgrounds.  The photos above show the fruits of my labours.

Apart from the Chameleon markers, the media I have used are:

  • Distress and Distress Oxide inks
  • Iridescent and metallic paints from Liquitex and Pebeo.
  • Perfect pearls sprays
  • Stencils
  • Stamps
  • Black Archival Ink
  • Inktense pencils
  • 3D Crystal Lacquer
  • Alchemy Wax

I think that’s the complete list of media.  I used mixed media paper for the backgrounds, and the paper was cut out using rectangular dies.  Behind the backgrounds, I used silver mirriboard as a mat.

I’m quite pleased with them.  No so sure about the kraft card bases (which are 5¾” x 4″ in size), but they were what I had.

Now, all I have to do is work out a price for them and pop them into my Etsy shop, though I think I will have to take better photos for that!

Today’s mixed media ACEOs/ATCs

ACEOs_30May2017_AngelaPorter

Today’s ACEOs/ATCs

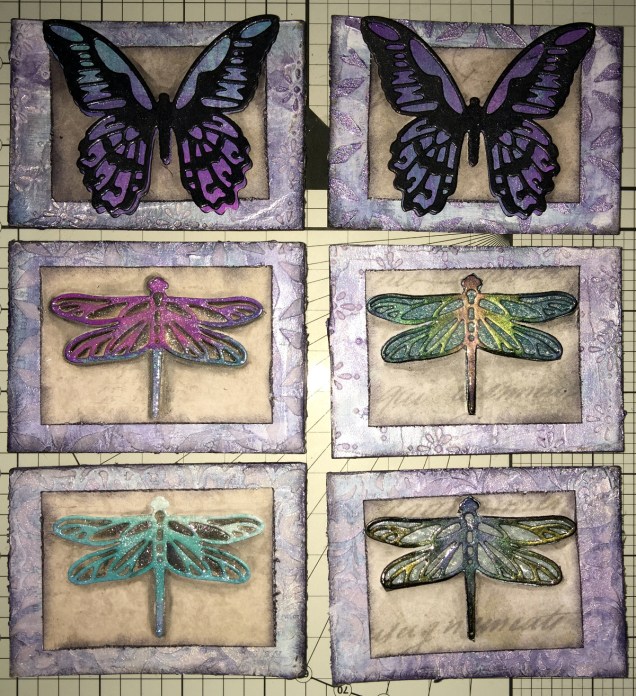
Today I’ve created a set of six ACEO/ATC cards using dragonflies and butterflies as focal images.

The photograph doesn’t do them much justice; the backgrounds are shiny purple and silver with some stenciled patterns created using modelling paste.  Peeking through in places are patterns from some reprints of first series Ordnance Survey maps as well as some torn text from an old mathematics text book.

I couldn’t work out how to use my cogs and gears on these, but remembered all the patterned paper I have, so I had a bit of a furtle through  and found some paper that looked nice against the busy background, which also the focal images looked good on.  Indeed, they look like mounted specimens.

I got the focal images from my stash, already painted.  However, I did put some painted and embossed papers behind the wings of two of the dragonflies, which looks quite nice.  I did add a wash of iridescent medium to all the focal images (can’t avoid adding some sparkle).

On returning from an appointment, I decided I would cover the dragonflies with 3D Crystal Lacquer, which has worked out really well I think (difficult to photograph though).

I’m really quite pleased with these ACEOs/ATCs; they’re simple, yet they just work and satisfy my need for ornate, sparkle and shine.  I’m glad I used the patterned paper to crated a calmer centre to mount the focal images on.

I don’t think I’m going to add any words/quotes to these, though a few gems or similar may be in order once the crystal lacquer has fully dried.

Drawing focal images

One thing I thought of as I was using the die cuts for focal images, is that I do need to find the confidence/courage to draw my own.  I have done some fungi, flowers and ammonites, but haven’t printed them out at the right size, yet.

Also, it may be that using the surface to do drawings for this may not be the best way for me to work; my drawings do tend to turn out a little too ‘perfect’ for my liking in some ways.  I’m still doing my best to work out how I can get my Surface Book to work for me as I’d like it too.  However, if I don’t use the smoothing tools in the software, the pen wobble just is totally annoying (it’s also something that is inherent in the Surface Pen/Surface book, which I really hope Microsoft will do something about sooner rather than later.

It’s really easy to use dies to cut out images for use, but to create my own…well…but we’ll see if I manage to use my own drawings in the next batch of ACEOs/ATCs.

So, my job this evening (apart from going out to do some food shopping) is to do some drawings, on watercolour paper I think, to cut out and use as focal images.

Oh, using scissors is a bit of an issue for me.  Despite me being right handed with pens and so on, I use scissors in my left hand.  In fact, there are quite a few things I can do with either hand, and many things I’m equally as bad at with either hand, such as using a badminton racquet or golf club!  Don’t ask.  Anyway, back to the scissors.  I’ve always struggled using scissors well, and I’m worse with left-handed scissors than I am with right-handed scissors.  Craft knives and me tend to be a slightly dangerous pairing – for me, not for anyone else!  I’m ok if I’m using a rule to cut straight lines, but anything else, well …

So, I will persevere, and perhaps the mistakes I make won’t be as noticeable to myself…

More dottiness – in the form of mandalas!

DotMandala01_8May2017_AngelaPorter

Over the last couple or three days I’ve been playing with mandalas and dots, just purely for fun!

To create the mandala above, I used shimmery, iridescent watercolour paints on black card.  The photo really doesn’t capture the shimmery loveliness of the mandala.  The mandala measures approx. 8″ x 8″.

DotMandala05_8May2017_AngelaPorter

This next mandala, again 8″ x 8″,  was made using acrylic paints with green card as the substrate.  Once I thought the paints were dry, I tried adding some distress inks so that there were shades of green in the background.  However, not all of the dots were completely dry and some smeared.  Also, the ink coloured the white dots.  So, the lesson is to add the shading before doing the dotting!

DotMandala02_8May2017_AngelaPorter

These four small mandalas (approx. 4″x4″) I added shading using a damp paintbrush and Distress ink.  I thought I’d try drawing the design in ink in three of them then adding dots in white and copper to add more/different patterns as well a some shininess.

Oh, the mandala with the teal and red-brown dots had distress ink sponged in the centre. The white acrylic paint wasn’t stained by the ink.  These dots had a lot longer to dry than the previous mandala.

DotMandala03_8May2017_AngelaPorter

For this mandala (approx 8″ x 8″) I first applied some distress inks to white watercolour paper  Then I drew the mandala in black ink.  Finally, I added dots with gold acrylic paint.  You can still see the pencil construction lines as I want to give the gold paint plenty of time to dry before trying to erase the lines.

DotMandala04_8May2017_AngelaPorter

This final mandala, approx 6″ x 6″, was drawn using black ink on pink card.  Once the drawing was complete, distress inks were applied to give different shades of pink/purple.  Then dot patterns were applied using white acrylic paint and iridescent watercolour paints.

Never give up and Foamiran flowers

AngelaPorter28April2017_01

Back to playing with mixed media today, and this is the result…

It’s around 8″ x 6″ in size and 300lb Smooth watercolour paper by Daler-Rowney is the substrate.

First, I coloured the paper using Distress Oxide inks, with a light spray of gold mica mixture.

Once that had dried, I added the diamond motif and text to the background using texture paste through stencils.  Once the paste had dried, I used a rich gold System 3 acrylic paint from Daler-Rowney to paint the texture paste.

Yesterday, I had used embossing folders with my Big Shot from Sizzix to emboss coloured card which I then added metallic and iridescent colours to.  The dark red-brown layer of cogs is part of one of these papers. Behind it, there’s a piece of patterned paper.  Both have had their edges roughed up (distressed) and then inked using black Archival Ink from Ranger.

I next chose an ACEO or ATC card from my stash to act as a focal point.  I also firtled through my stash of steampunk diecuts to find some cogs and a clock dial to add to the background.

The diecuts were all made from kraft card and I used Distress inks to add the base colours of a rich blue, an intense blue-green and a red-brown before dry brushing metallic and iridescent acrylic paints from Liquitex over them to give the appearance of old metal.

Finally, I assembled everything together in an arrangement that pleased me.  I used a Payne’s Grey Inktense pencil and a water brush to add shadows, and finally a few sparkly gems (I can’t resist the use of sparkle!).

I thought I’d finished, however, the postman brought me a box that contained some Foamiran sheets I’d ordered a couple of days ago, and I just had to have a go at making some flowers.  You can see one of the flowers on the mixed media piece.

The flowers are quite easy to make.  I die cut flower shapes from the Foamiran.  I then used a couple of Faber-Castell Gelatos and a damp baby wipe to apply colour the the front and back of the flowers.

Next, I used my heat tool to warm the foam so it curled up a little and then shaped the petals before using hot glue to stick the layers together to make fluffy flowers.  Finally, I used an alcohol marker to colour some clear gems in so they complemented the flowers and attached to their centres.

I think I’m going to be making more of the flowers, they are easy to make, if a little fiddly given the current manicure I’m sporting.  Next time my nails are done, I’ll make sure they are kept fairly short!

Flowerpunked

IMG_0602

This is todays mixed media creation (approx 5.25″ x 11.5″.  I think ‘Flowerpunked’ is a good name for it, or for the series of works like this.

I found a way to lift the flowers up so they have more dimension; wish I’d thought of that when I was adding the cogs., still there’s always the next one!  It’s all a learning process – it never ends!  I also think the stenciled patterns on the background are a bit dark and heavy … and just didn’t quite know what to do about them at the time as I didn’t want to lose the pretty background colours/patterns I’d already created.