Clip Studio Paint vs Autodesk Sketchbook Pro

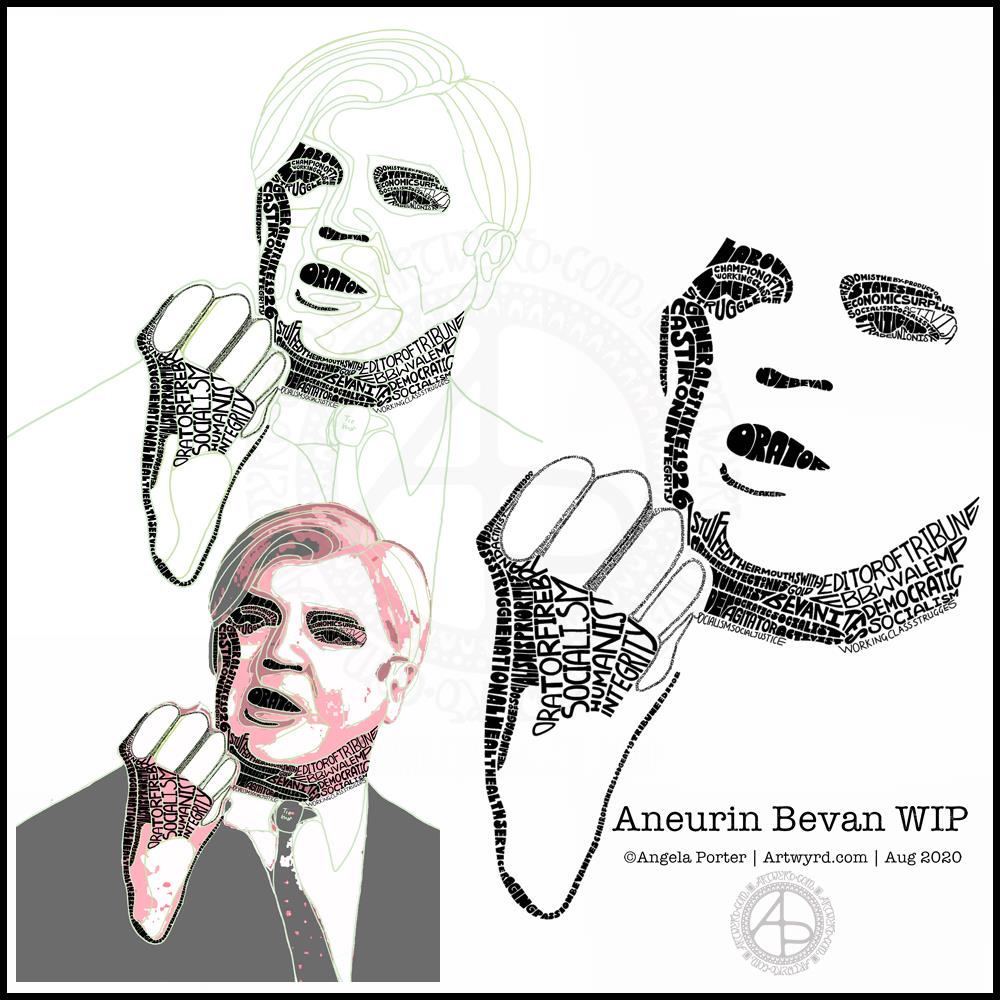
Yesterday, I thought I’d give Clip Studio Paint a go. The bottom part of the template above was coloured in Clip Studio, the top part in Autodesk Sketchbook Pro.

I spent yesterday afternoon, and a bit of this morning, colouring part of the template above in Clip Studio Paint. So, these are my first impressions of Clip Studio Paint and a comparison with Autodesk Sketchbook Pro.

I think it’s impossible to tell the difference between the colouring I’ve achieved with both programs. What is different is the user interface more than anything else.

I’ve long been a fan of Autodesk Sketchbook Pro, and that isn’t going to change. I love the intuitive and rather beautiful interface of the software, the menus on screen and the colour and brush ‘pucks’. Everything is done easily and simply through the quite minimalist, yet powerful, tool bars and menus. Keyboard shortcuts are available, but I prefer to use my pen directly on the screen as I work. It makes working digitally as natural as working with traditional media.

As I’m familiar with the Affinity suite of programs from Serif, working out what the different menus and tools,, which are similar to Photoshop, wasn’t as confusing as it would’ve been in the past. Thanks to working with Sketchbook Pro, I have a better understanding of what the various tools do.

While the tools and options are all accessible on the screen, I find it frustrating and time consuming as I seem to have to perform more steps in Clip Studio Paint to do the same task as I would in Sketchbook Pro. I’m sure there must be keyboard shortcuts, which may help streamline the process somewhat. However, I work directly on the screen with Sketchbook Pro and the only time I use my keyboard is name the file before saving it, or if I want to add text to the art. Usually, they keyboard is out of the way so that I can adjust the angle and distance of the screen to suit my comfort.

I do prefer the way I can choose colours in Autodesk Sketchbook Pro, as well as the ease of creating a custom palette. Sketchbook Pro also comes with a separate Copic color palette. Being able to move them around the screen means I can pop them where I like, make them easily and quickly accessible for me.

Don’t get me wrong, there’s a comprehensive colour palette and various options of viewing colours in Clip Studio Pro, but I like the more intuitive and streamline way of doing it in Autodesk Sketchbook Pro. It’s just personal preference more than anything.

Having the colour puck makes it easy to alter the saturation and tone of a chosen colour really quickly. The brush puck makes changing the size and opacity a breeze. I keep the pucks close to where I work for convenience.

Again, there’s nothing wrong with how all this is done in Clip Studio Paint, but I just prefer the ease with which I can do everything in Sketchbook Pro.

The Sketchbook brush palette is a great tool too; I have all my favourite brushes available in one, easily accessible place. A click on this palette and I can access all the brush sets I’ve either downloaded or created so I can add or remove brushes as I need to.

The zoom and rotate touch functions only work separately. I found this a clunky and awkward way to work. I think that’s because I’m used to doing both at the same time and at will in Sketchbook Pro.

What I did like are the many more choices of brush effects in Clip Studio Paint. However, I think I can replicate many of them in Sketchbook. There are some interesting brushes in Clip Studio Paint, but nothing that I couldn’t replicate if I found I really wanted to use them.

Anyway, I will persevere with Clip Studio, working with it from time to time to become more familiar with it. The ability to draw vectors may be helpful in the future, but then I have Affinity Designer on my ‘puter, which is Serif’s version of Adobe Illustrator.

Also, I’m hoping I can find a way in Clip Studio Paint to work in CMYK rather than RGB. When I convert files to CMYK for printing, the colours shift and I’d like to work in roughly the colours that would be printed.

Overall, I think it’s a good, affordable application. It’s a fraction of the cost of any Adobe Product. I paid £40 for the Clip Studio Paint version; that’s a one-off purchase and you have free upgrades for life. You also get access to online resources created by other Clip Studio Paint users.

This price is on a par with the price of each of the Affinity suite of programs (approx £50 each), and there are regular, free updates to the software.

You can get Autodesk Sketchbook for free, though I subscribe to the pro version monthly for approx. £12; it does have a few more features than the free version. Just because Sketchbook is free doesn’t mean it’s not professional; it is. It doesn’t look powerful, but it is.

How much will I use Clip Studio Paint? That I’m not sure. Perhaps with more use the frustrations I experienced with lessen as I become more familiar with the software. Perhaps I’ll gain fresh ideas on what effects I can try out in Autodesk Sketchbook Pro.

Do I think Clip Studio Paint is a bad program? Not at all. It seems to be powerful and similar to Adobe Photoshop and artists and illustrators are able to create fantastic artworks with it. I’m sure that if you are familiar with the way Photoshop works, you’ll find Clip Studio Paint an easy transition to make.

Personally, I find the way the menus are set up hard work and time consuming to use. I’ve been spoiled with the simple sophistication and intutive nature of the Autodesk Sketchbook interface, no matter which version you use. I find I spend less time clicking on menu after menu to get to what I want to use, and more time creating art in Sketchbook. That may be a function of my familiarity and comfort with the software. What I don’t want is to feel I’m struggling or working so hard to get an effect I’d like when I could do it so simply in Sketchbook.

One thing I know is that Autodesk Sketchbook Pro will be my go-to digital art program. It does all I want to do digitally, and most probably a lot more I’ve not worked out yet.

Typographic Portrait WIP

This morning I’ve been working on my typographic portrait of Aneurin Bevan. This portrait is the third iteration. I’m learning as I go along, trying out ideas as they occur to me.

I started with the photograph Nye Bevan and used the posterise tool in Affinity Photo to create areas of contrast. Then, I added colour to these areas to help me differentiate ‘twixt them. I completed this task in Autodesk Sketchbook Pro.

The next stage was to draw lines around these areas of colour, smoothing them out somewhat, and using artistic interpretation where necessary. These are the green lines that delineate the areas for different weights of text. I’ve decided to leave the white areas blank.

The green guidelines have been changed and edited as I work the portrait.

The area that was vexing me most were the fingers. However, I had an idea to use tiny lettering to add some deep shadow. I’m sure I’ll work out how to add some lighter shadow areas later on (my mind is already ticking over that issue) to give more volume to the fingers.

They typography is hand drawn and I’m having to come to terms with the struggle I’m having with my perfectionist side. This isn’t to do with the shapes of the letters, but the weight of them and making sure that they are consistent. As I’m hand-drawing the letters, then they are going to be imperfect, and I need to learn to accept when they are good enough.

Also, those imperfections and style of lettering are personal to me, and that is what will differentiate my work from others.

I’m also struggling with letting go of the desire to be as photographically accurate with the portrait as I can be. This is where learning to simplify the shapes of the different areas of contrast comes in, and recognising they don’t have to be a perfect copy of the photo in order for the resulting portrait to be recognisable as Aneurin Bevan.

One other thing I’ve done is to let go of trying to use full quotes in the portrait. I’m using repetitions of words and short phrases that represent Nye – personally, politically and in terms of achievements. I’ve realised the portrait doesn’t have to be a grammatically correct biography! I will, however, be using quotes to fill in his jacket.

I’m not sure what to do with his shirt and tie yet. It will fall into place soon enough I’m sure.

Working digitally helps me in so many ways. It takes away the frustration of starting over again if I make a mistake, and also minor frustrations. I gain a confidence to try things out, knowing that if they don’t work out I’ve not screwed up the rest of the work I’m happy with.

Working digitally, for me, is like working with pen and pencil on paper. I use a digital pen on the screen of my Surface Studio, just as I would pen on paper. It’s easy to undo and edit changes made. It removes from me the pressure to be perfect first time and helps me to persevere when things aren’t working as I’d like them to.

All the skills I’m learning digitally, in terms of the hand-drawn typography and being more patient with myself and allowing my work to be ‘perfectly imperfect’ is transferable to the work I do with traditional media too.

Monday Morning Mandala

I actually started this mandala yesterday morning, but I did most of the work on it this morning.

Black, white and craft paper, with some warm grey shading to help to bring out a sense of volume to areas of pattern.

The number five.

I chose, to start with, five-fold symmetry.

The number five symbolises balance and harmony. It also can represent freedom, independence, adventure, curiosity, intelligence, individualism, courage, and important life lessons to be learned from your experiences.

Five can also be symbolic of a problem, but there are solutions to the problem. As five also symbolises inner wisdom, the solution comes from our own inner wisdom. Once a solution is identified, then a plan of action needs to be developed through passion, emotions, ideas or work. Then it needs to be followed through.

Star symbolism

The central motif of the mandala is reminiscent of a five-pointed star.

Stars are symbols of guidance and are often considered protective symbols. They are also associated with wishes, mysteries and magic. Most often, they represent something that is good, beautiful or positive. They are symbols of hope, truth and spirit.

The colour brown

Brown is a natural colour that evokes a sense of strength, approachabilityapproachability and reliability. It is often associated with resilience, dependability, security and safety.

Feelings of loneliness, sadness and isolation can also arise with brown, especially when used in large amounts, like a vast, expansive rocky landscape or desert. But it also can bring to mind feelings of warmth, comfort and security as brown also represents a hearth, the heart of a home, and so it represents a deep connection to one’s home.

Of course, brown also represents connections with the earth and so nature. It is a wholesome colour.

Symbolism and my art

I’m finding looking into the symbolism of numbers, colours and motifs quite interesting. I don’t often think overly hard about the colours I use when I create art, especially my daily ‘warm up’ art practice.

However, it is interesting to look at the meanings of colours, motifs I choose and how they relate to what I am currently experiencing on a personal level.

Inhale. Exhale. Repeat.

Mandala

Black and white mandala.

This morning was a morning that I needed to do some art that was familiar, calming, soothing and intricate enough that I could lose myself in it. A mandala always fits that bill. Always. It doesn’t matter if it’s drawn with pen and ink on paper or digitally. The mindful, calming effect is the same. It’s the process that matters, the repetitive shapes and patterns that are drawn that contribute greatly to the soothing effect.

I do tend to gravitate towards digital art, and I find the symmetry tool in Autodesk Sketchbook Pro helps to save a lot of time. The ability to erase ink removes the frustration that a mistake creates for the hyperperfectionist part of me.

Other than those time-saving (and frustration-saving) tools, the process of mandala drawing is the same for me.

It starts by using a compass, protractor and ruler to set out the circular grid. Then, it’s digital pen on screen to draw the mandala in exactly the same way as I would on paper, just without so much repetition of sections.

However this was created, it has served it’s purpose – given me some time and space for inner peace and contentment.

Hello August!

The calendar page turns over and we’re into a new month.

August always heralds the end of summer and start of autumn, my favourite season. It is the last full month of summer here in the Valleys of South Wales. The evenings come noticeably earlier, always a sign that the year is continuing on its endless cycle of seasons.

We have a grey, damp and blustery start to the first day of the month. There are shafts of sunlight finding their way through gaps in the clouds, but there’s a deliciously refreshing snap to the cool and fresh air after the night-time rain.

I thought I’d create a really simple mandala design for the start of this month, one that is full of warm colours, but that hint of autumnal tones in the background.

I kept things simply stylised in the design. If nothing else, working on it made me smile, inwardly as well as on my lips.

I woke early-ish today and did some work on one of the typographic portraits I’ve been doing. Then, in my rush to get to the shower, I clicked the wrong button and lost my work. Thankfully, it’ll be easy enough to do it again. I also think that with the version I’m working on, I’m finding my way with the process. I have a lot of the portrait left to do, but I feel less frustrated with it and have a clearer idea of what I’d like to achieve now I’ve taken a few days break from this kind of work.

Before I settle back to the typography, I am going to take a walk in the fresh air of the morning. Well, after I’ve done my social media posts!

Hand-drawn typography practice

This morning, I decided to leave portraits alone for a little while. I woke with the idea of using typography to fill some typography!

So, I drew the outlines of ‘Nye’, for Aneurin Bevan. I then used wavy lines to split the outlines into interesting sections. Then, I pencilled in some quotes by Aneurin Bevan. This let me adjust size/ spacing so that the quotes fit and made sense. In some places I’ve stretched the letters as there wasn’t enough space for the next word. I could’ve made all the letters in the line wider, but thought the wider letters would add some interest and flow. Of course, I now realise I could’ve stretched some letters at the start of the lines too, but I can always do that as I ink in the lettering.

Anyway, my next step was to scan the sketch into Autodesk Sketchbook Pro so I could do the inking digitally, and you can see what I’ve done so far. I do need to adjust some letters, like the B at the start of the line I’ve started to ink. I will also need to go back and clean up some of the edges of letters.

It’s a nice project for me to do today. I didn’t sleep at all well last night; I was up and down to the loo. I had a sudden attack of anxiety yesterday, a really intense one. The pilot light on my boiler had gone out and I couldn’t light it, so I had to arrange for a breakdown visit. There was the stress of ‘what if they can’t fix it’ as well as a stranger in my home for the first time since most probably February.

Panic mode! And it didn’t abate all day, no matter what I tried to do. This kind of anxiety/stress always hits me in my digestive system, so it was an unpleasant night for me.

All needless of course. The gas engineer arrived this morning and he lit the pilot light first go. And it’s stayed lit. I felt like a right numpty. However, all is well, as I have now booked it for a service too.

I’m still feeling on edge, as well as really tired. So, working on a portrait wouldn’t be the best idea for me as at the moment they are frustrating and overwhelming me.

So, I thought I’d go for some hand-lettering or hand-drawn typography practice. Just practice. No pressure. However, the idea I had may turn out to be a fairly good one. Maybe.

Typographic Portrait WIP

Phew! This has taken me many, many hours to do, along with a lot of frustration and alterations. However, it’s getting there, possibly.

This is both the first portrait I’ve done, as well as the first large typographical project.

I’m following a Domestika course – “Hand-Drawn Typographic Portrait” by Sara King.

I’m not entirely sure that I’ve fully succeeded. I seem to have a lot of white space, and that is all to do with the photograph I used. I thought it had enough detail in terms of tones of light and dark. I guess not! Or maybe this is just part of my style.

There are areas on his jacket to the bottom left and right that need pattern or image put there. I have yet to work out what to do about the shirt. Also, I need to try removing the lines around the jacket and collar too.

Aneurin “Nye” Bevan was the main architect of the UK’s National Health Service after WWII. He’s also considered one of the best political orators of all time. There’s an Aneurin Bevan website if you’d like to know more.

While this is hand-drawn, I chose to work digitally. My Surface Studio allows me to work with a digital pen directly on the screen as if I was drawing on paper. This makes it easy to edit as I work.

I now need a break from this particular artwork, so I can look at it with fresh eyes (and any feedback people offer on it) and then return to it another day.

Mandala

Today’s artistic offering is a mandala with a quote about meditation.

The simple typography was done in Affinity Publisher. I used Autodesk Sketchbook Pro to create the mandala.

I just needed some quiet time this morning. I spent quite a while meditating before breakfast. Then, my attention turned towards art.

I knew I wanted to include a quote in today’s art, and I found this quote about meditation that resonated with me.

Meditation and mandalas go together like bread and butter!

The mandala design is quite simple and bold, in quite subtle colours, for me.

It’s going to be a quiet day for me today. A self-care day. I may not get anymore work done on my typographical portrait, but I will be immersing myself in arty and/or creative activities for sure.

Typographic Mushrooms

Just a little something I wanted to try out – using hand-drawn typography to create illustrations. I chose a mushroom, for no other reason than I like mushrooms.

It’s more about practising the hand-drawn typography or hand lettering than anything else.

What I realised, when I completed the black and white version, is that I could’ve varied the weight of the letters to produce highlights. That’s for another day, I think.

I also had to try adding colour, and in that way adding highlight and shadow.

I like both versions, but I think I like the coloured one a bit more.

I mentioned I’m following the Sarah King Domestika course – Hand-Drawn Typographic Portraits. I have started work on my first portrait, but it’s going to take me a while to do. In the meantime, little projects, like the mushroom, will give me plenty of practice as well as a chance to work out my process and way of working, as well as how I’d like to use it so it adds a note of harmony to my artistic song.

I started with a pencil sketch of the mushroom. Then, I added the words in rough with pencil. I scanned the sketch into Autodesk Sketchbook Pro. I then used my Microsoft Surface Slim Pen, to hand-draw the typography. Even though I’m using digital media. Autodesk Sketchbook Pro is a lot like working on paper, but it streamlines the process and allows me to skip a lot of the tedious steps. It also lets me take a black and white drawing and add colour quite easily.

I’ve done this while I’m waiting for a migraine-type headache to subside enough that I can return to bed and sleep the dregs of it away. I’m nearly at that point now as I’m beginning to feel tired and sleepy. So, I’ll get the rest of the social media postings done, and then crawl back into bed to sleep.