Doodle art

At the weekend, I finished all the illustrations for the upcoming colouring book ‘By the Sea‘, to be one of the titles in the Escapes series from Dover publications.

So, over the last couple of days I’ve been doing other things, some arty, some not.  However, after watching some videos on YouTube by piccandle, I thought I’d have a go at their particular style of doodle art, and this is my homage to them.

angela-porter20170118_001edited_small

I had a lot of fun drawing this I must admit. It’s full size is shy of A4 in size, and I drew it on squared paper, scanned it in, cleaned it up using GiMP, then printed it out ready to colour, most probably with Copics, Spectrum Noir Illustrator markers and Promarkers.

More mushrooms!

Just like hobbits, I believe there’s only one thing better than mushrooms and that is MORE mushrooms!

In my case that means more needle felted mushrooms.

needlefelted-mushrooms-by-angela-porter-2017

So, I’ve learned a fair amount about needle felting in making these mushrooms and I look forward to creating more items as time allows.  I suspect my own whimsical, doodly drawings will be a source of much inspiration.

It is, however, much quicker to draw and colour things than to needle felt them.

The large mushroom took around 10 hours to finish.  The smaller ones have taken between 4 and 6 hours to create.

Now, all I have to do is to decide what to do with them!

Needle felted mushroom

The last four hours have been spent happily stabbing – lots of stabbing.  All to create my first needle felted ‘sculpture – a mushroom.

The photo isn’t brilliant (it is after 2am here in the UK, and I lost track of time..), and grey isn’t my usual colour of choice; however I used it for the mushroom as I have lots of grey wool and if it didn’t work out, it would be no great loss.

However, it has worked out.  It’s been a bit of a learning thing, and I still have lots to learn, learning that can only be done by doing it seems.

I do have a few coloured ‘circles’ to add, and then I’m sure I’ll want to add beads and stuff to add sparkle (that inner raven of mine demands sparkle whenever I can manage it!).

Overall, I’m really quite pleased with the outcome so far!

I’ve not done any sculpting for many, many years, and only then with clay.  I enjoyed working with clay, but I don’t have the facilities to do that now, but I can use wool and felt it, and I really have enjoyed the felting.  It’s easy on my fingers too (apart from the one stab to my thumb when I missed the mushroom a tad!).  It’s sculpting in terms of building the form up, rather than removing material to reveal a form, such as you’d do in stone sulpture.  The building up appeals to me far more.

I’ll finish this mushroom, then I’m sure there’ll be more things to be made.

A work in progress

The design is drawn, the base colour added using Ranger’s Distress Inks. Now, I’m adding extra colour and shading using Derwent’s Inktense pencils and a damp brush.  It’s going to take a goodly while.

img_0534
Enter a caption

How I spent the last three days…

I have to admit that I, like so very many others, spent the Christmas period alone (except for a couple of hours playing Trivial Pursuit at my little sisters on Christmas night).  It’s not the first Christmas that this has happened, but it’s one in a very long succession of solitary Christmases.

I feel the pressure from society and the media greatly at this time of the year; the pressure to be in a happy family, showered with gifts and food and company and loving intimacy.

The image we’re sold that we can’t possibly be happy unless we’re part of a big, loving, happy family and in a meaningful, happy, loving relationship is a trigger point for my mood, for unlocking the kennel of the black dog that can nip at my heels all too often.

This year, though, I’m happy to say that the black dog didn’t visit as often or as long as it has in the past many, many years.  Oh, I’ve had my moments, but I’ve survived better than I have for a very long time, most probably 20 years or so.

What helped is indulging myself in my coping strategies – creating art, making music, reading, cat cuddling and generally being creative (which currently means knitting baby blankets for my neice who is expecting twins in 3 to 4 months time).  Also, avoiding social media – facebook especially – has helped too.

Reminding myself that I’m not at the point in my healing journey from the cptsd (complex post traumatic stress disorder) that I experience that I feel able to have healthy relationships has also helped.  It’s a work in progress, the healing that is.

Another sign of my recovery from the trials and tribulations of the cptsd that I experience is that I made a little effort to add some ‘decorations’ for the Winter Solstice/Yule/Christmas season, which include a trio of small, knitted christmas trees, which kept me a little occupied in the days/weeks leading up to this time, as well as knitting and needle felting some bacteria and viruses for a pharmacist I met at an event I attended as a Time to Change Wales champion.

So, now the next event that can cause the black dog to find some strength is New Year’s Eve…

…which I can survive by using my super-power of being creative to help me cope.

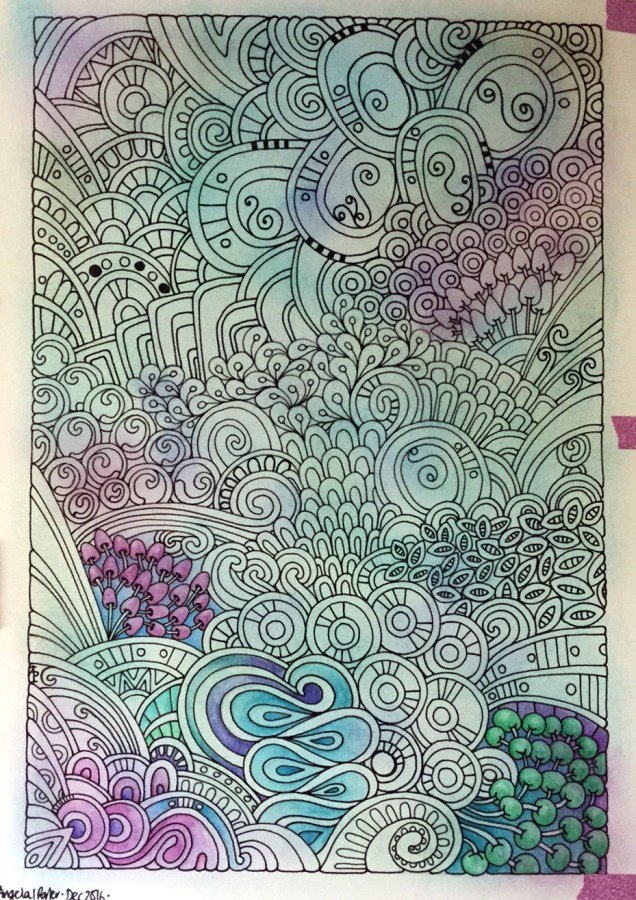
The piece of art above has been done over the past 3 days.  The black outlines were drawn first, followed by a base layer of Ranger’s Distress Inks applied with Clarity Stencil brushes.

I then used the Distress Inks as watercolours to intensify the colours in various places as well as to add the colour to the berries/seeds/buds.

Next, I used Cosmic Shimmer’s Iridescent Watercolour paints to add some shimmer in large areas, before adding detailed patterns using coloured pencils (I chose to use my Mitsubishi Uni Pencils for this).

Finally, I added metallic and ‘glittery’ sparkle using Sakura’s Gold Gelly Roll Metallic pen and a Clear Star Gelly Roll pen.

I was rather restrained for me by leaving areas just coloured, not embellished to high heaven and back! The areas I have added texture/pattern to stand out more and it’s not quite so overwhelming.

This could mean my artistic skills are maturing a little.

The most important thing, however, is that I enjoyed the process of creating this large (for me) piece of art. The paper I used is A3 in size, and the drawing is approx 9.5″ x 14.5″.

When I finally figure out how to price my art (any one wishing to offer help/advice/suggestions on this, then it will be gratefully recieved) I may put it up for sale on Etsy.

Season’s Greetings 2016

winter_05_coloured1

Sending each and every one of you all the very best of the wishes of the season. May each of your days ahead be filled with love, joy and all things bright and good!

Thank you to all who have supported me and sent me such kind words too.

Drawn on my Surfacebook, coloured in via Autodesk Sketchbook Pro.


Winter Wreath Coloured

The second of the templates I posted yesterday has been coloured.  I went with a cooler colour palette than I would usually choose.

Coloured using Caran D’Ache Luminance pencils and a blending solution was used, which actually brought out the colours beautifully!

I also forgot to mention that these wreaths were drawn in Autodesk Sketchbook on my Microsoft Surface Book.

Winter/Christmas Wreath Colouring Pages

I know that for most of you it’s a busy time of year.  So, I’d like to share a couple of colouring templates to help calm you, even if it’s for just a few minutes.

Many studies have been done that show colouring to be as relaxing and therapeutic as meditation, even if you do it for just a few minutes!

All I ask is that you don’t share the uncoloured images, and that if you share coloured images you provide a link back to either this page or my facebook page.  Oh, and the images are for personal use only, not for commercial use in any way.

Enjoy!


And here’s one I coloured!

Spectrum Noir Illustrator pens – Review

Today, I popped into my local craft shop – Dandie Crafts (Dandie Crafts Facebook Page)- in their new premises in Caerphilly.

The shop is larger, smells fresh and new, has more space for stock and much more space for classes and demos.  The warm welcome was very much the same.

I had gone there to stock up on paper for my printer; I like their own range of acid-free heavy-weight paper (usually 160g/m²) and found the Spectrum Noir Illustrator  twin-tip alcohol markers in stock.

I bought the six packs of pens, which cost £12.99, so the pens work out a little over £2 each, which is about half the price of a Copic Sketch marker, Promarkers you can get for a little over £1 each at the moment.

Debbie, the lovely lady in charge today, told me they’re supposed to be a new formulation of ink that blends more easily with quality Japanese nibs.  One of the nibs is a bullet nib, the other a brush nib.

On the Illustrator marker packaging it says:

For smooth, natural linework and detailed colouring.  Fully blendable, streak-free coverage.  Perfect for drawing and illustration.

So, I just had to buy and try them out!

I drew the design using the True Black marker and the bullet tip.

The bullet tip isn’t as fine as I thought it would be.  The tip is softer than the bullet tips found on the Promarker pens.  Personally, I’d prefer the bullet nibs to be firmer.

The pen drew nicely with plenty of ink in the new pen (something that hasn’t always happened with my experience of Spectrum Noir pens in the past).  Also, the ink seems jucier in a different way that I can’t describe.  It does seem to be a different formulation.

The black lines are thicker than I’d usually draw, but I’m hoping they’ll give a stained-glass kind of feel to the art.

Once I’d inked out the design on 160gsm smooth white card, I started to colour in the design using just two colour blending.  That was going to be a bit of a challenge as I have eight of the six pen sets which aren’t the full range of colours in the Illustrator pens.

What I did notice is that the colours do blend much more easily than the original Spectrum Noir markers, and also the Promarkers and the Copics!  The ink in the Illustrator pens is definitely different to the others.

Also, where I coloured fairly large areas with one colour, there was no streaking!  Admittedly I didn’t colour a huge area, but so far so good.  The lack of streaks was the case with both the bullet nib and the brush nib.

For the green leaves, I also used a tip-to-tip method to transfer a little of the darker colour on to the lighter colour to help blending with two quite different shades of green. That worked well.

The brush nib is made up of fibres that do spread out – more like the Chameleon pen nibs than Copics.  I don’t now how that will affect their ability to get into small nooks and crannies as they are used over time.

I also noticed that the inks are a lot more vibrant and ‘cleaner’ in colour than the original Spectrum Noir pens, which is a huge plus for them.

The only downside is that as I was colouring, the inks would blend out the black ink, so some of the lines have bled where I don’t want them to bleed.

I do need to test them out with the usual pens I use for drawing and also with the Epson Ultra-brite ink I favour, which hasn’t been affected by alcohol markers previously.

Overall, I’m happy with the pens.  I most probably will get the full set of 96 and will use them along with my other alcohol markers as I’m sure they’ll work well with them.


Lest We Forget

Yesterday, 11th November 2016, I woke with a desire to create a very simple poppy wreath to mark Armistice Day.  Something to homour the memories of all who have lost their lives through conflict, no matter when or where.  I’m sure we would all love to live in a world that is far more peaceful, where differences can be settled through discussion and coming to understand and respect one another, even if that means to agree to disagree.

If you’d like to download, print and colour it, please visit my facebook page – Angela Porter Illustrator .  All I ask is that you respect it is for personal use only, not for sale, not for re-sale nor for publication.  I’d like to see your coloured work, if you feel inclined to share 🙂


And here’s coloured version 1 – coloured in on my SurfaceBook.

Coloured version 2 below was completed using Faber-Castell’s Luminance pencils along with Zest-it blending solution.  The glossy centres and glittery and glossy drops were added using Tonic Studios’ Crystal drops.