Entangled Art Infinity Card – Parts 1 and 2

I’ve had some fun with this, and there’s more to come. And a bit of a story to tell first.

I was asked on my YouTube channel how I know which patterns go with each other. That’s not an easy question to answer; experience, experimenting, trusting instincts, and having some patterns or motifs that are your go-to ones.

Then, yesterday morning, as I was slowly coming around from sleep, I watched a video on YouTube at Jen’s Arty Inclinations on how to make a fast and simple infinity card for a junk journal.

Jen recommended going to Lynn at Playing with Paper and Glue to watch her video about making a slightly different infinity card. So I did that.

And as I watched and saw how easy it was to make the infinity card (yes, it really is!), I realised that this would be a lovely and different way to collect together my favourite go-to motifs and patterns. And that thought linked back to the comment on my YouTube channel.

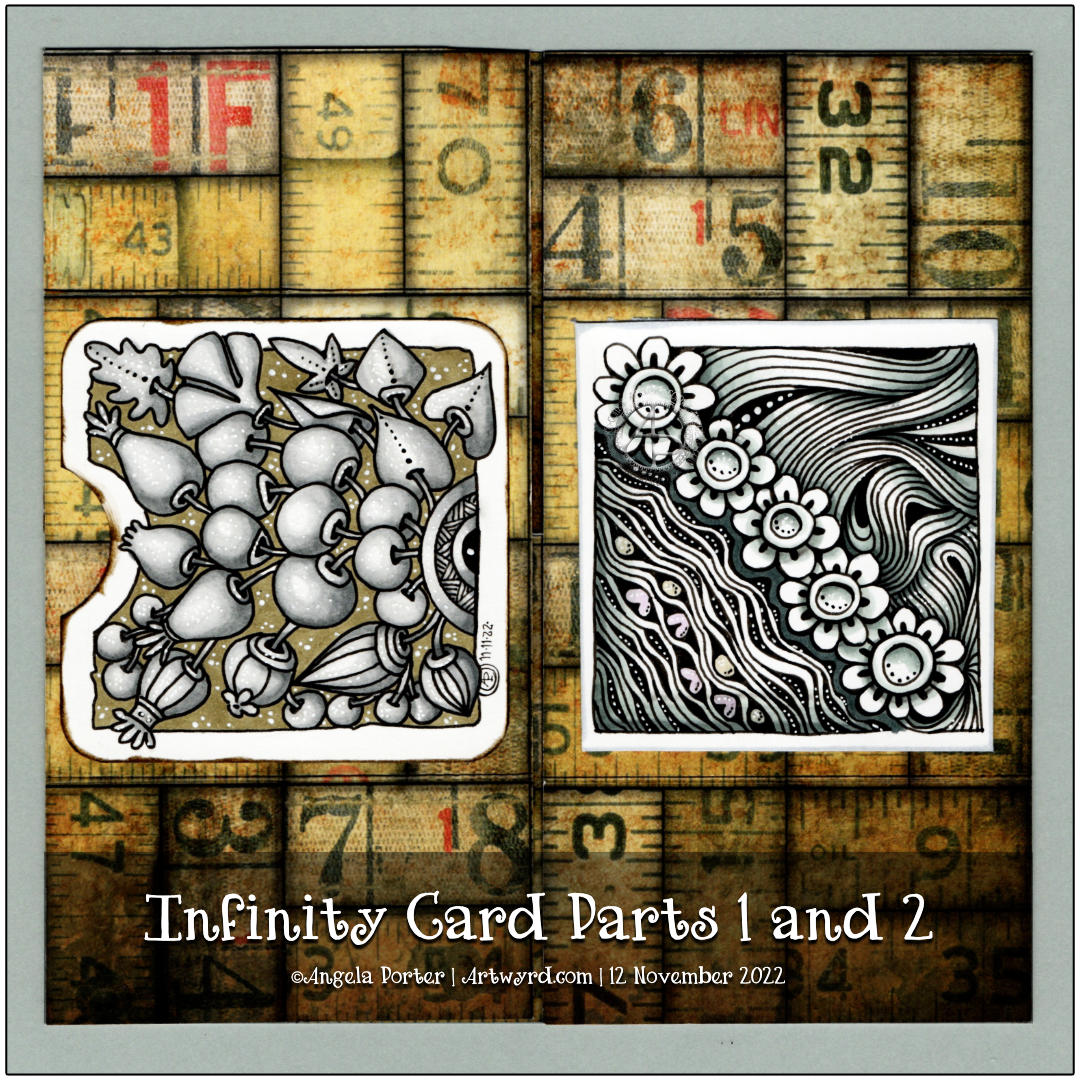
So, I made an infinity card, mucked it up a bit, but learned from that. Then I made a HUGE one, which was ridiculously big! So, I made another one to the sizes Lynn gave, which you can see me doing in part 1. Then, I had to add the first panel on the left of the image above.

I went with variations of pokeroot, pokeleaf and pokepods! I’m not sure there’s a pattern called pokepods, but there is now. I cut a notch out of the card and created a little pocket for a drawing, note, colour palette, or something else to be hidden.

I drew with Copic Multiliner Sp pens (0.5 and 0.25, I think). Colour was added with yellow-grey and neutral-grey Ohuhu markers. A white gel pen was used to add dotty highlights and the pattern to the back.

In the video for part 2, I created the panel to the right. Daisies are always a flower I love to draw; I have many variations of them in my memory hoard. The flowy pattern and Diva Dance are two of my go-to patterns; they share some similarities in my head.

For this panel, I used a Uni Emott 0.4 ever fine pen to draw the design, then green-grey Ohuhu markers to add colour. Then, I used a white gellyroll pen to add the dotty highlights.

I wasn’t sure about the Tim Holtz scrapbook paper I used to make the infinity card, but as I added the panels, it mostly got covered up, just a hint of a background behind the drawings.

It may not be the best choice of paper to make the infinity card from, in terms of colour and pattern. However, as I’ve never done anything like this, it was a sacrifice I was willing to make!

Actually, I wasn’t sure about the entire project. I thought it may be a bit odd, whacky, and weird. But, now two panels are done, I’m looking forward to completing the infinity card.

I will be adding more pocketses, possibly even panels that open out to reveal more. There are, possibly, 32 panels to be done, though I’m not sure as I keep losing count! But it’s a longer-term project.

Having said that, the panels are small. Cute even. Perfect for when I have just a little time to draw.

Moon Poppies

A bookmark decorated with whimsical and stylised ‘moon’ poppies.

I really enjoyed drawing this one and adding shades of blue-grey to bring out the volume in the drawing. Of course, there is a drawing tutorial on YouTube showing how I created this bookmark.

Two Seed Pod Posies

This morning I finished the posy to the right, and I thought it would be interesting to post both versions together.

The version on the right was actually drawn before the one on the left; it was the inspiration for yesterday’s drawing tutorial video on YouTube. I decided to add colour to it yesterday evening, and I added the subtle background pattern this morning.

I like both and would find it hard to pick one as a favourite. There are pros and cons to each for sure.

What do you think? Which do you prefer?

Whimsical, stylised Seed Pods #ComeDrawWithMe #DrawWithMe

I love seed pods! They are often so architectural in nature. They lend themselves to whimsy and stylised drawings so well too.

I love giving them sturdy stems with tops that look like column capitals. The leaves on these are inspired by medieval illuminated manuscripts, something else I absolutely love!

For the panel behind them, I decided to keep the pattern fairly simple – Tripoli, a Zentangle tangle pattern.

If you’d like to draw your own seedpods, then take a look at the accompanying draw with me tutorial on YouTube.

A Fun and Whimsical Entangled Garden – #ComeDrawWithMe

I had a lovely time drawing this little garden this morning. It includes some of my favourite things – round Romanesque-inspired arches and some Romanesque patterns, zentangle tangle patterns, crystals, flowers, mushrooms and frondage.

Naturally, I filmed this, and a #ComeDrawWithMe or #DrawWithMe video is available on YouTube.

TWISBI ECO fountain pens with medium, fine and extra-fine nibs were my drawing tools of choice. An approx. 11cm x 17cm (4.3″ x 7″) piece of Ohuhu marker paper was my drawing surface. To add some shading, I used a set of three grey-green Arteza Everblend alcohol markers. Finally, a white 08 Sakura GellyRoll pen was used to add dots of white as highlights.

I have to remember not to use Dokumentus Ink, which fills my TWISBI pens, with alcohol markers; they can pick up some of the ink and spread it around. I must remember that Copic Multiliners or fineliners such as Sakura Pigma Microns, Uni Unipins, or Emotts are perfect for alcohol markers.

I do like the monochrome nature of the shading so far. I’d be intrigued to digitally scan it and add a coloured layer. Maybe when I’ve finished it, I’ll try that.

Colouring Page – 3 November 2022

This week’s colouring page is a typically ‘Angela’ entangled one; it’s just what wanted to flow out of my pen today. And that most probably has a lot to say about what’s going on in my subconscious today. I’m well out of sorts for sure. I think I know what is causing it, but, like the weather, it will pass along.

Flowy Op-Art Pattern – Draw With Me video tutorial.

In today’s YouTube drawing tutorial video, I show how I draw this pattern/design which is very reminiscent of Op-Art. It was a bit of a tricky one to figure out, but I got there! And once figured out it’s not that difficult to draw, honest!

I also show how this pattern can fill any kind of space in the video. I do hope you’ll have a look and give this pattern a go yourself.

Whimsical Flowers – Creating Variations

Please click on the “Watch on YouTube” button to view in Youtube. Cheers!

Flowers are things I really enjoy drawing, particularly whimsical and stylised ones. So, today I drew a few for a drawing tutorial YouTube video.

Halloween Whimsy!

What is Halloween without a clutch of whimsical drunken party skulls along with some tentacles, eyeballs, pumpkins and so on? Click on this link to see my YouTube video about how I drew and added colour to this drawing.

I love Halloween; it’s one of the few celebrations in the year that don’t fill me with deep sadness and cause emotional distraught. And, of course, when it comes to me, cute and whimsical, smiley and pretty is my preferred style of illustration.

I thoroughly enjoyed drawing this design earlier today. My whimsical heart was filled with joy as I just a few of my favourite things. I’m sure there’s a song there…

“Hats upon skull-ies and batwings on potions,
mushrooms on bottles and bright orange pumpkins,
Some stripy tentacles with round eyeballs,
These are a few of my favourite things.”

Well, it doesn’t rhyme, but it’s a start!

So whatever you are doing today, however you are celebrating, or not, I wish you the very best!

Inktober Tangles 2022, Days 26 and 27 – Feliz and Narfello(ish)

Click on this link to view today’s drawing tutorial (for the bottom design) on YouTube.

Oh, I got my right royal knickers into a twist today over Narfello! I ended up doing two videos and still managed to muck up with Nafello.

The top design was my first attempt. There are lots of things I like about it. But after nearly an hour and a half video, I convinced myself I’d made a total mess of Narfello. So, I drew breath and started over and produced the design at the bottom, but without the colour; I added the colour while the video was uploading and processing.

Even with the second attempt, I still managed to not get Narfello ‘right’. But I think it’s probably close enough for today.

I’m so glad I did a second version, as I like my Feliz (to the left). I like the way the variations gradually change from left to right (or right to left!). It feels more coherent than the first version of Feliz, where I went to town exploring ways to fill the pattern!

I also like how the Narfello-ish appears from under the Feliz in the second version. I can see that I need to add some quite intense shade to the right of the Feliz to enhance this illusion. However, I’ve just about run out of energy for today, so that is a job for another time.

One thing that I am enjoying is the contrast between the geometrical Feliz and the organic, flowy Narfello.

I’m also pleased with how much volume I’ve created using monochrome Arteza Everblend markers, particularly on the bottom design.

Both of these designs will end up in my sketchbook. There are some variations in the upper one I’d like to try. The lower one is a reminder to look at how I can slowly change the filler patterns, if that’s the right term, to change the pattern subtly.

I really have enjoyed working with this pair of patterns. I hope you take a look at the accompanying drawing tutorial on Youtube and have a go at drawing your own version!