I spent some lovely, peaceful time today recording a video showing how I work to create variations on a theme.This theme is motifs based around circles and how I go from simple to more complex, possibly over complex.
This design was inspired by a Zentangle Tile I did in the Tea and Tangle session organised and run by Tracy Hough CZT.
I wanted to do a design that was simple (ish?) and didn’t use too many patterns. This will form a page in my accordion journal.
The paper is Clay toned paper from Fabriano. The pens I use are an 0.3 Unipin fine liner and a Tombow Fudenosuke. To add colour, I used some Derwent Drawing Pencils in Chinese White, Pale Cedar and Olive Earth. White dots were added with a white Sakura Gelly Roll pen. Gold details added using a gold glitter Unball Signo gel pen.
I love curvy, flowy, abstract patterns and the illusion of depth, volume, twisting, and bending space. And seed pods. And seeds. So lots of my favourite things in this design. I even snuck in a few spirals!
To add shade, I used three cool grey Faber-Castell Pitt Artist Pens. Though they haven’t blended smoothly, I’m quite happy with that. The design looks almost metallic as a result. In fact, I am happy with this design in its entirety. I could increase the contrast a bit more between the darkest shadowed areas and the white highlights. But I can always revisit that in my own time.
I’m really enjoying adding panels to this infinity card. Each panel is a quick project, with no pressure to be perfect or polished. I’m finding them a fun way to explore patterns that develop from one into another, that share common features in some way, or that spark off an idea for another. It’s always a bit of a mystery trip, never knowing what the destination is, only where the journey began.
Today’s journey started in the bottom right with the Zentangle pattern “TagH”. The plumptious, rounded shapes of each part of Tagh, led me to think of circles with flowers inside, like blooming discs or spheres. That led me to Moonberry by Debbie New CZT at the top right. I used some of my favourite leaves and more TagH to fill in the remaining space.
To add volume, I used some red-grey Ohuhu brush markers. Oh, and to draw the design, I used a black Uni Emott everfine pen.
Oh, you may have noticed the notch at the top left. That shows this is also a pocket!
I have no idea why, but tall, thin drawings (bookmarks) just appeal to me. Indeed, they always have.
I enjoyed drawing this one, and I’m fairly pleased with the chosen colours. There’s a soft, muted, vintage palette along with the flowers, seed pods, berries and leaves mainly inspired by Medieval Illuminated Manuscripts and the work of the Arts and Crafts Movement artists.
Although not all the ‘hats’ worked out well, they were still fun to explore as possibilities. As this is a sketchbook page, the permission to experiment, explore, and try things out is implicit. A sketchbook is a place to do all these things and more. You can finish a piece of art or not. You can show people or not.
A safe place to be artful, that’s how I think of my sketchbooks more and more. I put too much pressure on myself to always finish a drawing, to have it polished and “imperfectly perfect”. If I don’t finish something, I can beat myself up. But I’m learning that in a sketchbook, I can do all I need to learn, grow, and develop. And sometimes that includes knowing when enough has been done!
It may take me a long while to be able to set aside my perfectionism to fully embrace this, but like everything in life, it is a work in progress!
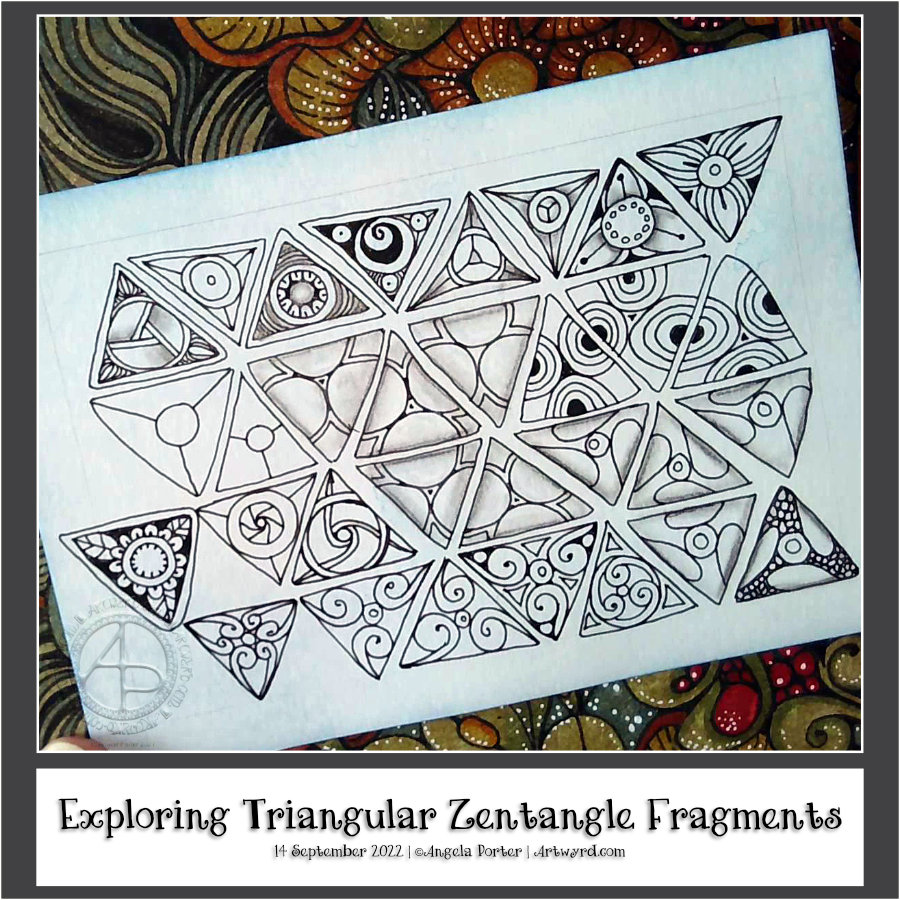
This morning I just wanted to mess around with some fragments, and triangular ones seemed the way to go! ‘Fragments’ is the Zentangle term for the cells that make up a repeating pattern.
I started with a simple fragment of a circle (orb in Zentangle-speak) inside a triangle. All of these fragments have orbs as part of them, and I’m not sure if I’ve done many of them before.
I’ve written it before, and no doubt will again, that exploring both fragments and tangle patterns is an absorbing activity. No matter how often I look at one particular fragment, there are endless variations that can result. Some may be of use in a ‘reticulum’ (Zentangle-ese for the grid upon which a pattern is formed), others may just be for the experience of being curious and seeing what happens if I do x, y or z…
This is also a great warm-up activity. It gets my hand-eye coordination and fine motor control working well. My creative brain gets flexed and exercised too. It is also an opportunity to try out new drawing tools and media.
Another big benefit of this practice is that there is no pressure to complete a finished artwork. There’s the implied permission to make mistakes, for things to not work out. Indeed, I learn more from those that don’t work out or where a mistake is made than anything that works out well.
I’m always amazed by how many fragments can be made from a simple start. In this case a circle within a triangle.
This was a nice way to start my day! Exploring fragments and creating fragments is always a fascinating process. I never quite know what will come from my mind onto the paper. Some fragments work out, others don’t. Either way, it is still of value, even if just exercising hand-eye coordination, fine motor skills and the creativity ‘muscle’!
I can see some of these fragments working best as individual motifs. Others would work well in a reticulum – the zentangle name for a grid.
I still have quite a few rectangles to fill, so I will post them as a resource when that’s done.
Talking of resources… I now have quite a few sketchbooks and loose pages filled with explorations of fragments. I need to start organising them all so I can refer to them for inspiration. Or do I? I mean, it’s not a huge issue to just sit and do some of these fragments until I find one I’d like to use in a drawing. I worry about forgetting things, not using them or referring to them. Perhaps the value in all of this is to get a memory hoard of shapes and ways of putting patterns together, which can be drawn upon when needed.
Yes, a memory hoard, whether conscious or stored in the subconscious, is so important and trusting that all these things will be there, somewhere, ready to be used in different, unusual and even unique ways.
Today, I experimented with various things during this video. The first was putting a coloured background behind the drawing on vellum paper/parchment paper. Then, I coloured the back of a drawing with alcohol markers to show the difference. Alcohol markers work fine and well, but brush markers like Tombows, with water-based colours, work better. Coloured pencils will also work, as will most mediums.
The next experiment involved drawing on some vellum with a metallic gel pen and then a black fineliner and embossing from the back. These work really well. You could draw with any kind of gel pen, fineliner or just a pencil, graphite or white or another colour.
I also showed how you can add highlights to the drawing even when the colour has been added to the reverse. The embossed vellum will always look white on the front if you emboss it on the rear.
The final thing I did was to complete the drawing of scena variations, which you can see above. This will need a good while to flatten out under some heavy items before I can finish adding filler patterns and either colour or coloured background.
I have thoroughly enjoyed exploring vellum/parchment to create Zentangle-inspired art using not pens but ball styluses. It’s the same yet different to drawing on paper with a pen. But, I think it is worth continuing to explore and use from time to time.
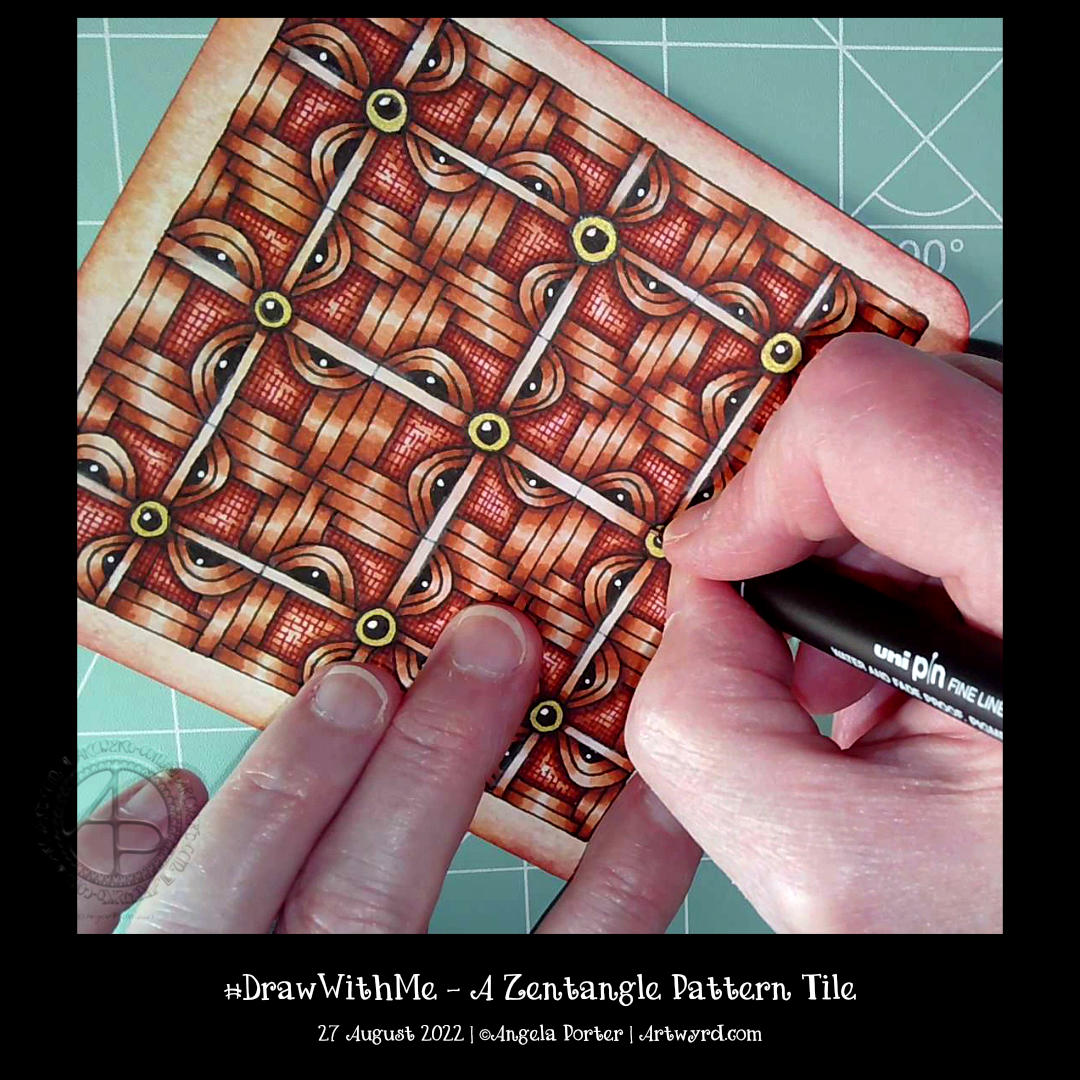
Today, I spent more than two hours creating this tile. I like how it’s turned out, particularly the volume and dimension achieved by shadow and highlight.
I started with a 4½” (11.5 cm) square of Artway’s Flat White Enviro mixed media paper, which is sturdy and works well with alcohol markers. My first step was to colour the paper with some Distress inks – I used Dried Marigold, Spiced Marmalade, Saltwater Taffy, Seedless Preserves and a hint of Aged Mahogany around the edge.
In true Zentangle fashion, no pencil was used to set the grid. And I chose to use a square fragment from my explorations yesterday. Of course, the fragment had a bit of a twist, with some weaving done in the style of the Zentangle pattern ‘Hurry’. Oh, and I used an 0.3 Unipin fineliner pen to do all the line drawing. Apart from the tattered burlap pattern, which I used a rusty red Staedtler Triplus fineliner for
The next step was to start to add shadow and highlight to warp space. Not really, but the illusion of dimension! I chose to use a trio of red-brown Ohuhu Art Markers. They don’t blend as well on this paper as they would on marker paper, but I like the texture that results in this case.
The final steps included: adding some shadow to the overlying grid with alcohol markers, highlights with a white charcoal pencil and a white 08 Gelly roll pen, and finally, the gold outer of the ‘buttons’ or ‘beads’ that hold the grid together.
I wanted to complete a piece of art for today’s video to mark a YouTube achievement of getting 1000+ subscribers. If you are one of those subscribers, I thank you from the bottom of my heart!